• Amazon.com
  • Amazon.in
  • home
    • baby guide
    • HowzBuy.com

Windows Screenshots or Screen Recording using PowerPoint [PC or Laptop]

Most of you will need screen recording on your laptop or desktop PC for some or the other reasons. In fact I need it for company presentations many times. So today I found a super easy method to do screen recording using the PowerPoint software which comes with the MS office suite. Anyway PowerPoint is installed on most of the laptops or PC’s so thought to share this quick method with all of you.
Take screenshots or record videos
The method descried in below post can be used to record any movie scenes from media player or Instagram stories displayed inside your web browser or Facebook videos, in face every movie file played on your laptop or every picture file open on your screen can be captured using this simple & quick method.
Not only this now I am able to record all that I am doing like working on my CAD software and need to share some steps with my colleague, or made an animation or rotating a CAD model on screen, all things what I do on my desktop or laptop screen can be simply recorded using this simple technique.
Video capture full screen or partial screen
Also another beauty of using PowerPoint to record the screen is that it allows Full screen capture as well as draw a rectangle to capture partial screen only.
Which means if you wish to capture particular part of video being played on screen it is possible without doing complex operations.
Compress the videos too
Another thing I will describe in this post is how you can also compress the prepared video using built-in compression facility, so you don’t need any external software for movie compression, I think that is a bonus of this method.
Why I missed it for so many years ?
In fact I am using PowerPoint since years! but found this today itself! and so much surprised how I missed this, may be the reason is that you need to have updated PowerPoint 2013 or PowerPoint 2016 software to have these buttons of screenshot and screen recording inside PowerPoint.
Third party App versus Microsoft Windows own software ?
Today if you want to do screen recording of your laptop or PC, there is no built-in software or App, but all you have to do is look for third-party apps or software’s online.
However today due to security reasons most of the schools and corporate companies do not allow you installation of any third party software’s or apps on your laptop or PC!
So this super screen recording method using built-in Microsoft owned PowerPoint will be highly useful to you in school and office.
Yes, you read it correctly.
Microsoft PowerPoint is not only software to prepare text and picture presentations, but also useful for taking screenshots as well as screen recording too 🙂 You can do it for much more than mere presentations. Learn here how?

Super Easy Screen Recording in Windows PC or Laptop using PowerPoint

Capturing a screen recording using PowerPoint Step-by-Step guide —
1) Open any existing or blank PowerPoint presentation
2) Click on the Insert tab which is just near to the Home tab
3) Look for the Screen Recording button located at the end of complete sub-menu ribbon of Insert menu (see image below)
4) Press the Screen recording button and you will get a pop-out window as shown in the image below.
Screen Recording in Windows PC or Laptop using PowerPoint
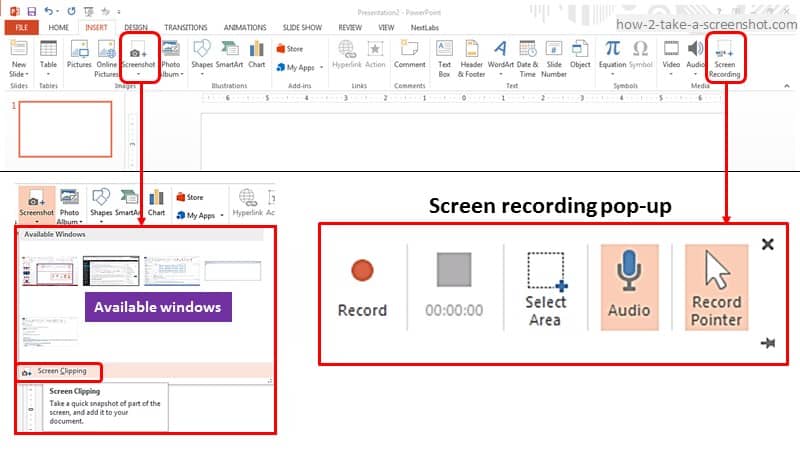
5) You can select area of screen you wish to record using Windows key + Shift + A (Full screen) or tap on Select Area in the dock that pops up. (see image above)
5.1) If you have opted for select area option, then simply click and drag the cross-hairs tool and select the intended area in rectangular shape.
Note : You can click buttons Audio and Record Pointer, which is toggle for recording the mouse pointer and audio (record or no-record)
6) Now you are ready to record, Press the Record button (Red dot) or use shortcut Windows key  ⊞ + Shift + R to start the recording. Now the recording will continue to capture all actions or movie or whatever you do even if  you switch over to a different program or window.
Note 1 : The same shortcut can be used to pause and resume the recording.
Note 2 : If you want to PIN the recorder dock on top or particular place, do it using the PIN icon at the bottom right corner (see image above), if you don’t pin it, the dock will simply disappear once the recording starts and then to stop or resume you need to use Windows shortcuts only.
7) Once done, you can stop recording using the STOP button on the recording dock or using the keyboard shortcut: Windows key ⊞ + Shift + Q (Remember if the dock is floating then you can only use given shortcut to stop recording)
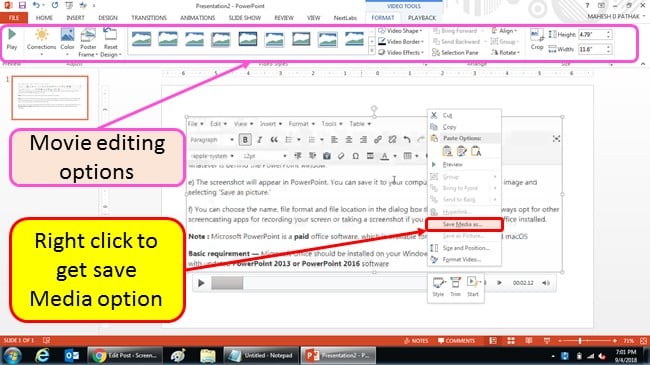
8) Now you will get the video on PowerPoint presentation slide, you can use many editing options available at the screen top and once done, simply Right-click the video and select ‘Save Media As’ to save a recording of the video on your computer drive. (see image below)
Note : In the Save Media As dialogue box, you need to select location to save and provide filename. The format which PowerPoint allows is MP4 by default.
editing movie using powerpoint mp4 format

How to take a screenshot in Windows PC or Laptop using PowerPoint?

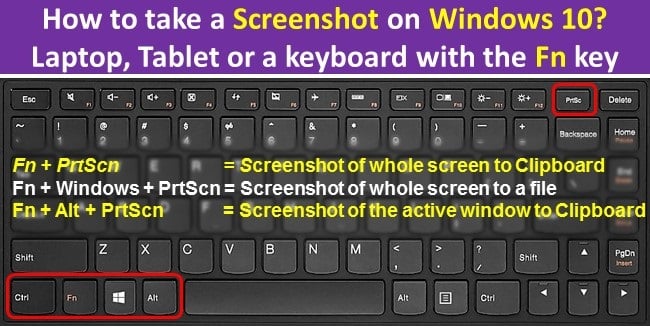
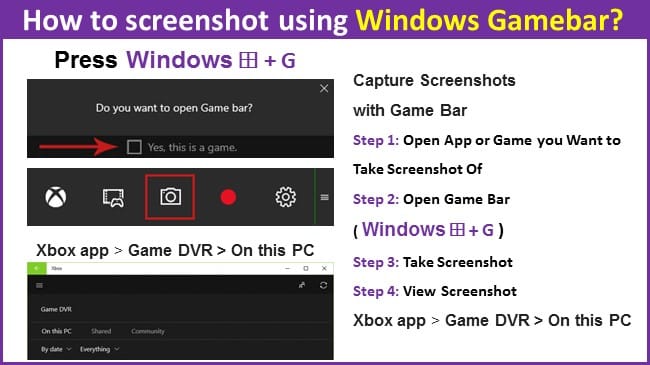
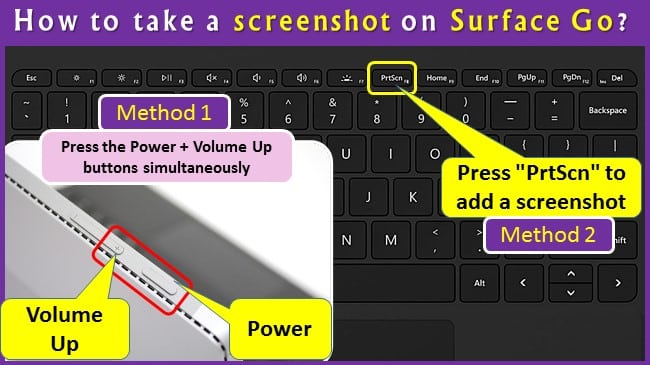
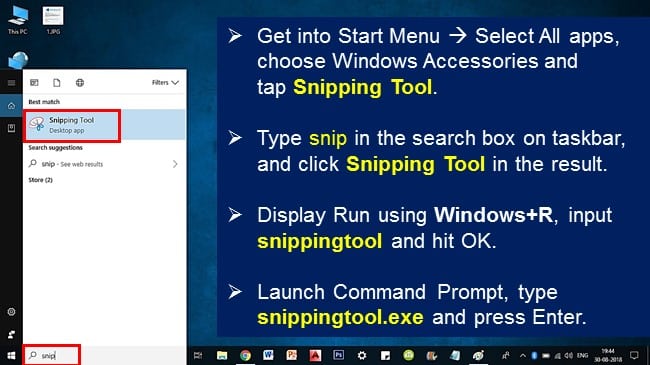
I have already explained different ways to take a screenshot in Windows 10 or below versions, Read the post here
Further to it, if you are already making a PowerPoint presentation and want to insert screenshot from any of the active window without switching over to it, there is simple method as given below –
Also another interesting thing is that the screenshot will precisely fit to the active power point slide size.
Step-by-Step guide to take a screenshot of any active window —
1) Open any existing or blank PowerPoint presentation
2) Click on the Insert tab which is just near to the Home tab
3) Look for the Screenshot button located in the sub-menu ribbon of Insert menu (see image above)
4) You will see drop-down window showing a grid of all the active windows on your computer (except the minimized windows)
5) Simply click on any desired window from grid and the screenshot will be inserted into your active presentation slide.
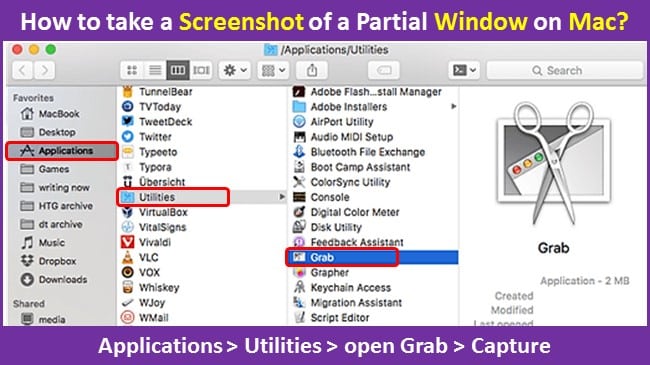
Note : Instead of full window screen-capture, if you want partial window capture, select Screen Clipping at the bottom of Grid (see image above), this will minimize active PPT window and allow you to click and drag window to take partial screenshot.
6) You can save the screenshot on active slide by right-clicking the image and selecting ‘Save as picture.’
7) You get save-as dialogue box, where you can provide picture file name, location, image format and save it to local drive.
Note : Various Image saving formats available through PowerPoint are GIF, JPG, PNG, TIF, BMP, WMF, EMF
 
Basic requirement if you wish to use above method of screen recording or screen capture —
Microsoft Office should be installed on your Windows PC or Laptop with updated PowerPoint 2013 or PowerPoint 2016 software
Note : Microsoft PowerPoint is a paid office software, which is available for Android, Windows, and macOS

Bottomline:

I have explained here a simple and quick method of screen recording using PowerPoint which is Microsoft own office suite software, mostly this is super useful if you are in school or office where most of the time installation of external software is not allowed. However if there is no such restriction you may like to use third-party screencasting apps for recording your screen or taking a screenshot.
Choice is yours!
If you find this post useful please let me know by putting comments below, so that I can write more such simple methods which will be useful to you in day to day operations.
Cheers !!

8 EASY Ways to Screenshot on Samsung Galaxy S9 & S9 Plus

Samsung means innovation, with its latest 2018 flagship smartphones, it has proven again and again their R&D capabilities to get the best at reasonable prices. The latest introduction of S9 series also gets into innovative ways in some fundamental features like taking a screenshot. So in this post I will explain you How to Take Screenshot on Samsung Galaxy S9 & S9 Plus.
As said although capturing a screenshot is basic feature of any Android smartphone, but Samsung surpasses all the expectations, getting powerful at each level of operations, including the screenshots (printscreen).
The Samsung S9 & S9 Plus provides you multiple alternate ways of capturing a screen, and editing them too.
The most special thing  I would like to mention is that S9 / S9 Plus printscreen allows you to take longer screengrabs that capture length of information like ever before. So you will be able to document, long length articles from web in a single grab screen captures. I will get into the details as you proceed reading this post.

How to Take Screenshot on Samsung Galaxy S9 & S9 Plus?

To take a screenshot on your Galaxy S9 phone, Press and hold the Power and Volume Down keys simultaneously until the screen flashes indicating screenshot captured. (for approximately 2 seconds).
And the captured screenshot is saved automatically to Gallery > Screenshots
Here are all the different ways you can capture, edit and share screenshots on the Galaxy S9 & S9 Plus.

INDEX

1 Hold the buttons to screenshot – Traditional Method Samsung Galaxy S8, Galaxy S8 Plus and Galaxy Note 8, S9, S9 Plus Jump to Topic
2 Palm swipe screenshot Jump to Topic
3 Scroll capture Jump to Topic
4 Bixby Voice Jump to Topic
5 Google Assistant Jump to Topic
 6 How to take partial screenshot?
Use Smart Select
S9, S9 Plus Jump to Topic
7 How to edit image using Samsung Galaxy View? Samsung Galaxy S8, Galaxy S8 Plus and Galaxy Note 8, S9, S9 Plus Jump to Topic
8 FAQ – Can’t take screenshot due to security policy? Jump to Topic

smasung s9 plus - screenshot using volume and power buttons

1) Hold the buttons to screenshot [Traditional Android Method]

Honestly this is the most simple way to get a screenshot on any android phone on this earth! and 90% of the time I use this method.
However this method has only one disadvantage, while I take a screenshot of a video, it becomes difficult to take precise moment shot, since whatever I do and press both buttons simultaneously, the time delay causes capturing wrong moment of video, whatever you do! And this is where I suggest you to read this guide to know and try other methods too.
Step-by-Step guide – using traditional android method
1) Open the content on the screen you want to capture like a photo, video, website, social share app.
2) Press and hold the volume down button and power buttons simultaneously for about 2 seconds.
3) You will hear a camera shutter sound and flashing animation showing the screen shrink-in, and editing options will appear briefly on the screen.
4) Edit-on-the-fly: Tap the options appeared on the bottom of the screen, if you want to edit the screenshot immediately after it’s captured, you get options to draw, crop or share it too.
5) Notification shade: The options at the screen bottom will disappear after a while, and the screenshot will be automatically saved in the notification shade, if you wish, you can expand and tap the options to edit, share or delete it.
6) Edit-or-Share-later: If you want to share or edit the snap later, simply dismiss the notifications, and the screenshot will be saved to the Gallery > Screenshots. Later you can go there and use any other app to edit and share the photos, as an example – Google Photos.
Samsung S9 Plus Palm Swipe Feature to take a screenshot

2) Palm swipe screenshot

If you have a question on How to screenshot without power button on Samsung S9 phones? then here is the answer.
Samsung has introduced this innovative method to capture a screenshot!
Which uses a hand swipe across the screen, in my opinion its good as a innovation, but practically doing this to get a printscreen is somewhat cumbersome and need a practice! At least I prefer using the traditional method of using buttons to take a screen snap 🙂
Anyway lets look at this NEW method step-by-step
1) Turn ON this feature : Settings > Advanced features > “Palm swipe to capture”.
On some older phones, it may be found in Settings > Motions and gestures (in the Motion category).

2) Open the content on the screen you want to capture like a photo, video, website, social share app.
3) Place the side of the palm of your hand on the edge of the screen, and in one motion swipe it across the whole display of the phone from left to right or vice versa.
Note : Make sure you maintain contact with the screen throughout the entire motion.
4) You will hear a camera shutter sound and flashing animation showing the screen shrink-in, and editing options will appear briefly on the screen, with the same editing and sharing options at the bottom of the screen.
Note : You can’t use this gesture while the on-screen keyboard is showing.
Samsung S9 Plus – Scroll Capture method to take screenshot

3) Scroll capture

Now if you have a question How to print screen on Samsung Galaxy s9 phone? there here is an answer –
Now this is something which I liked the most, many times I need to capture an article on web-page, which goes out of single screen and capturing it in a go is practically impossible on a mobile device. (although possible on desktop using some chrome extensions)
So this innovative “Screen capture” facility helps me getting a complete extra long screenshot of a scrollable content. Simply keep the Screen capture button pressed till you want or end of scrolling content (like a web-page) and the application automatically generates image file by stitching together several screenshots automatically, result is a super-tall screenshot in a go.
Okay, so lets see how to use this Screen-Capture Step-by-Step
1) Open the content on the screen you want to capture, in this case generally it will be a web-page which scrolls across the height of mobile screen and hence you are not able to see it in a go.
2) Please note that the screen you want to capture must be able to vertically scroll — as an example a web-page in browser.
Note : The scroll will only move in downward direction, hence make sure that you are on the top side of the content you want to capture.
3) Use the button combination (power+vol) or palm swipe method to initiate the screenshot.
4) You will see floating image edit menu at the bottom, locate and tap “scroll capture” option. (see image above)
5) Continuously press the “Scroll Capture” button to keep scrolling the screenshot down. A preview will keep showing the total size of the image. (see image above)
6) Tap the Preview to finish
7) This super extra-tall scrolling screenshot will be saved automatically to the gallery — you can edit, crop and share it as desired.
Samsung S9 Plus – Bixby Voice method to take a screenshot

4) Bixby Voice — Using digital voice assistant

I found that Bixby Voice digital assistant method to take a screenshot is extremely useful while your hands are busy in doing some work and you are unable to reach the phone to operate it using the button combination or swipe gesture.
1) During first use (only) you need to set up the Bixy feature by going to Bixby home > Settings > Voice wake-up. (one time setting)
2) Open the content on the screen you want to capture like a photo, video, website, social share app.
3) Press and hold the Bixby Button, or if you’ve configured it as shown in step-1, just say “Hey Bixby”.
4) With the digital assistant interface activated, just say “take a screenshot” or alternatively you can give elaborate instruction like  “take a screenshot and share it to Twitter” or “capture this screen and text it to Jane”
5) The screenshot will be automatically saved to the Gallery, you can view, edit or share it.
Note:  Only hitch is that when you take screenshot using the Bixby digital assistant, you don’t get the instant edit option, like the other methods. However I am sure this method will be used only when you don’t have an access to the physical buttons, so naturally editing is not an option needed.
Samsung S9 Plus – Google Assistant to take a screenshot

5) Google Assistant — Using digital voice assistant

Similar to the Bixby voice assistant on the Galaxy S9, you can also use the standard Google Assistant too.
Follow the similar process already explained in this article on using Bixby assistant.
All you have to do is press and hold the home button or say, “OK Google” to bring up Assistant. Then just say, “Take a screenshot” or type in the command with the keyboard.
Here is the Step-by-step guide:
1) Open the content on the screen you want to capture like a photo, video, website, social share app.
2) Press and hold the home button or say, “OK Google”.
3) Say, “Take a screenshot”, or type in the command with the keyboard.
4) Rest of the process remains same to save the snap to Gallery and editing it further.
Samsung S9 Plus – Smart Select to take a screenshot

6) How to take Partial screenshot on Samsung S9 / S9 Plus?

USE Smart select

I have already jotted down many methods above to take full screenshot as well as scrolling screenshot, however many situations you need only a partial screenshot only.
So either you can take full screen snap and edit it later or capture partial part of screen using Smart Select feature provided by Samsung on the Galaxy S9 and S9 Plus.
Further the Smart select allows you to select using two different shapes (square or oval) and even create a GIF image file.
Here is the Step-by-step guide for you –
1) During first use (only) you need to set up the Smart select feature by going to Settings > Display > Edge screen > Edge panels. (one time setting)
2) Open the content on the screen you want to capture like a photo, video, website, social share app.
3) Open the Edge panel from the side, find and tap the “Smart select” option. ( you may need to keep swiping from side to side until you’ve revealed the Smart Select page.)
4) Select the shape you want to use for the screenshot. (square or oval)
5) A gridded box will appear on the screen. You can use your finger to resize it.
Note : If you’re trying to capture a small video clip or animation, use the GIF option.
6) Select the area you want to capture and tap “Done.” and then Save.
7) Your screenshot will be saved to the Gallery > Screenshots folder.


Now that you have learnt the different ways to take a screenshot using your Galaxy S9 or S9+ phone, its time to post process the generated screen snap in image format.

7) After the screenshot — How to edit image using Samsung Galaxy View?

Using all above methods the captured screenshot is saved automatically to Gallery > Screenshots
Or you get auto-edit bar at the bottom of the screen, which you can use for instant editing, saving and sharing across social network like Snapchat, Facebook, Twitter, Instgram etc.
So once you get the screen capture in the gallery, you can use Samsung Galaxy View to edit it further.
Here is the Step-by-Step guide on how to do it –
1) From the Home screen, swipe left, Touch Apps > Gallery.
2) Touch a photo to edit.
3) You will get different editing options –

  • Rotate: Rotate the photo.
  • Crop: Select parts of the photo to trim.
  • Photo Editor: More photo editing options.
  • Adjustment: Crop, rotate, flip, angle the photo.
  • Tone: Add color enhancements to the photo.
  • Effect: Add various stylize effects to the photo.
  • Drawing: Draw on the photo using a wide range of pen settings.
  • Collage: Create a collage.

4) Edit the image as needed and press SAVE at the top of the screen to save your changes.
5) Galaxy view app will create and save a new image file (The original file will be left untouched.)
6) Now you can mail it, share it across social network or do whatever you need.


7) FAQ — Can’t take screenshot due to security policy?

Although I have not faced this issue till now on S9 or any other Android phone used so far, since I was writing a comprehensive guide, thought of researching on issues and writing a consolidated trial guide –
Trial 1: Change the display settings. ( S9 & S9+ )
— Goto Settings>>Display>>Screen Resolution
— Change it to FHD(1920×1080) from WQHD(2560×1440).
Reference — https://forum.xda-developers.com/tmobile-galaxy-note5/help/screenshot-issues-t3208747/page2
Trial 2: Check the Policy set on Phone (Applicable to All Android phones)
Many cases a school or company, have enforced policies that prevent screenshots. Such security policies can also be enforced if you have added a company account to your phone. In such case only System Admin can help you out. (Mostly this happens on Company owned or School owned/provided Android phones)
Trial 3: Needs root (Applicable to All Android phones)
First you need to install terminal emulator from from Playstore.
Open terminal and write the following commands:
su
wm size reset
wm dpi reset
Now you can make a screenshot
Reference — https://forum.xda-developers.com/galaxy-note-3/help/screenshot-blocked-security-policies-t3580385
Trial 4: “FaceProvider” settings ( S9 & S9+ )
— Goto settings>applications>all
— Find the faceprovidor app
—  Now delete faceprovidor’s data and cache and reboot the phone.
— Try screenshots again.
Reference — https://forum.xda-developers.com/tmobile-galaxy-note5/help/screenshot-issues-t3208747/page3
Info 1: Chrome Incognito Mode (Applicable to All Android phones with latest OS update)
The Android updated OS prevents screenshots in the Chrome browser while in Incognito Mode browsing.
As on date, this feature can’t be disabled by any means.
Workaround is to install Firefox and take a screenshot in Incognito mode there.


References for writing this post are taken from —

  • Samsung official guide on image editing ( Source )
  • Samsung official guide on Smart select ( Source )
  • Samsung official guide on Swipe palm ( Source )
  • Understanding what is Bixby ( Source )
  • Setting up Google Assistant on Samsung device ( Source )

How to screenshot iPad / iPad Pro / iPhone / iPad mini?

Once you are Apple fan you ought to get all the gadgets from Apple including the Mac, iPhone, iPod and iPad too! While I talk about the iPad Pro, iPad, and iPad mini, the screens are so big, that there’s a lot you can view and share across the social network. So here in this post you will learn on How to take a screenshot on iPhone, iPad, iPod touch for Any Generation device.

How to take a screenshot of your iPad or iPad Pro or iPhone or iPad mini or iPad 2?

Press the Home button and Sleep/Wake button simultaneously to get screenshot on iPad or iPad Pro or iPhone or iPad mini.

INDEX

1 How to take a screenshot of your iPad or iPad Pro or iPhone or iPad mini or iPad 2 or ipad air 2? Jump to Topic
2 How to take a partial screenshot on iPhone or iPad or iPad Pro or iPad mini or iPad 2 or ipad air 2? Jump to Topic
3 How to edit your screenshots with Instant Markup? iOS 11 or later. Jump to Topic
4 Where to find your screenshots on your iPad or iPad Pro? Jump to Topic
5 Troubleshooting : Screenshot not working Jump to Topic

How to take Screenshot on iPad or iPad Pro
Applicability : below method is applicable to iPad or iPad Pro or iPhone or iPad mini or iPad 2  or ipad air 2, iPhone 5s
1) Open the App or video or game console or Social network window (chat) you want to capture. You can use split view/picture-in-picture as desired.
2) Set up everything on the screen exactly the way you want it for the screenshot.
3) Press and hold the Sleep/Wake (on/off – POWER) button and Home button at the bottom of the iPad screen simultaneously, then release them quickly.
4) The screen will flash white and you will get confirmation of camera shutter sound (if your sound is enabled).
5) The screenshot thumbnail will appear at the bottom left corner of your screen.
6) If you wish to edit the image snap, simply Tap on the image. You can choose whether to save the screenshot to your Camera Roll or delete it.
6.1) Or simply swipe it to the left and it will disappear from the display.
6.2) If you don’t dismiss the screenshot by swiping to the left, it will disappear automatically after a few seconds and save to your camera roll.
To find the screenshots stored to your phone memory, go to Photos > Albums and tap Screenshots.
Tip :
I am sure you will master to hit both buttons at the same time, my suggestion is to hold the Sleep/Wake (on/off) button first and then click the Home button, this will surely minimize the chances of accidentally activating Siri or, if you’re trying to screenshot the lock screen, blowing through it with Touch ID.
Also if you are not so quick about it, then surely you will pull up the power-off screen!
How to take Screenshot on iPhone

2) How to take a partial screenshot on iPhone or iPad or iPad Pro?

Applicability : below method is applicable to iPad or iPad Pro or iPhone or iPad mini or iPad 2  or ipad air 2, iPhone 5s
Unlike Windows or Mac, you don’t get Snipping Tool on your iOS device!
So you don’t have any direct option to take partial screenshot of selected area.

Workaround 1:

After capturing the screen as a whole image, go to the Camera Roll and crop out the area that you wish not to be included. But this is time consuming, but possible option using built-in markup tool.

Workaround 2: Only for jailbroken users

Use a Snapper 2 tool to enhance the screenshot-taking ability on iOS device.
[ Similar tool named CroppingScreen is also available with jailbreak tweak ]
So instead of post processing the screenshots for cropping, Snapper 2 lets your crop them on the fly as you take them.
Further you can pin the cropped screenshots on top of the screen, for quick reference.
You can use Snapper 2 to cut out a photo, paste it inside the Notes app using Snapper 2, it avoids  jumping back and forth between the Photos app and the Notes app.
Good thing is that  you can activate the Snapper 2, via the same Home + Sleep button combination, now use your finger to crop a screenshot to a specific area of the screen.
Once you crop the screenshot, double tap it to confirm the shot, or a tap and hold to cancel.
After confirmation, the Cropped image as called as snaps, will get pinned to the screen until you dismiss them. You can drag the snaps anywhere around the screen, or use the contents of the screenshot for a reference while doing other tasks, like comparison of two posts.
And if you feel that the snaps are getting mingled into the screen making it difficult to identify, then simply enable the shadow feature to help you differentiate.
Snapper 2 is compatible with iPhones on iOS 7, 8, 9, 10 and 11. And iPhone X. iPads are tested on iOS 8.4 and 9.3.3.
Snapper 2 features :

  • You can get control over the area to crop before snapping!
  • Facebook-heads-like interface to close snaps
  • Snaps organised by application.
  • Multiple snaps on the screen at the same time possible.
  • Built-in sharing options
  • You can use it with or without Activator!
  • You get history panel accessible via Activator OR the Settings app.

Workaround 3: Works on iPad Pro with keyboard

If you have the iPad Pro, using add on keyboard, you can use the Cmd + Shift + 4 button to get an  image editor with the full screen contents surrounded with crop corners.
When ready, you can save the cropped (and possibly edited) image to Photos folder.


3) How to edit your screenshots with Instant Markup? iOS 11 or later.

You can add text, shapes, drawings, and much more using Instant Markup tool.
You have already learnt that, as soon as you take a screenshot, a thumbnail of it appears at the bottom left corner of screen, now if you tap the thumbnail, it will automatically take you to Instant Markup mode.
This is extremely useful feature, since most of the time you need to do some markup to add value to the screenshot before sending or sharing it on social networks.
So this utility tool, helps you to mark, highlight and annotate your screenshots.
Use pencil, eraser. highlighter or  Magic Rope during editing to add value to the markup.
Instant Markup also allows you crop your screenshots. Simply touch and hold one of the edges or corners and drag it to the new crop.
How to edit your screenshots with Instant Markup
There are four additional tools you can add to a screenshot in Instant Markup by tapping the More button in the bottom right corner of the screen (it looks like a plus symbol), which are:
Add a text field —
Text lets you add a layer of text & type words on your screenshot. Tap the newly added text field to call up the keyboard so you can write something. Tap the circle to choose a different text color (white, black, blue, green, yellow, and red), and tap AA to adjust the text’s font, size, and alignment.
Signature —
If you do editing frequently to add your name or brand logo etc. then signature is tool for you.
Create and store a signature, and add it to your screenshot during editing at a click.
Magnifier —
You can use this feature to zoom in image areas and work around details.
As needed you will be able to resize and reshape the Magnifier border, and increase or decrease the amount of zoom. Simply drag the loop around and resize it using a blue dot or adjust the shape.
Shapes — Rectangle, Circle, Speech bubble, or Arrow
Absolutely essential feature to add value to the screenshot, add solid or outlined callout of any size and shape simply by dragging the edges. (again use the blue dots to resize, and the green dots to adjust the arrow’s curve and the speech bubble’s appearance.)
And similar to other image editing tools, markup also gives you an opportunity to undo or redo your editing steps.
Sharing or Saving — iOS 7 or later
Finally once you are done with editing and ready to go, simply share the edited image, right from the Instant Markup interface.
All you have to do is to tap the Share button and choose to share via social media, AirDrop, or email.
You can share the photo directly to Facebook, Twitter, Flickr, etc. or via the corresponding AirDrop or email icons at the bottom. Only make sure that both Wi-Fi and Bluetooth needs to be active on your device.
[ Note : share icon is located in the lower-left corner after you open the photo ]
OR tap Done. and choose Save to Photos or Delete the Screenshot.


4) Where to find your screenshots on your iPad or iPad Pro?

If you use editing tool, at final step you get an option to save the photo.
And if you skip Instant Markup, then the screenshot will be automatically saved to the device, which can be accessed and edited at later point of time using the same editing tool.
1) Launch the Photos app from your Home screen.
2) Goto Photos > Albums and tap Screenshots.
3) Alternatively you can locate the screenshots in the main Photos and Camera albums by scrolling through all photo library.


5) Troubleshooting : Screenshot not working

Many times this problem can occur after you update the iOS, in that case you can try the following —
Fix 1: Add a time delay in button pressing sequence
Press the Power and Home button simultaneously as usual, but press the Home button after one second you press the Power button.
Fix 2: Force restart the iOS device
Restart iPad: Press and hold the iPhone or iPad’s home and the power button, until the “slide to power off” occur. Slide to power off, after about 30 seconds, turn the iPad again..
Force Restart iPad: Press and hold the iPhone or iPad’s home and the power button for minimum 10 seconds till you can see the Apple logo on the screen. Device will force restart.
Recheck taking the screenshot using standard methods described above in this post.
Fix 3: Use AssistiveTouch
Take screenshots using AssistiveTouch (Method already described in this post)
Fix 4: Check the iPad Home button is working
Simply check if the Home button on iPad is working for other operations, if not, head down to the local Apple store to repair it!
Fix 5: Try iPhone System Repair Software to Fix any iOS System Related Issues or update the iOS to latest software version.
Fix 6: Wait for the Next iOS Update!
If you try everything hard, and still screenshot not working, then best way is to wait and watch for Apple to release a new iOS update to patch things up.

All above methods are equally applicable for iPad or iPad Pro or iPhone or iPad mini all versions.


Bottom line:

Taking a screenshot is as common as calling someone on mobile phone. Its inherent part of social media for sharing.
Maybe its taking picture of your social feed of facebook, or chat on Snapchat, or navigation map callouts, your gaming highest score or a shot from favorite movie, there can be numerous reasons.
Sometimes the Screenshots can be extremely useful as an Evidence, recording useful information while browsing, creating wish-lists, or getting a troubleshooting advice.
And that is the reason I wrote my learning’s on how to capture the screen on your iOS device, and adding drawings or text using Markup tool.

References for this post:

  • Apple official website ( Source post )

How to take a screenshot on iPhone X, XS, XS Max and XR Buttons or AssistiveTouch?

I was pretty familiar with using my iPhone, and when I wanted to take a screenshot, simple known way was to press the power and home buttons simultaneously. But with my New iPhone X with edge-to-edge display that stretched across the face of the iPhone X did not have any Home button at all? So I had to learn new way of capturing the screen for sharing moments from my videos, game scores & chats from Twitter and FB. With introduction of latest iPhone XS, iPhone XS Max, and iPhone XR series it will be interesting to know, how exactly do you capture the screen now?
Simply all the latest XS series also do not have home buttons, hence they will also follow the same new button combo to take screenshots.
Well I found that its pretty simple and intuitive operation and jotted down the step-by-step guide for you.
How to take Screenshot on iPhone X

How to take a screenshot on iPhone X,  iPhone XR, iPhone XS, or iPhone XS Max?

Press and hold the Side button on the right side and Volume Up button on left side of iPhone  simultaneously, then release them quickly to get a screenshot on iPhone X (iPhone 10), iPhone XS, or iPhone XS Max and iPhone XR.
Applicable to : iPhone X, iPhone XS, iPhone XS Max, and iPhone XR
1) Open the App or video or game console or Social network window (chat) you want to capture.
2) Set up everything on the screen exactly the way you want it for the screenshot.
3) Press and hold the Side button (previously known as Sleep/Wake button) on the right side and Volume Up button on left side of  iPhone X, iPhone XS, or iPhone XS Max simultaneously, then release them quickly.
Note : This is where it replaces the Home button step from previous iPhones.
4) The screen will flash white and you will get confirmation of camera shutter sound (if your sound is enabled).
5) The screenshot thumbnail will appear at the bottom left corner of your screen.
6) If you wish to edit the image snap, or share it to an iMessage conversation, WhatsApp, Slack or mail then simply Tap on the image. You can choose whether to save the screenshot to your Camera Roll or delete it.
6.1) Or simply swipe it to the left and it will disappear from the display.
6.2) If you don’t dismiss the screenshot by swiping to the left, it will disappear automatically after a few seconds and save to your camera roll.
iPhone X – Screenshot using Assistive touch 1

Taking screenshots with AssistiveTouch

Applicable to : iPhone X (iPhone 10), iPhone XS, iPhone XS Max, and iPhone XR
Using AssistiveTouch, you can take a one-handed screenshot anytime by tapping on the Assistive Touch button followed by the screenshot button, here is how to do it on your iPhone.
Step-by-Step Guide
1) Turn on AssistiveTouch — Settings > General > Accessibility and toggle AssistiveTouch
You can perform more complex touch-based actions, including pinching, activating 3D Touch, or multi-finger swiping using AssistiveTouch feature.
2) Select actions on the AssistiveTouch menu — tap Customize Top Level Menu
Here  you can tap an icon to change it or add an additional one by pressing the plus sign icon in the bottom right-hand corner.
A list of different choices will come up and you can scroll down to add Screenshot.
You can choose the menu to open up through single-tap, double-tap, long press, or 3D touch.
how to take a screenshot on iphone xs max, xr, xs?
 
3) Capture the screenshot — 
3.1 — If you have set Open Menu, then press the AssistiveTouch button to open the menu and tap the Screenshot option.
3.2 — If you have chosen only AssistiveTouch to perform screenshots, then you can tap on the button.
With either of above settings, your iPhone display will briefly flash white with camera shutter sound, to indicate screen capture worked successfully.
4) View, edit, and share the screenshots —
Now the things work perfectly as I have already described in the beginning.
AssistiveTouch, photos will be saved the same way as with screenshots taken using physical buttons.
By tapping on it, you can crop, magnify, or mark up the image, and then share it on social media or text messages.


How to record your iPhone X  (iPhone 10) or iPhone XS, XR screen?

Well now that you have learned to take a screenshot on your new iPhone XS then its easy task to further learn to record the screen too, I mean video recording of screen.
Step-by-Step approach explained
1) Settings >> Control Center >>Customize Controls >> Tap the plus sign next to Screen Recording.
2) You are ready to record phone screen now.
3) To start recording, simply open the Control center and tap the Round record button.
4) All your recordings will be saved in the Photos app on your iPhone.


Problems faced while taking a screenshot on iPhone X, XS, XR

When I got my hands on iPhone X the first time and learned to take screen snaps, I also learnt the fact that, the two buttons which generate a screenshot are placed almost in front of each other (on both sides), so ergonomically when I used to hold the phone for some other reasons it caused misfiring of screenshots without wanting!
Which means it was far too easy to accidentally get unintentional screenshots when getting the phone out of the pocket or bag or just picking it up off the table!
Or even I got nice screenshots of my alarm/clock app every morning I wake up! For every snooze, there’s a screenshot! 😛
Or while using the phone in landscape mode and trying to adjust volume, I got auto-screenshots, or turn the screen off, mostly during watching a video.
It was not really so much annoying and frustrating, but irritation for sure since I have to wait looking at the fading notification at bottom left corner or swipe it left to make it disappear faster!
And I was not shocked to see that there were many like me on this earth!
Just for info, see redditor mrqpa thread below –
iPhone X is my ultimate unwanted screenshot machine
So many days I was wondering on how to avoid accidental screenshots on iPhone X?
Unfortunately I could not find switch settings that can disable this feature or even could not locate any third-party solutions to remap the buttons or prevent the iPhone X from taking screenshots.
Luckily I came to know that with iOS 12 beta release ( source ), which is Apple’s latest operating system, they have released a fix to prevent accidental screenshots on the iPhone X 🙂


Update 19 Sept 2018: iOS 12 screenshot issue resolution

iOS 12 OS is available for download and Business Insider confirmed that issue of accidental screenshots has been addressed to a large extent with new iOS release. ( Source News ) what it means that accidental screenshot issue will also get addressed on all the latest 2018 iPhones, including the newly launched iPhone XS and XS Max, and the iPhone XR/
In latest beta update in iOS 12 the process of taking a screenshot remains the same, only refinement is done in the command registration process, hence if these two buttons gets pressed simultaneously and your device display is OFF or in sleep mode, then it won’t generate a screenshot. Well it will not completely eliminate the issue, which will still persist when I am using the phone for some other reasons and the screen is awake.
Specially remember that  iPhone X has the Raise to Wake feature!
Anyway, this update only disables the screenshot function for a second or two when your iPhone is locked and asleep. May help me at least reducing some unwanted clutter of multiple pictures of my Home screen !
However I will need to wait till the final version of iOS 12 gets releases since I am not that expert user to dare downloading the Beta version and trying it upfront 😛 or even I do not have any intention to joint their developer or public beta programme.
[ Note : If at all you are willing to test the Beta version of Apple OS, you may like to join their Public Beta program by registering with your Apple ID – Click Apple site Sign Up page here ]


My workaround till the arrival of New iOS update!

Since I was not aware of arrival of bug fix from Apple, till that time I had my own workaround!
The first thing I learnt was to immediately delete each accidental screenshot as & when it’s taken, by tapping on the preview of the screenshot in the bottom left and Delete screenshot. (But again its annoying and painful)
Second thin I did was buying a phone case with stiff buttons, this surely helped me by making it  harder to inadvertently active the screenshot feature, while it also gave nice protection for my iPhone X from any calamitous drops, which I inadvertently do!
But this is not an elegant solution, since it also spoils looks of my beautiful iPhone X and again if I want to take out my phone out of case, it generates a record, it takes a screenshot!
And the most stupid thing I tried is not holding the phone from top! Behavioral change !! Ouch .. it didn’t worked at all 😛 I can’t change myself at this age, may be apple has to change!


My suggestions to Apple to avoid accidental screenshot issue!

I know I am not an expert in this field, but I am a common man, I can really suggest what I feel appropriate.
Why not Apple provides an alternative method for taking a screenshot?

  1. Follow what many Android phones have since years! Simply stagger the power button and volume button, little study and expertise on User Experience (UE) is needed, that’s all? or using a common sense!
  2. Increase the delay time of holding the buttons simultaneously. (in line with Android)
  3. Why not using a three finger swipe down which is currently available on the Apple’s own iPad. What do you say?
  4. Another suggestion is simply add an on-screen confirmation of the screenshot, ask “Are you sure you want to take the picture?”
  5. Or even change it so that you need to hold down all three physical buttons on the phone to take a screenshot!
  6. When you drag left it saves the screenshot, extend the logic, just drag right to delete it (not a smart suggestion, but at least its a workaround!)

Bottom line

To me whoever says what! iPhone is the best!!
No matter once you fall in love with Apple, all minor issues get sorted out.
And well with beta iOS 12 release, it is seen that Apple do takes customer issues seriously (even after Steve!)
So best luck!
Enjoy!!
Cheers !!

14 EASY ways to Screenshot (Print Screen) Windows PC & Laptop

You have rescently upgraded to Windows latest 2018 version and want to know How to Take Screenshots (Print Screen) on Windows 10 ? then you are on right page. Here I will explain you step-by-step on various methods to take a screenshot using built-in tools like printscreen and mind it that most of the methods are also applicable on Windows other versions such as 7, 8, XP and 10.
If you are comparing with Apple Mac, the screenshot process is much more simpler. [ See Mac screenshot process ]
Windows provides you plenty of built-in tools like the Snipping Tool, different keyboard and physical button shortcuts, and if you are not satisfied with built-in tools, then you can go for thousands of third-party tools available across internet.
Like Mac in Windows also you can save the full screen, the active window, or a rectangular selection to a file or copy to the Clipboard for pasting into another application.
So I have tried to make this intuitive screenshot guide, with several different ways to take a screenshot on your Windows 7, Windows 8, Windows XP & windows 10 desktop PCs or laptops or even on surface tabs.

INDEX

1 How to take a screenshot of your entire screen? Windows 7, 8, XP, 10 Jump to Topic
2 How to take a screenshot of your entire screen & save to drive? Windows 7, 8, XP, 10 Jump to Topic
3 How to take a screenshot of active window? Windows 7, 8, XP, 10 Jump to Topic
4 How to take a screenshot of your entire screen & share on social networks? Windows 7, 8, XP, 10 Jump to Topic
5 How to take a screenshot of your entire screen on Windows Surface device? 2 methods Microsoft Surface or an ASUS Vivotab or a Dell Venue Tablets Jump to Topic
6 How do I take a partial screenshot? Windows 7, 8, XP, 10 Jump to Topic
7 How do I take a partial screenshot? Windows 10 only Jump to Topic
8 Using function key to take a Screenshot on Windows Laptop, Tablet or keyboard Keyboards with Alt key
dell & hp laptops
Jump to Topic
9 How to take screenshots of the active game window? Windows 10 Creators Update only Jump to Topic
10 Take and share screenshots Windows 8.1 only Jump to Topic
11 How to take screenshots of the entire screen, an active window or crop using a Snip Editor? Windows 7, 8, XP, 10 Jump to Topic
12 How to take a screenshot on a Dell tablet? Dell Tablet Jump to Topic
13 How to take a screenshot on Surface Go? Windows Surface Go Jump to Topic
14 Windows 10 Version 1809 Snip Bar screenshot [ new tool ] Windows 10 Version 1809 Jump to Topic
15 How to take a screenshot using Microsoft Edge? Windows 10 Jump to Topic
Reference Guide
1) How do I know which version of Windows 10 I have?
2) Where is my snipping tool windows 10?
3) Snipping tool download
4) What to do if I don’t have Print Screen key on my laptop or desktop ?
Jump to Topic

Using the keyboard shortcuts

1) How to take a screenshot of your entire screen?

USE PrtScn (Print Screen) or CTRL+ PrtScn keys

Applicable to : OS Windows XP and Windows Vista, Windows 7, Windows 8, 8.1 and 10. Dell laptop, Dell Computer, hp laptop, lenovo laptop, acer laptop, asus laptop, asus notebook and all other brands.
This is the most famous method so far known since ages! and till today it works in all versions of Windows.
To capture your entire screen, tap the PrtScn button. (Print Screen key) or CTRL + PrtScn keys.
Windows captures a screenshot of the whole screen and copies it to the clipboard ( Read more on clipboard on Microsoft website)
Remember that Windows do not save the screenshot to any file but copies it to memory of computer.
Now you can open open an image editing tool like Microsoft Paint), and press CTRL + V keys to paste the screenshot into the editor. Now you do some basic editing (if needed) and then save the image file to local drive in any format like BMP, JPEG, TIFF, PNG.
how to paste the picture from the clipboard to paint?
Alternatively you can also open any other application like PowerPoint, MSWord or even chat software’s like WhatsApp, Snapchat and directly paste the screenshot using CTRL + V key combination.
Go back to Index


2) How to take a screenshot of your entire screen & save to drive?

USE Windows Key ⊞ + PrtScn (Print Screen)

Applicable to : Windows 8, 8.1 and 10, Dell laptop, Dell Computer, hp laptop and all other brands
To capture your entire screen and automatically save the screenshot to the local drive
Simply tap the Windows Key ⊞ + PrtScn.
Your screen will briefly go dim just to indicate that windows has captured a screenshot, and the entire screen image screenshot will be automatically saved to the Pictures library > Screenshots folder.
The file will be named “Screeenshot(number).png” where the number is generated serially depending upon how many screenshots you have taken like Screeenshot(1).png, Screeenshot(2).png, Screeenshot(3).png ……..
Note: dell will store the screenshot in the Pictures folder (screenshots subfolder) , find it in C:\Users\[YOUR NAME]\Pictures\Screenshots
Go back to Index


3) How to take a screenshot of active window?

 USE Alt + PrtScn (Print Screen)

Applicable to : OS Windows XP and Windows Vista, Windows 7, Windows 8, 8.1 and 10. Dell laptop, Dell Computer, hp laptop, asus notebook and all other brands
To take a quick screenshot of the active window, use the keyboard shortcut Alt + PrtScn.
Open the window that you want to capture and press Alt + PrtScn on your keyboard.
Windows automatically captures a screenshot of the active window and copies it to the clipboard
Remember that Windows do not save the screenshot to any file but copies it to memory of computer.
Now you can open open an image editing tool like Microsoft Paint), and press CTRL + V keys to paste the screenshot into the editor. Now you do some basic editing (if needed) and then save the image file to local drive in any format like BMP, JPEG, TIFF, PNG.
Alternatively you can also open any other application like PowerPoint, MSWord or even chat software’s like WhatsApp, Snapchat and directly paste the screenshot using CTRL + V key combination.
Go back to Index


4) How to take a screenshot of your entire screen & share on social networks?

USE Windows ⊞ Key + H

If you want to capture your entire screen and share it across social network, use the Windows Key ⊞ + H keyboard shortcut.
Windows will capture your entire screen and automatically open the Windows Share toolbar to allow immediate sharing of snapshot over social networks with your friends via email, Facebook, Twitter, OneNote, etc.
Go back to Index


5) How to take a screenshot of your entire screen on Windows Surface device?

On Microsoft Surface or Surface Pro tablet, or an ASUS Vivotab or a Dell Venue tablets there is no PrtScn key on the Type Cover!
Don’t worry there are multiple ways available to take screenshot, using physical keys like smartphones or using keyboard hotkey combinations to get the work done. Let’s look at both the methods –

Method 1 – USE Windows Logo + Volume Down

Applicable to : Windows 8, 8.1 and 10
If you are using a Windows Surface device, and want to capture entire screen, hold down the Windows Logo touch button at the bottom of your Surface screen and hit the physical volume-down button on the side of the tablet.
Your screen will briefly go dim just to indicate that windows has captured a screenshot, and the entire screen image screenshot will be automatically saved to the Pictures > Screenshots folder.
This process of using physical buttons is exactly similar to take screenshot on your smartphone or tablet 🙂
How to take a Screenshot on Windows Surface or Surface Pro tablet

Method 2 – USE Surface-device specific shortcuts for Windows 10

If you are using Microsoft Surface or Surface Pro tablet, or an ASUS Vivotab or a Dell Venue tablets with Windows 10, then you can use the following key combination which is specific to Windows 10 version of Surface-device specific :

Fn + Spacebar Captures an image of your current screen to the clipboard, so that you can paste it into any application. (equivalent of the standard PrtScn key)
Fn + Alt + Spacebar Captures a screenshot of the active window, to the clipboard, so that you can paste it into any application. (equivalent of Alt + PrtScn keyboard shortcut)

Go back to Index


6) How do I take a partial screenshot?

USE Snipping Tool

Applicable to : Dell laptop, Dell Computer, hp laptop and all other brands
Again one more legacy tool given by Windows since ages!
Windows built-in Snipping Tool can be used for Complete screen capture, partial window capture or even free form and window capture.
You can find this tool in
Start > All Programs > Windows Accessories > Snipping Tool.
To know more ways on locating Snipping tool on your computer, go-to reference section in this post (Jump to Topic)
See the image below showing different options available with the Snipping tool.
How to use Snipping Tool in Windows 10 to take a screenshot
Step-by-Step approach to take a screenshot
1) Open the Snipping tool
2) Click New to get options or begin the screenshot process. By default windows will take a rectangular shaped snip, which means you can use your mouse to drag and draw a rectangular part of your screen for capture.
2.1) If you want shape selection other than rectangle, then windows provide you other options like free-form, window, and full-screen snips (refer to image above showing the options)
3) Leave the mouse button and you will see the capture in Snipping tool window.
4) Manually save the screen capture to local drive in any format such as PNG, GIF, JPG, MHT.
4.1) Alternatively you can directly paste the screenshot using CTRL + V keys to applications like MS Paint, PowerPoint, Word, Excel or directly to any social share apps.

Using timer in Snipping tool

If you want to know what it the timer used for in snipping tool, you can select delay timer between 1–5 seconds.
This delay is extremely useful when you wish to capture a pop-up menu or tooltip, so till the time capture activates, open the tooltip or pop-up and automatically after the set time is elapsed, the screen will freeze and fade out so that you can create your snip, OR you can also choose, full-screen, and it will just capture the snip immediately.
Go back to Index


7) How do I take a partial screenshot?

USE Windows ⊞ + Shift + S (Windows 10 only)

This method is applicable only for Windows 10,
Press Windows Key ⊞ + Shift + S to capture a region of your screen and copy it to your clipboard.
Once you press Windows Key ⊞ + Shift + S, the screen is dimmed, and you will see a cursor, now simply use your mouse to draw on the screen the region that you want to capture in a screenshot, and release the mouse cursor.
The screenshot is saved to the clipboard.
Now you can open Paint or Powerpoint or any other application, where you can paste it using CTRL + V.
Info : This feature was originally part of OneNote 2016 but has been added to Windows 10 itself.
Go back to Index


8) Using function key to take a Screenshot on Windows Laptop, Tablet or keyboard

Applicable to : Windows XP, Vista, and 7, dell computer
Notes specially for dell keyboards:

  1. The “Print Screen” key is typically found in the upper-right side of Dell keyboards.
  2. Some Dell keyboards have “PrtSc” written in a different color than the regular key color (e.g., white).
  3. Unlike other manufacturers keyboards, the “Print Screen” key usually don’t have anything else written on it.
  4. The “Print Screen” key may be written as PrintScreen, PrntScrn, PrntScr, PrtScn, PrtScr, PrtSc or a similar abbreviation

Using function key to take a Screenshot on Windows Laptop, Tablet or keyboard
Al the methods described in this post will work perfectly well on desktop PCs with Windows or on Windows devices with a standard keyboard.
However, specially on laptops or convertible device with a Fn key, the PrtScn key will have multiple functions to do.
Hence if you just press the PrtScn (Print Screen) key, it will not take screen shot!
So follow the following keyboard shortcut guide, if you have Function (Fn) key on your laptop – applicable to Dell, hp laptops

Fn + PrtScn – Takes a screenshot of the whole screen
– Copies it to the clipboard
Fn + Windows + PrtScn – Takes a screenshot of the whole screen
– Saves it as a file on the hard drive.
Fn + Alt + PrtScn – Takes a screenshot of the active window.

Go back to Index


9) How to take screenshots of the active game window?

USE Windows ⊞ + Alt + PrtScn (Windows 10 Creators Update only)

If you are a gaming freak and want to capture screenshot while playing the game, then you can use Windows ⊞+ Alt + PrtScn keys to automatically create screenshot of an active gaming window. System will automatically generate a screen capture and store on  your Windows 10 computer or device.
The screenshot will be saved in your Videos library, in the Captures folder, good thing is that, the filename will include the name of the game that you are playing and the date and time when the screenshot was taken 🙂
Note : This feature will work only if you have Windows 10 Creators Update, Microsoft has introduced a new Game Bar that can be used when playing games of all kinds specially for gamers. This Game bar allows taking screenshots.

USE Windows ⊞ + G (Windows 10 Creators Update only)

A popup window named GameBar will be opened, with above key combination. With this app, you can easily take full-screen shoots. But this system only works on windows 10 latest version.
Step 1: Open App or Game you Want to Take Screenshot Of
Step 2: Open Game Bar ( Windows ⊞ + G )
Step 3: Take Screenshot
Step 4: View Screenshot Xbox app > Game DVR > On this PC
How to screenshot using Windows Gamebar?
Go back to Index


10) Take and share screenshots [ only on Windows 8.1 ]

Windows 8 introduced Charms concept, which is taken further in the Windows 8.1 version which can be used to take and share screenshots.
How to Take and share screenshots on Windows 8
Go back to Index


11) How to take screenshots of the entire screen, an active window or crop using a Snip Editor?

Update as on  Sept 2018 – Microsoft has decided to discontinue development of Snip, and on May 1, 2018 the app will stop working ( Source )
Snip Editor, was a tool developed under the Microsoft Garage project.
This surely worked a little better than the Snipping Tool allowing you to take screenshots of the entire screen, an active window, or a manually-cropped rectangle.
The Snip app also featured different ways to annotate screenshots, including a free-hand pen option and voice recording. It also had an option to delay screenshots by up to 5 seconds, facilitating grabbing the disappearing menus and tooltips.
Go back to Index


12) How to take a screenshot on a Dell tablet?

Applicable to Dell Venue 8 Pro, 11 Pro tablet with Windows 8.1 or Windows RT 8.1
Now if you own a Dell Windows tablet computer, then simply press the
Windows ⊞ button + volume down (-) button
on your tablet simultaneously to take a screenshot. The screen will dim for a second with an audible notification to indicate the screenshot was taken.
dell will store the screenshot in the Pictures folder (screenshots subfolder) , find it in C:\Users\[YOUR NAME]\Pictures\Screenshots
Go back to Index


13) How to take a screenshot on Surface Go?

How to take a screenshot on Surface Go?

Method 1 : Taking a screenshot on Surface Go without a keyboard

Step-by-Step Guide
1) Press the Power + Volume Up buttons simultaneously.
Note : See the image above, these buttons are located on the top side of your Surface Go.
2) Leaving the buttons should darken the screen briefly to confirm that a screenshot has taken and copied to the clipboard.
3) Now you can open any app where you want to paste this screenshot image.
4) Long press on the touch screen of Surface Go where you want to save your screenshot and Select Paste.
Done.

Method 2 : Taking a screenshot on Surface Go using a keyboard

Step-by-Step Guide
1) Locate the “PrtScn” key on your keyboard top (refer to image above showing keyboard)
Note : Ensure that the “Fn” key toggle is set to OFF.
2) Press “PrtScn” key when the required screen is active, and the screenshot is added to the clipboard.
Note : In the background sign in to OneDrive, and your screenshot will be automatically added to the pictures folder (JPG version)
3) Open any app where you want to paste the screenshot, and press CTRL+V to paste the screenshot.
Go back to Index


14) How do I take a screenshot Windows 10 Version 1809 using Snip Bar?

Latest update of Windows 10 you can use the following for taking a screenshot –

  1. Windows Key ⊞ + PrtScn (Print Screen) – Jump to Topic
  2. PrtScn (Print Screen) or CTRL+ PrtScn keys – Jump to Topic
  3. Alt + PrtScn (Print Screen) – Jump to Topic
  4. The Snipping Tool application [ new tool ]

The Snipping Tool application [ new tool ]

The new tool in Windows 10 Version 1809, allows you to capture a rectangle, a freeform area, or take a full screenshot, and copy it directly to the clipboard.
When you take a snip, you can directly go to the Screen Sketch app to edit, annotate and share screenshot on social media.
However in this update, traditional tools available in the Snipping Tool (Delay, Window snip, and ink color, etc) are missing !

USE Windows ⊞ + Shift + S

1) Press Windows Key ⊞ + Shift + S to take a screenshot and copy it to your clipboard OR click on the pen tail button (if you have a pen).
2) A snipping toobar will open, allowing you to select to snip in a rectangle, freeform, or full screen.
3) You can now take a snip using any of the desired tool.
4) You will see a notification pop-up, informing “Snip saved to Clipboard” – “Tap to annotate and share snip”
5) Now you can open Paint or Powerpoint or any other application, where you can paste it using CTRL + V.

Using Snip and Sketch application to take a screenshot:

1) Open Windows ⊞ Start.
2) Search for Snip and Sketch application, tap to open the app.
3) Tap the New button in the upper left corner.
4) Select the kind of snip you need to use, including a rectangular, freeform, and fullscreen clip
5) Take the screenshot.

Using Action Center quick button

1) Open Action Center using the “Windows ⊞ key + A” keyboard shortcut
2) Tap the Expand button >> Tap the Screen Snip button.
3) Now select the kind of snip you need to use, including a rectangular, freeform, and fullscreen clip
4) Take the screenshot.
Go back to Index


15)How to take a screenshot using Microsoft Edge?

Applicable to Windows 10
While you use Microsoft Edge for browsing experience on Windows 10, it also facilitates taking screenshots of any web page you are viewing using a simple Add notes button.
Lets learn how to do it Step-by-Step:
1) Open Microsoft Edge browser >> Load the website
2) You will see “Add Notes” button on the top right side of toolbar >> Click on it >> Click the Save button >> Select OneNote >> Click the Save button OR click the Share button to share the image with other people through email or social media.
Tip: Similar to Snip & Sketch, using Add Notes you can annotate the image, add notes, crop too.
Go back to Index


Reference guide

1) How do I know which version of Windows 10 I have?

First thing to do is to check which Windows version your desktop PC or laptop is loaded with … So that you know which printscreen shortcuts to be used and looked for.
So to find out which version of Windows your PC is running, Windows 10 or windows 7 or any other do the following
1) press Windows logo key  + R ,
2) type winver, then select OK.

2) Where is my snipping tool windows 10?

– Get into Start Menu > Select All apps, choose Windows Accessories and tap Snipping Tool.
– Type snip in the search box on taskbar, and click Snipping Tool in the result.
– Display Run using Windows+R, input snippingtool and hit OK.
– Launch Command Prompt, type snippingtool.exe and press Enter.
Alternate way to find snipping tool in windows is to use File Explorer > navigate to “C:\Windows\System32” and then double-click or tap on the executable file called SnippingTool.exe.

where is my snipping tool windows 10?

3) Snipping tool download

Download Screenshot Snipping Tool from Microsoft Official website – Snipping tool download here (applicable for Windows 10 version 10586.0 or higher)
Microsoft snipping tool download for windows 7 – Please note that Windows 7 Starter kit does not include a Snipping Tool, however Home Premium, Professional and Ultimate Windows 7 versions have Snipping Tool.
Microsoft snipping tool download for windows XP – The Windows 7 Snipping Tool is not available for XP.

4) What to do if I don’t have Print Screen key on my laptop or desktop ?

Try to locate the “Print Screen” key on your laptop or desktop keyboard, remember that depending upon the manufacturer such as dell, hp, lenovo, acer, asus etc this key may be written as PrintScreen, PrntScrn, PrntScr, PrtScn, PrtScr, PrtSc or a similar abbreviation
However in case you still are not able to find the Print Screen key separately, then don’t worry.
Simply use Fn + Insert keys simultaneously to take a screenshot.

Bottom line

Windows is the most widely used OS in world.
It is so famous because of its intuitive interface, simple copy past operations, drag drop of files makes it user easy to use for a non trained person too.
Since it is widely used on Desktop PCs and Laptops, people using it daily do need to generate screenshots for personal use, official use, social sharing or any other reasons for keeping a record of transactions etc. In fact I use it quite extensively for writing my blog too.
So obviously not everyone is aware of technique of generating screenshots, hence you will see multiple queries floating across web like “how to take a screenshot on windows” or “how to screenshot on hp or dell laptops” – Now point to be noted here is that be it a dell laptop or hp laptop, the method of taking screenshot remains the same as described above in this post.
Well even it might be that you want to know where is the print screen button located?
So in this post I have tried to cover all the known methods which works perfectly on various versions of Windows OS such as Windows 7, 8, XP, Windows 10 on desktop PCs, laptops or Windows Surface devices (tablets).
Above guide is also applicable to dell latitude, dell inspiron 15,
Hope this helps!
Cheers!!

8 EASY Ways to Screenshot (Print screen) Mac / Macbook Pro

If you have bought new Mac or switched over to Mac in 2020, here is my beginners guide for new Apple fans on How to take a screenshot (print screen) on a Mac & MacBook Pro. Specially useful, if you are looking for the Print Screen button present on most of the standard keyboards designed for Windows OS.
If you look at any Laptop or Desktop with windows OS, you will always find a simple “Print screen” button which allows to take a screenshot directly in combination to the Function key.
However when it comes to Mac or MacBook Pro, the PrintScreen button is simply  missing!
Of-course you can take a full or partial screenshot on Mac, but with few combination of keys together. unfortunately its not intuitive on Mac as using a simple Print Screen button in Windows and slightly hard to memorize!
So I have prepared text guide as well as a info-graphics, which you can simply print and paste on your pin board for quick reference.
On Mac, you have an option to capture your entire screen or just a selected portion of it (partial screen).
Also you have an option to automatically save the screenshot to your desktop or to the clipboard.

How to Take Screenshots (Print Screen) on Mac or Macbook Pro?

Full Screen Shot — Hold down Command ⌘ + shift + 3 simultaneously
Partial Screen Shot — Hold down Command ⌘ + shift + 4 simultaneously
So while you wish to share your moments of your favorite videos, achievement of games, discussions on social networks like Twitter or Facebook, any bugs you want to report to Apple support, OR almost anything and everything you see on your screen, this step-by-step guide will help you. Also do refer to Info-graphics which will help you for quick print and reference.
Note : All methods prescribed in this article for taking a screenshot will work with OS Sierra, OS X El Capitan, OS X Yosemite, and most older versions of the modern Mac operating system.

Sn

INDEX – How to take screenshot on Mac?

1 How to take a screenshot of your entire screen? Jump to Topic
2 How do I take a partial screenshot? Jump to Topic
3 How to take a screenshot of a window? Jump to Topic
4 How to take a screenshot of a menu? Jump to Topic
5 How do I take a screenshot of the Touch Bar (MacBook Pro)? Jump to Topic
6 How can I take a screenshot using Preview? Jump to Topic
7 Where are my Screenshots stored? Jump to Topic
8 How can I change screenshot file format to JPG or TIFF or GIF or PDF? Jump to Topic
9 How to copy the screenshot directly to clipboard instead of desktop save? Jump to Topic
10 How to paste image from clipboard into a document or something? Jump to Topic
11 How to take screenshots using the command line (“Terminal”)? Jump to Topic
12 How to take screenshots in MacOS Mojave?
How to Change Mojave’s Default Screenshot Location?
Jump to Topic
13 How to edit screenshots? Jump to Topic
14 How to Customize Mac Screenshot Shortcuts? Interesting topic Hotkey! Jump to Topic
15 How to Fix Screenshot on Mac Not Working Error? Jump to Topic
16 How to transfer the screenshot from Mac to iPhone? Jump to Topic

1) How to take a screenshot of your entire screen?

1) Hold down Command ⌘ + shift + 3 simultaneously
2) You will hear a camera click sound.
Result : Mac will capture the entire screen and save it as a .png file on your desktop.
Note : [ File on Desktop will be named like “Screen shot 2020-08-29 at 08.45.00 AM.png” ]
Tip : This process also works on MacBook Air
How to take Screenshot of your Entire Screen on Mac
Go to Index

2) How do I take a partial screenshot?

You can take screenshot of selected portion of your screen using following key combination –
1) Hold down Command ⌘ + shift + 4 simultaneously
2) Now your mouse pointer will change to a crosshair (+)
3) Move the crosshair (+) using the mouse or tackpad to the location where you want to start the screenshot, then drag to draw a rectangle which specifies “what to capture”
– The crosshairs provide you a precise pixel count  during dragging (see the image snap shot below), this helps you selecting a specific image size (or even to measure).
– You can hold down Option to change the lock point to the center of the area.
– Or you can hold down Shift to lock all sides but the one in the direction you’re currently moving.
4) After you select desired area, simply, release your mouse or trackpad button to hear a camera click sound.
Note : [ If you wish to cancel the operation, press the Esc (Escape) key before you release the button. ]
5) The screenshot will be saved to your desktop.
Note : [ File on Desktop will be named like “Screen shot 2020-08-29 at 08.45.00 AM.png” ]
Tip : This process also works on MacBook Air
Go to Index
How to take Screenshot of your Partial Screen on Mac

3) How to take a screenshot of a window?

1) Hold down Command ⌘ + shift + 4
2) Now your mouse pointer will change to a crosshair (+)
3) Press the Spacebar and the pointer changes to a Camera.
4) Move the camera over a window to highlight it. The window will tint blue to show your selection.
5) Now click your mouse or trackpad. You will get a confirmation camera click sound.
Note : [ If you wish to cancel the operation, press the Esc (Escape) key before you release the button. ]
6) The screenshot will be saved to your desktop.
Note : [ File on Desktop will be named like “Screen shot 2020-08-29 at 08.45.00 AM.png” ]
Important note : Some apps, especially those designed to play copy-protected videos such as DVD Player, might not let you take screenshots of their windows.
How to take a Screenshot of a Window on Mac
Go to Index

4) How to take a screenshot of a menu?

1) Click the menu to reveal its contents.
2) Hold down Command ⌘ + shift + 4
3) Now your mouse pointer will change to a crosshair (+)
4) Drag to select the menu.
5) Release your mouse or trackpad button.
Note : [ If you wish to cancel the operation, press the Esc (Escape) key before you release the button. ]
6) The screenshot will be saved to your desktop.
Note : [ File on Desktop will be named like “Screen shot 2020-08-29 at 08.45.00 AM.png” ]
These steps capture the contents of a menu, but not its title:
1) Click the menu to reveal its contents.
2) Hold down Command ⌘ + shift + 4
3) Now your mouse pointer will change to a crosshair (+)
4) Press the Space bar. The pointer changes to a camera.
5) Move the camera over the menu to highlight it.
6) Click your mouse or trackpad.
Note : [ If you wish to cancel the operation, press the Esc (Escape) key before you release the button. ]
7) The screenshot will be saved to your desktop.
Note : [ File on Desktop will be named like “Screen shot 2020-08-29 at 08.45.00 AM.png” ]
Go to Index


5) How do I take a screenshot of the Touch Bar (MacBook Pro)?

If you have a Mac with a Touch Bar and macOS Sierra 10.12.2 or later then use the following key combination –
1) Hold down Command ⌘ + shift + 6
2) Your Mac captures the entire Touch Bar and saves it as a file on the desktop.
How to take a Screenshot of Touch Bar on MacBook Pro
Go to Index


6) How can I take a screenshot using Preview?

In case you don’t remember keyboard shortcuts, then you also have an option of taking a screenshot on Mac using Preview.
Just for information, Preview is built-in image and PDF viewer in the macOS. You can view and print images and PDF files.
See the info-graphics below showing how to use Preview for taking a full or partial or window screenshot.
How to take a Screenshot using Preview on Mac?
Go to Index


7) Where are my Screenshots stored?

All your Screenshots are by default saved on the desktop in Mac OS X v10.6 and later as .png image format files.
The image file will be names as “Screen Shot date at time.png.”
as an example “Screen shot 2020-08-29 at 08.45.00 AM.png”
So you can look at the screenshot file on your desktop or alternatively from the Finder.
– Simply Double click on the screenshot file to open and share it with Preview.
– Right click the file and choose Open With
– or drag and drop the file, to open and share it with another app.
Go to Index


8) How can I change screenshot file format to JPG or TIFF or GIF or PDF?

Yes, you can change the default file format PNG to other formats such as JPG, TIFF or GIF or PDF.
Well by default Mac uses PNG format to store the file on desktop, however sometimes you wish to change this default for various reasons.
As an example say you are using a MacBook Pro Retina or some other 4K monitor, the screenshots can be as large as 5 to 8 MB. And may cases if you wish to send it over email or upload to some government websites etc, you need lighter file sizes and wish to get the screenshots as JPG rather than PNG.
Tip : [ Go for JPG since that is a common type and will output smaller image size than default PNG. ]
So there are TWO options to do this.

Option 1 – Simple to execute

With Preview Option which I have explained earlier ( Click to jump there ) you get an option to save your screenshots in JPG, TIFF, PDF, and other file formats.

Option 2 – Difficult to execute, but changes image file format default permanently on Mac

You can change the default PNG format using a simple terminal command.

Step by Step guide

1) To find the Terminal, Go to Applications -> Utilities. Or use search to find “Terminal”.
2) copy/paste following command inside the terminal window and press enter (return)

defaults write com.apple.screencapture type jpg

Tip : If your Mac asks for user password, just go ahead and enter it.
3) Restart the system to get the changes applied.
3) Alternatively – In case you don’t want to reboot the system, use following command in Terminal window and press enter (return).

killall SystemUIServer

4) You are done. Now all the further screen captures (print screen) will be saved to JPG format.
Note : In case you wish to change the image file format again, repeat steps above by changing the file format name in command line. as an example defaults write com.apple.screencapture type PNG
Go to Index


9) How to copy the screenshot directly to clipboard instead of desktop save?

Sometimes you want to directly copy the screenshot directly to other application, so to avoid one step of picking up file from desktop, you have an option to directly copy the screenshot to your clipboard.
1) Hold down Cotrol key together with any of the combinations given above.
For an example,
Use Control + Command ⌘ + shift + 3
Instead of
Command ⌘ + shift + 3
2) Now the screenshot will be directly copied to the clipboard (instead of saving it as a desktop file).
Go to Index


10) How to paste image from clipboard into a document or something?

Hold down Command ⌘ Button + V
This is similar to the Windows paste option using Control + V, here on Mac too, Command + V, pastes the screenshot on the clipboard directly into a document or image you are currently editing.
Go to Index


11) How to take screenshots using the command line (“Terminal”)?

1) To find the Terminal, Go to Applications -> Utilities. Or use search to find “Terminal”.
2) copy/paste following command inside the terminal window and press enter (return)
First command will provide you screen capture

man screencapture
OR if you wish to introduce delay in screen capture, then use below command
screencapture -T 10 ~/Desktop/screenshot.png
Go to Index


12) How to take screenshots in MacOS Mojave?

with the MacOS Mojave update. (Also get to know the new Stacks and dark mode.) you can use the new screenshot tool and keyboard shortcut.
Command ⌘ + shift + 5
How to take screenshots in MacOS Mojave?
Press Command ⌘ + shift + 5 which will bring up a small panel at the bottom of your display with screen capture options as shown in the above image. You can simply drag this screenshot panel at suitable location on the screen.
You will get Screenshot buttons, Video recording buttons, and an Option button with sub-options as given below –

  • Screenshot Options
    • Capture the entire screen,
    • A window or
    • A selection of your screen
  • Video-recording buttons
    • Record your entire screen or
    • A selection of it
  • Options Button
    • Save your screenshot to
      • Desktop,
      • Documents,
      • Clipboard,
      • Mail,
      • Messages or
      • Preview
    • Set a 5-10-second delay

On the left of this control panel you will get an X button to close the panel, or alternatively just hit the Escape key to exit out from Screenshot menu.
From the options button you can choose location to save your screenshot – as Desktop, Documents, Clipboard, Mail, Messages or Preview, as well as set a 5-10-second delay when you want to capture a disappearing tool-tip or menu.
Once you capture the screenshot, you get a floating thumbnail at the bottom, in case needed you can switch-off this preview. If you Click this Floating Thumbnail, you will get a Markup View preview window with all of the markup tools. So you can annotate screenshots without needing to open Preview or delete it simply.
Tip: you can choose to show your mouse pointer in a screenshot or video.

How to Change Mojave’s Default Screenshot Location?

See image above for reference
Go to “Options” button >> Change saving location using the toggle near the top of choices (Desktop / Documents / Mail / Messages / QuickTime Player / Other Location …)
Use above menu to change the place where you wish to save your screenshots, as an example click “Other Location” from that list, to get open/save dialog box to select where you want future screenshots to be saved.
Go to Index


13) How to edit screenshots?

You can open the screenshots with Preview, Safari, and other apps and then view them or edit too.

Step-by-step Guide to edit an image on Preview

1) Double click to open a screenshot with Preview.
2) Rotate :
Rotate button is indicated by a curved arrow and is located at the upper right part of the window.
You can Click the “Rotate” button to rotate the screenshot orientation 90 degrees.
3) Adjust Size:
“Tools” is located in the top menu bar and will open a box with options to adjust the width, height or resolution.
Open the “Tools” menu and select “Adjust Size”.
4) Crop:
Click the “Select” tool located in the upper toolbar, click and drag to select the area of the image that you wish to crop. Then select “Crop” from the “Tools” menu in the top menu bar.
5) Adjust Color:
Open “Tools” and select “Adjust Color”. A new pane will appear with sliders to adjust the exposure, contrast, highlights, shadows, saturation, temperature, tint, or sharpness.
6) Annotation [pen tool, shapes, or text insert]
Annotation tools button is located in the upper right corner of the window. This gives you access to annotation tools, such as a pen tool, shapes, or text insert.
7) Save the edited screenshot:
Open the “File” menu and select “Save As” to save your changes. You will be prompted to name the screenshot and browse for a save location. Clicking “Save” will confirm your changes.
Go to Index


14) How to Customize Mac Screenshot Shortcuts? Hotkey!

I really get annoyed to press so many keys to get one screenshot! It is the most stupid thing to cross fingers to reach so many keys!! So thought on defining hot keys on mac which I like or feel more convenient for daily operations.
So here I suggest you to use the Mac’s excellent keyboard hotkey mapping function to create your own screenshot shortcuts.

Step-by-step guide to customize screenshot keys on Mac

1) Go to System Preferences > Keyboard > Shortcuts.
2) You will see list on the left hand side of screen (see image snap below), from the list select Screen Shots
3) Now you will see the Mac’s screenshot options on right hand side of window (see image snap below) with their default keyboard shortcut combinations.
How to Customize Mac Screenshot Shortcuts
4) Select the screenshot command you want to modify and double click and press new combination as desired.
5) You are done 🙂 Close the System Preferences window and carry on with your screenshots!
Go to Index


15) How to Fix Screenshot on Mac Not Working Error?

15.1 — Restart your Mac
Press the Power button (or press “Control + Eject”) and, when a dialog box appears, click the Restart button.
Choose the “Apple key” and then click “Restart”.
Press “Control + Command + Eject” (or “Control + Command + Power” button)
15.2 — Check the screenshot shortcuts
Go to “System Preferences” > “Keyboard & Mouse” > “Keyboard Shortcuts” > check whether the shortcuts are activated or not under Screen Shots, and also check that they have not been assigned to something else.
15.3 — Use Grab to take a screenshot on Mac
Try using the pre-installed Grab on Mac to take a screenshot of a partial section of the screen, an individual window, or the entire screen.
Go to “Applications” > “Utilities” > find and open “Grab” > “Capture” > choose to take a specific screenshot
How to take a Screenshot of a Partial Window on Mac using Grab built-in software
15.4 — Take a screenshot using Preview – This topic is already covered previously Jump to Topic
Go to Index


16) How to transfer the screenshot from Mac to iPhone?

Once you take a screenshot, you can sync these new images to yout iPhone.
Best and easiest way is to use AirDrop to transfer screenshot from Mac to iPhone or vice versa.
1) Turn on AirDrop,
2) Turn on Bluetooth Wi-Fi connection on both iPhone and Mac,
3) Go to the Photos application on Mac, and then choose to share the specific screenshot with iPhone via AirDrop.
Read Apple official guide on How to use Airdrop?
Go to Index


To write this article, I have taken an extensive reference from Apple official website ( Source )

11 EASY Ways to Screenshot Snapchat Without Them Knowing

While I use Instagram as well as Snapchat for looking at interesting stories! You know what I mean? Snapchat is more attractive in terms of spicy stories all over the web, and only due to the fear factor that snapchat notifies if you screenshot stories, So I knew if I need to do it, I need to search for workarounds, and here at my answer after research on – How to screenshot on Snapchat without them knowing? I got answer for not only Android phones but also for Apple iOS iPhone or iPad devices, all these workarounds which worked for me and as tested in Aug 2020.
So lets see all my workarounds step by step to Screenshot on Snapchat Without Them Knowing
All the workarounds given below are tried by me and confirmed that they work in Aug 2020!
Since Snapchat keeps continuously updating their algorithm and releases app patches, its possible that some of the workarounds may not work, if at all you notice that below method / methods not working, please intimate by adding comment below and I will update the post, also let me know if you are using better method or app or a recorder which can be useful to other friends reading this post.
However beware that Snapchat’s privacy policy and support page make it clear that your snaps & /or stories are by no means safe from being saved by other users!


INDEX – Secret Workarounds

1 Android & iOS Clear the phone App Data Jump there
2.1 Android Using a Screen Recording App Jump there
2.2 Apple iOS Use a Screen Recording – With Mac Jump there
2.3 Apple iOS Use a Screen Recording App – iPhone, iPhone X, XS, XS MAX AND XR
, iPad, or iPod touch – how to snapchat without holding button iOS6 & iOS11
Jump there
3 Android Using the Google Assistant Jump there
4 Android & iOS Using the SnapSaver Jump there
4.1 Android & iOS Using the SnapCrack Jump there
4.2 iOS Using the SnapBox Jump there
5 Samsung Galaxy Note Using S-pen’s Screen Write Jump there
6 Android & iOS Go simple – Use another phone! Jump there
7 Android Using recent app button – Latest TRICK 2020 Jump there
FAQ 1 Question : Is it illegal to screenshot a Snapchat story?
2 Question : Does Snapchat send screenshot notifications for stories?
3 Question : If you take a screenshot of an unopened Snapchat story is the user notified?
4 Question : Does Snapchat notify screenshots on chat?
5 Question : Why does my Snapchat say I screenshot when I didn’t?
Jump there

Workaround 1) Clear the phone App Data after taking screenshot [ Android & iOS]

Online mode –

You take a screen snapshot on Snapchat, App system will immediately send notification to other user about the activity. So you can’t take a screenshot in online mode without them knowing!

Offline mode – Goto Airplane mode to switch off internet / WiFi connection

You take a screen snapshot of Snapchat story or image secretly, and App system can’t send notification to other user since you are offline.
However in the background, Snapchat App will write this pending task in command log file, which will be executed by the App as soon as you switch to online mode! Which means the other user will still get delayed notification i.e. as soon as you go online mode.
So simplest way to prevent sending this (delayed) notification is to clear the IG log file 🙂
Which means the App will not be able to find the notification command in log, so it will also not send any notification even when you go online after clearing the cache.
But only negative using this method is that when you clear the App data (log file), the app will also forget your login credentials, and hence you need to re-login to Snapchat account, so some sacrifice is needed 😛
But I think this is very simple and effective workaround for secretly save snapchats, without need of any special external third party app or software or assistance.
Clear Snapchat Cache data on iPhone and Android Phone
Here is the OFFLINE method to take screenshot, explained Step-by-Step
1) Open Snapchat, allow it to load the complete story or image.
2) Now turn OFF your internet connection, simply goto Airplane mode.
3) Open the story or image and take a screenshot [ Do not hurry to go online, read below steps ]
4) Go to the App cache setting and clear the data (see image below) – Go to System Settings > Apps > Snapchat > Storage > Clear Cache and Clear Data.

Pros Cons
Works on Android & iOS Have to log in after every time you clear the cache
No third party apps installation needed Somewhat time consuming and tedious
Not even marked as “seen”

Go back to Index


Workaround 2.1) Using a Screen Recording App

[For Android Phone]

First solution of using a screen recorder, I will show you how it works on an Android phone.
This is due to the fact that Snapchat do not have capability to detect the screen recording App running in the background (as on Aug 2020). So in this case I am going to take help of this shortfall and load a screen recorder to make a video and later use it to take a snap of liked portion.
Snapchat how to take screenshot using screen recorder on Android

Here is Using a Screen Recording App to take screenshot, explained Step-by-Step
1) Goto Google Play Store and download any screen recording app.
Note : I am using AZ Screen Recorder App which works well without any Root requirements, its intuitive and easy to use interface app (See snapshot above working on Snapchat) – here is App Download link
2) Install and run AZ Screen Recorder to do initial settings like permissions etc. And you are ready to take snap.
3) Now open Snapchat, you will see faint icon of AZ screen recorder, press it to get a menu as shown in the above image. Select recorder from the Menu to start your screen recording.
3.1) Now whatever you do in the Snapchat will be recorded secretly in the background, any chats or stories that you view will get recorded to the local memory.
4) You can stop the recording at any point of time.
5) The complete activity is video recorded and saved to your gallery by this app.
6) Goto Galary or file manager to open up the recorded video.
7) Play the video and take as many screenshots as you like from the screen recording being played.
This method works best when you want to record a chat ( for some secret reasons 😛 )
Also it provides flexibility to record long chats or view many stories in a go, till keep recording, only keep in mind that long recording is going to consume the mobile memory. Also long video reviewing and taking snapshots is a cumbersome task, in fact I tried this method and spent lot of time in getting video recording shot for the perfect moment 😛
Tip : Set the recorder App to record video to the highest possible resolution to get the best results.

Pros Cons
Works on Android & iOS Recorded video consumes huge mobile local storage
Works even when you are live chatting Time consuming& tedious
Good for screening multiple stories at a single go Capturing snaps of replayed video is a skill in itself!

Go back to Index


Workaround 2.2) Use a Screen Recording App – Option 1, using Mac

[For Apple iOS Phone – iPhone  X, XS, XS MAX AND XR ]

In section 2.1 you saw hos to use screen recorder on an Android phone, but what to do on an Apple phone?
Don’t worry, you still can use the same logic but only you need to have an iPhone and a Mac with a lightning cable.
Yes, using QuickTime’s screen capture feature is a guaranteed way to capture high-quality Snapchat Story videos or pictures.
Its not at all easy! but yes, its a cumbersome technique, but again the most  efficient!
Snapchat how to take screenshot using screen recorder on iphone
Here is Using a Screen Recording App to take screenshot, explained Step-by-Step
1) Connect your iPhone X, XS, XS MAX AND XR to your Mac
2) Open up QuickTime player
3) Choose File » New Movie Recording in the QuickTime menu bar.
4) Clicking the recording button will show you different recording options – Here you have to choose your phone as the Movie Recording input.
5) As soon as you select the phone, your iPhone screen will appears as-is on your Mac screen.
6) Hit the record button and then go to Snapchat, you are done, begin recording as many snaps and stories you like!
I loved this method due to the high quality capture done by QuickTime, I could play snaps to pick the perfect images to screen capture! much better than the Android experience.
Tip : If you have an iOS 11 phone, you get a screen recording feature that you can use for this purpose without downloading anything 🙂

Pros Cons
Works on iOS You must have a Mac
Works even when you are live chatting You need to be wired to do all this stuff
Good for screening multiple stories at a single go

Go back to Index


Workaround 2.3) Use a Screen Recording App – Option 2, how to snapchat without holding button on iOS11

[For Apple iPhone, iPad, or iPod touch]

1) Go to Settings > Control Center > Customize Controls, then tap next to Screen Recording.
2) Open Control Center and Tap Record, the the three-second countdown begins.
Note :  To capture sound while you record, press deeply on and tap Microphone Audio.
4) To stop recording, open Control Center and tap . Or tap the red status bar at the top of your screen and tap Stop.
5) Your screen recording gets saved automatically to the Photos app.
Note :
Many websites have specified above method to record Snapchat story or photos, however please note that even you use iOS 11’s screen recording feature, SNAPCHAT still notifies the other user saying someone “took a screenshot!” of either your photo or video. Only as on now it is not able to detect if the story has been fully recorded or not.
Read Apple guide on using recording in iOS11

How to Record a Hands Free Snapchat Video on iOS6?

Since Snapchat allows you to watch videos without holding the screen, similar ways iOS6 allows you to  record all your snaps without touching the screen.
1) Go to phone Settings, tap Setting > General > Accessibility > Assistive Touch
2) Turn Assistive Touch ON, and now tap on Create New Gesture.
3) Blue bar will appear on the bottom of the screen, now Press and hold on the screen until the blue bar finishes.
4) It will ask to provide Gesture name – provide suitable name such as “without holding hands”
5) Open Snapchat app and tap on the little transparent circle icon and select “without holding hands”
6) Drag this black circle icon to the Snapchat record button and it will start rerecording in hands free mode.
Note: for iOS11 users I have already given separate method above.
Go back to Index


Workaround 3) Using the Google Assistant [For Android Phone]

For an Android phone owner this is the easiest and fantastic way to take screenshot of any Snapchat story or chat without generating any automatic notification!
This is easy since it works only on your voice command and always ready to listen to you 🙂
Snapchat how to take screenshot on android using google assistant
Here is Using the Google Assistant to take screenshot, explained Step-by-Step
1) Install  Google Assistant (if not available on your phone, yes – even to save space once upon a time I removed it)
2) Open the Snapchat App and view the story or the picture you want to screenshot.
3) Simply call the Google Assistant by saying the magical words “Ok Google” or alternatively by holding down the home button.
4) Ask the Google Assistant to take a screenshot by saying “Take a screenshot” or “Whats on my screen” or simply type it out.
5) Google assistant will give you various sharing options like sharing with someone else or uploading to Google Photos, select one suitably. Unfortunately Google assistant does not save the screenshot to your local drive 🙁

Pros Cons
Works on Android Screenshots can’t be saved directly to the gallery
Simple, intuitive and fast
No third party app needed to be installed

But I have old mobile or old Android OS version without any Google Assistant what should I do?

Don’t worry, even if you don’t have the Google Assistant get the free app Copy (Text & Screenshots)  Which works almost like the Google Assistant, where you can call it by long pressing the home button and clicking on the image icon to take a screenshot.
Go back to Index


Workaround 4) Using the SnapSaver [For iOS & Android Phones]

Some Apps are specially designed for this purpose only.
Now SnapSaver is recommended for using on an iOS as well as Android phone, which again allows secret screenshots of anyone’s Snapshot pictures 😛
This is something like starting a photo session, take pictures anytime during the session, and the pictures directly goes to built-in gallery.
Here is Using the SnapSaver App to take screenshot, explained Step-by-Step
1) Install SnapSaver App from Google Playstore. OR Download SnapSave for iOS
2) Open the Snap Saver app and start a session.
3) You can select desired option like Screenshot, Screen Recording, Burst Screenshot and Integrated.
4) Now open Snapchat App, start viewing snaps or stories you want to screenshot secretly.
5) Simply Click on the pop-up camera icon on your screen and take a screenshot.
6) Once you are done taking multiple snaps, go back to the SnapSaver app and end the session.
Take secret Screenshots on snapchat with SnapSaver Android
Good thing is that this SnapSaver app has its own gallery to view all the screenshots or screen recordings that you have taken. The App also provides a many options and settings to choose from and is overall a proven method to screenshot without knowing the other person, here you need not logout from the SnapChat or clear the cache!
Further you have an option to share the screenshots directly from the App gallery.

Pros Cons
Works on iOS and Android You get ads in the free version
Simple, intuitive and fast
Screenshot, Burst Screenshot, and Video
In-built gallery

Go back to Index


Workaround 4.1) Using the SnapCrack [For iOS & Android Phones]

This is another good App used as Snapchat saver, which is highly efficient in copying received pictures and videos without the sender knowing.
SnapCrack App is available for both iOS and Android phones.
The App not only helps you to save the snaps with single tap, but also helps forwarding them to other friends 😛
Step-by-Step guide
1) Download Snapcrack Download SnapCrack for iOS   /    Download SnapCrack for Android [latest check on Sept 2020 – Android app does not work!]
2) Install Snapcrack on your device
3) Log-in to the app using your Snapchat credentials
Note : You will be automatically logged out from Snapchat.
4) App will fetch data from Snapchat and ask for authority to use your data. After approval you will get similar interface like Snapchat
5) Now you can see and save any snaps send by your friends by a simple “Save” button tap.
6) Goto the “Stories” section to view all the stories and tap on the “Save” button to save the story to your phone memory.

Pros Cons
Works on iOS and Android Plz note that this App is not authorized by Snapchat inc. So your account may get banned to violate the conditions of Snapchat. 
Simple, intuitive and fast
stickers and doodles are available

Go back to Index


Workaround 4.2) Using the SnapBox [For iOS Phones]

This Snapchat saver app is called as SnaBox and works only on iOS,
SnapBox allows you to save every Snap and Story of your friend without his knowledge. Snaps being saved to local device, can be accessed as and when needed.
The App not only helps you to save the snaps with single tap, but also helps forwarding them to other friends 😛
Step-by-Step guide
1) Download & Install SnapBox to your iPhone Download SnapBox for iOS
Note : Look for Snapchat ghost in an open box icon (see below)
SnapBox app to save snapchat stories without them knowing
2) Log-in to the app using your Snapchat credentials
3) Now as soon as you get a notification for a new Snapchat, first open the Snap in Snapbox app, the snap will automatically saved to device and accessible any point of time opening the Snaobox snapsaver app.

Pros Cons
Works on iOS This app is not authorized by Snapchat, so there is risk in using to get banned.
Easy to use Doesn’t save video to camera roll

Go back to Index


Workaround 5) Using S-pen’s Screen Write – Applicable only for Samsung Galaxy Note

Note that this workaround is applicable only for Samsung Galaxy Note model.
You can simply use the built-in feature of he S-pen’s Screen Write or Smart Select feature to take a snapshot of the Snapchat screen and good thing is that the screen capture is not notified to the sender even while using the Snapchat App.
Go back to Index


Workaround 6) Go simple – Use another phone!

Looks stupid! But most of the people have multiple phones at home!
So KISS (Keep it Simple Stupid) – Simply use another phone or tablet to take a snap!
Of-course needless to say that this workaround is the most simple but looks to be used only if you don’t have time to play around the other hacks enlisted in this post to screenshot without detection.
However when you “screenshot” Snapchats using this method, the video or photo quality isn’t going to be that great 🙁 No one ever can keep the hands steady to capture a decent footage, also there will be an issue of glares of screen and the quality of the phone’s camera will matter.
Go back to Index


Workaround 7) Using recent app button – Latest Snapchat TRICK 2020

As you all know that all Android phones have facility to show resent apps that you have opened it can be seen by pressing the Home button or left of home button on some phones (depending upon model it will vary)
However pressing Recent Apps will show other windows too (partially), hence first step what you need to do is to close / clear all recent apps from the history of Phone.
Here are the Step-by-Step explanation –
1) Clear all recent apps from background by pressing clear button “X”.
2) Now you can open snapchat App.
3) Stay on the photo or story you want to secretly screenshot.
4) Now press recent app button on the bottom of your mobile screen.
5) In case the story or snap runs out of time, simply replay the story / snap & immediately press recent app button.
6) Capture snapshot of the screen using standard methods of Android, use Power + Volume button or any other method given on m website depending upon model of your phone.
This is fantastic method, where the other user will only get simple Replayed Notification and not the snap notification.
Go back to Index


Story behind writing this screenshot hacking post!

SnapChat launched as an app called Picaboo in July 2011, later rebranded as Snapchat.
One of the most powerful feature making this App so famous within such a short timeperiod was –

No matter what snaps & videos you sent out — silly selfies, scandalous, saucy, stupid, or sexy — recipients were not able to screenshot or store your snap without your knowledge!

What it means is that when you upload pictures and videos or send them to friends, they will expire after a few seconds, so you can send embarrassing or funny pictures of yourself without thinking much.
Now you know its human tendency, that if you present them doing something, it will be attempted number of times in numerous ways! Literally from the day this App launched, thousands of people tried breaking this rule.
While I do use Snapchat as well as Instagram, if you ask me which one I like the most, I have two answers … I like snapchat if I want to look at some real spice and I like Instagram if I need to see real nature related stories from my friends and web. Organically Snapchat has became farm of spicy, sexy photos! this may be due to the fact that due to fear factor, people don’t screenshot your stories, that make people posting anything they like. Also these stories disappear not leaving any solid proof which can be trouble later.
Since that day, till today in 2020, I mean seven years down the line, people are still trying to get around Snapchat’s anti-screenshot feature any way they can.
So not only me or you, almost everyone on this earth is asking the same question: How the hell can I screenshot on Snapchat without being notified?
And mind it, not only iOS users but also Android users are equally trying it hard to secretly screenshot!
Following are the most famous asked questions over internet in the year 2020 –
– How to screenshot on Snapchat without them knowing Android & iOS?
– How do you screenshot Snapchat without them knowing iPhone?
– How to screenshot on Snapchat without them knowing Android?
– How to screenshot on Snapchat without them knowing iOS?
– Snapchat screenshot hack
Screenshot on Snapchat Without Them Knowing ios and androidSo anyway enough methods now for trying at home ..
Now lets go to FAQ section where I have tried to answer many queries from people around the globe.


FAQ Section:

FAQ.1 — Question : Is it illegal to screenshot a Snapchat story?

“Under UK copyright law, it would be unlawful for a Snapchat user to copy an image and make it available to the public without the consent of the image owner”

It is illegal to screenshot Snapchat picture messages and pass them to others on without consent, the Government’s culture minister Ed Vaizey said anyone who who screenshotted a Snapchat message and shared it with others could be sued by its original sender – and face a prison sentence. ( Source News – independent.co.uk )
In-general, copyright is always held by the original content creator and hence if you capture it and repost it without their consent or republish it, you can be caught by the laws of most of the countries in world, however if you keep it to yourself without knowing anyone else on this earth! then its perfectly fine 😛

FAQ.2 — Question : Does Snapchat send screenshot notifications for stories?

Yes, there is a icon notification shown in the analytics portion of the app, the screenshot icons will be shown in different colors, to notify if the screenshot has been taken of your snap with audio, without audio or chat.
See the image below to understand kind of notifications sent by Snapchat

  • A screenshot has been taken of your Snap without audio
  • A screenshot has been taken of your Snap with audio
  • A screenshot has been taken of your Chat

Does Snapchat send screenshot notification for stories

FAQ.3 — Question : If you take a screenshot of an unopened Snapchat story is the user notified?

No. If you have not opened the story, no notification will be sent by Snapchat. And hence if you take screenshot of an unopened story using any of the above methods, the user will not get alert.

FAQ.4 — Question : Does Snapchat notify screenshots on chat?

Yes, if you take screenshot of a chat on Snapchat, notification will be shown on the shown in the analytics portion of the app of the person with whom you are chatting. See the image snap above which shows light blue color notification icon shown by snapchat.

FAQ.5 — Question : Why does my Snapchat say I screenshot when I didn’t?

FAQ.5.1 — Well this can be because your Snapchat app is misbehaving for some unknown reason. Try uninstalling and then re-installing Snapchat. Check if issue gets resolved.
FAQ.5.2 — Sometimes malware on your phone can do some dirty tricks like taking screenshots and saving them in the background without your knowledge  (i.e. Not in your camera roll or image section) If such case, try to run some anti-virus or anti-malware software on your phone.


Bottom line:

So considering user demands I have jotted down the tested and proven workarounds to Screenshot on Snapchat Without Them Knowing in 2020.
All above methods are working perfectly fine till they are patched by Snapchat! Till then enjoy!!
Now if you are using a special secret technique which you wish to share with me or other readers, please feel free to comment or send me a mail!
Important thing is that in case you are using some workaround apps to login using snapchat credentials, you carry lot of risk of getting permanently banned by Snapchat due to violation of terms and conditions, so think twice if it is really that important to try such unauthorized apps.
Hope this helps!
Cheers!!

10 EASY Ways to Screenshot Instagram Without Them Knowing

There are two major questions asked o Google today, first is How to take a screenshot on Instagram story? and second Does Instagram notify when you screenshot a story?
With over 800 million users ( As on September 2017 – Source ) any decision taken by Instagram (I mean FaceBook) is going to affect the worldwide user base and considering Snapchat as closest competition, the screenshot notification feature takes MOST IMPORTANT DECISION precedence in coming future.
So, till now thousands of people besides me have asked at least once to their friends to screenshot their Instagram story just to find out if Instagram notify when you screenshot a story? Well its just to make sure of I get notified when someone screenshots! So that I can continue on screenshotting other peoples Instagram story and not have to worry about them knowing 😛

INDEX

Take a Screenshot using Mobile Phone Android & iOS 1) Using the Airplane Mode Jump to Topic
2) Using Instagram Story Saver App Android Jump to Topic
3) Using Instagram Repost App iOS Jump to Topic
3.1) Use a Screen Recording facility of iOS11
[For Apple iPhone, iPhone X, XS, XS MAX and XR, iPad, or iPod touch] works on Instagram direct to capture story & photo
Jump to Topic
4) Using mobile camera Jump to Topic
Desktop computer or Laptop 5.1) Using Instagram Website Jump to Topic
5.2) Using Chrome IG Story Browser Extension Jump to Tpoic
6) Use Instagram URL to download – Using DownloadGram Jump to Tpoic
7) Use Instagram Source code to download photos Jump to Tpoic
8) Download photos and videos using external website Jump to Tpoic
9) Download complete Insta feed in a single GO Jump to Tpoic
iPhone users 10) iPhone users – How to download insta photos? Jump to Tpoic
FAQ Section 1) How to see who screenshotted your Instagram story?
2) When do I recommend to take screenshot on Instagram?
Jump to Tpoic

Following were the highest searched queries on internet during the year 2017!

— Can you see who screenshots your Instagram story?
— Does Instagram notify when you screenshot a story?
— Can people see if you screenshot Instagram story?
— Can you see who screenshots your Instagram story?
— Can someone tell if you screenshot their Instagram?
— How to screenshot Instagram stories without them knowing?
It was somewhere during January 2018, the experimentation to show the Screenshot Notification to other users if someone takes a screenshot of their story was conducted by Instagram team, the experiment continued till June 2018. During testing the some of the selected users were getting a warning that the next time they take a screenshot of a friend’s story the friend will be able to see it, as shown below ( Source )
With this proposed change, if someone takes a screenshot of your story, Instagram will display a kind of asterisk “*” symbol in front of the name in the list of people who watched the story. Further it will display a warning in App to you too, telling that, this capture information has been shown to the story’s author.
As you can see in the image below – The warning displayed in the app makes it clear that “the next time you take a screenshot of a story, the person who posted it will be notified.”
Just to tell you that Instagram’s also has improved this January to display whether or not a person is online in the private messaging area as “active now”, “active yesterday” and “online for x hours”.

Good bye freedom to screenshot IG stories. 💔 Thank you, Instagram for the warning. pic.twitter.com/y0pEaVR0Jq
— mulan (@__cajb) February 8, 2018
And

PSA: How you get notified on Instagram when someone took a screenshot of your Stories pic.twitter.com/Iua2QeyskF

— iz reading On the Edge of Scandal (@readbyher) February 11, 2018

Instagram will now notify you of person who took a screenshot or screen recording of your story. 🙊 pic.twitter.com/RBJHeiQtYV

— ᜋᜒᜃ (@mkrsltn) February 8, 2018


does instagram notify when you screenshot a story
Reference for creating above pic is taken from this tweet
However later it is clarified that ( Source Aug 2018 story )

Instagram will no longer notify people when you screenshot their stories.

So after the pilot testing of notification feature informing other users when their Instagram stories were screenshotted, Instagram has finally decided not to include it 🙂
So now you are FREE to screenshot Instagram stories without knowing them 🙂
This is the same feature that Snapchat has utilized over years, but Instagram looks dived down in a different direction to retain or increase the user base.
Well you are FREE to watch the stories again and again within 24 hours, and the original creator is unable to see who and how many times have watched the story. Of course, he or she can always still see who has watched her story by swiping up.

Can people see when you screenshot instagram stories or posts?

YES, But ONLY FOR PRIVATE DIRECT MESSAGES. please note and remember that whether for Android or iPhone ( iOS ) when someone takes a screenshot of a Private direct message screenshot – a warning notification will still be sent ( Source ). This feature is part of Instagram since November 2016.
When you take screenshot of any Private direct message story or photo, the following notification appears: “(user) generated a screenshot”.
This is what the social network says about Private Direct Messaging:

“After you send a disappearing photo or video to someone, you’ll see the status of the message (example: Delivered, Opened, Replayed, Screenshot) as part of your conversation in Direct. For group conversations, tap where it says the status of your message to see its status with each person in the group individually.”
Using iOS11 screen recording is the best solution to record IG direct stories, Jump to topic

How to screenshot Instagram stories without knowing them?

Although as of today the feature is taken back! there are chances to pop it again due to privacy reasons or whatever reasons!
So best way is to try and learn alternate methods which will allow you to capture a screenshot of Instagram stories without knowing them.
First of all why people want to take a screenshot (Print Screen) of an Instagram Story?
Well some reasons are legitimate, some not so much 😛
Reasons may be to capture a lovable memory of your friend or share it across family and friends!
But if this feature is enabled like snap-chat, then it will be difficult to justify a  reason for taking a screenshot! Fell like moral policing!
So here are some of the workarounds to take a screenshot of Instagram Stories without getting caught 🙂


FOUR Methods to take Story screenshot (Print Screen) from your phone

1) Using the Airplane Mode

airplane mode screenshot instagram
This is the most common sense trick used over years by the Snapchat users (Note: Snapchat has now blocked this method), which I have tested and still it works on Instagram.
1. Open the Instagram Story [Allow it to load completely]
2. Turn on Airplane mode [This turns off WiFi, BT, Data connection]
3. Take a screenshot of Instagram story
For Android phones – Press the Power + Volume down buttons simultaneously to take a screenshot
For iOS users –  iPhone X, XS, XS MAX and XR = Press the Left hand side button + Volume-Up button the right simultaneously. For iPhone users press Home + Power button simultaneously to take a screenshot ( Read detailed guide on iPad/iPhone here and iPhone X here )
4. Close Instagram
5. Switch off the Airplane mode
Go back to Index


2) Using the Instagram Story Saver App for Android

Instagram Stories - Story Saver for Android
1. Download the Story Saver for Instagram for Android from App Store [ Free Download link ]
2. Open the Story Saver App & Login using Instagram credentials.
3. You wil see your Instagram Stories feed in the form of a list. (See snap shots above)
4. Tap on a user to select and it will open a grid of their stories.
5. Tap on desired thumbnail and you’ll get popup of three options: Repost, Save, and Share.
6. Tap on Save and the image or video will be downloaded and saved to your Gallery.
Go back to Index


3) Using the Instagram Repost App on iOS

Instagram story screenshot on iOS Repost Story app
1. Download the Instagram Story apps on iOS App Store for iOS devices [ Free Download link ]
2. Open the Story Saver App & Login using Instagram credentials.
3. You will see see a UI similar to the Instagram app. (See snap shots above)
4. Tap on a user to select and it will open a grid of their stories.
5. Tap on desired thumbnail and and then from the three dotted menu button, select the Save option.
6. The photo or video will be saved to your Camera Roll.
Go back to Index


3.1) Use a Screen Recording facility of iOS11

[For Apple iPhone, iPhone X, XS, XS MAX and XR, iPad, or iPod touch]

1) Go to Settings > Control Center > Customize Controls, then tap next to Screen Recording.
2) Open Control Center and Tap Record, the the three-second countdown begins.
Note :  To capture sound while you record, press deeply on and tap Microphone Audio.
4) To stop recording, open Control Center and tap . Or tap the red status bar at the top of your screen and tap Stop.
5) Your screen recording gets saved automatically to the Photos app.

This method works even on Instgram Direct 🙂

Photos or videos captured via iOS11 screen recording in Instagram Direct do not let the sender know or notification sent by Instagram.
Go back to Index


4) Using other mobile camera!

If you don’t want to download any third-party apps and use login credentials, you can go for this easiest stupid workaround!
Yes use another mobile phone to take a photo of your phone with the Instagram Story!!
I know you will not get great capture, but at least it will get the job done!!!
Go back to Index


5) TWO Methods to take Story screenshot from your Desktop computer or Laptop ( Print Screen )

1. Use the Instagram Website

Although like FaceBook, Instagram is not really the most popular website or application which is used on desktop computers, but  when you want to take a screenshot secretly and in high resolution, going to desktop or laptp will be a good option. Here is how to do it.
Instagram story screenshot Using the desktop Website
1. Go-to the Instagram.com website from your Laptop or Desktop computer.
2. Login using Instagram credentials.
3. You can now view your feed, post photos, and even view Instagram Stories.
4. Open the Instagram Story.
5. Take a screenshot using proven methods!
6. Save the photo to local drive. Only you will not be able to download the video! but at least a photo.
Note : The Instagram website works on mobile as well as desktop browsers, and if you take a screen shot inside browser, no notification can be generated or sent.
My detailed guide on how to take screenshot on Windows PC – Read here
My detailed guide on how to take screenshot on MAC  – Read here
Go back to Index

2. Use the Chrome IG Story Browser Extension

The first option shown above can allow you to capture a screenshot on desktop or laptop, but what if you wish to capture a video story? then simply use a chrome extension called as Chrome IG story –
Instagram Stories download using Chrome IG Story Extension
1. Go-to the Chrome IG Story and Download extension for Chrome.
2. As soon as you open Instagram the extension will activate the privacy mode, so other users will not know that you have seen their story!
3. Just press on IG Story extension icon on the chrome app tab and you will see the feed list with Download icon (see the image above)
4. Download instantly all the available stories in a Zip file (including all videos)
5. Take a screenshot using proven methods!
6. Save the photo to local drive. Only you will not be able to download the video! but at least a photo.
Go back to Index


6) Use Instagram URL to download – Using DownloadGram

Step-by-Step guide to download photo from Instagram
1) Go to any picture you want to download from Insta
2) Now click the three dots in the top right corner, you will get options to share the photo.
3) Select “Copy Link” option to get the picture URL link.
4) Go to DownloadGram website, and Paste the link  – Done, downloadable version of the post will pop up which you can save straight to your camera roll.
Go back to Index


7) Use Instagram Source code to download photos

How to Use Instagram Source code to download photos?
Step-by-Step approach (Refer above image which shows all steps together)
1) Login to Insta from your laptop or PC.
2) Open the photo you want to download
3) Right click on photo and you will get menu as shown in above info-graphics, select “Inspect”
4) On right hand side of screen you will see new window which is called as developer window, simply click on the RED small circled black colour arrow to expand the image element (its small Black triangular arrow in front of “<div class=_____”)
5) Now you will see big image URL, click on the image url and you will see small pop-up showing the image itself and its URL, copy that URL and past into new browser tab to see the image 🙂
6) Done, right click on image and save to local disk.
Go back to Index


8) Download photos and videos using external website

Instagram Downloader Photo and Video
Step-by-Step approach (Refer above image which shows all steps together)
1) Login to Insta from your laptop or PC.
2) Open the photo you want to download
3) From the top bar, copy the Instagram URL
4) Go to https://www.10insta.net/ website and paste the URL into download window, press “Download”
5) Your image or video will be displayed below, press “Download” below the image or video to get it to local disk
Go back to Index


9) Download complete Insta feed in a single GO

Applicable to : PC, macOS and Linux.
You can use an external program available on 4K Stogram website to download Instagram accounts, hashtags and locations. ( Go to their website to download the program – Link )
Once you install 4K Stogram program you can Viewer and Download Instagram stories, hashtages, accounts, and locations too, at simple one click.
Its simple to subscribe to anyone’s feed, or give it specific hashtags and the program will keep downloading things as and when update happens, only remember that it will eat up your device local hard disk space.
As on Sept 2018, this app is free to download and use.
Go back to Index


10) iPhone users – How to download insta photos?

Using Regrammer App – Download it here
Step-by-Step guide on iPhone, iPhone X, XS, XS MAX and XR
1) Download Regrammer App & Install
2) Go to any picture you want to download from Insta
3) Now click the three dots in the top right corner, you will get options to share the photo.
4) Select “Copy Link” option to get the picture URL link.
5) Now open Regrammer, and the copied URL link be automatically fetched into the app. The picture will be available for Preview and confirmation.
6) Select to download it directly to your Photo Roll.
Go back to Index


FAQ Section

FAQ.1) How to see who screenshotted your Instagram story?

As on now you can only see who’s looking at your story. ( source Instagram site )
To see this information, all yo have to do is — Open your story and swipe up on the screen.
You will see a view counter and the names of the people who viewed it at the bottom of the screen.
However if you want to see who screenshotted your Instagram story? then
— Go to Stories main page — You will see your list of public post — now look for the pinwheel-shaped camera shutter icon next to the name of an account.
[ there is not direct notification or message, but you can check it manually time-to-time ]
ABOVE feature mentioned in RED color text is not available as on Sept 2018, since that was a limited experiment by Instagram

6.2) When do I recommend to take screenshot on Instagram?

This is social media and sometimes we do mistakes to share some intimate photos!
Now if this has happened without your explicit permission and you want to take legal actions then you may first need to take a screenshot or other record of the post and then check the local laws of the country or state.
Most of the local law enforcement authorities have their cyber crime cell to handle such cases.
These organizations provide information and resources for people who are being harassed or harmed online:

  • Cyber Civil Rights Initiative: Information and resources about nonconsensual pornography.
  • Without My Consent: Practical advice for anyone experiencing online harassment.
  • Love Is Respect: Resources for teens to prevent and end abusive dating relationships.

Please do read complete guidance article on Instagram official website here.


Bottom Line

Although Instagram has clarified that Instagram will no longer notify people when you screenshot their stories.( Source Aug 2018 story ) considering all the privacy laws being enforced across Europe and USA, Soon or later you will face this issue of Instagram notification when you screenshot a story.
So better to keep the guide given above on “How to Take Screenshots of Instagram Stories Without Getting Caught” ready and handy 😛
Although I strongly suggest to use your moral compass to save any Instagram Story, I mean do not think evil, do evil!
Remember that Stalkers and creeps may be one of the reason testing the notification feature by Instagram during Feb 2020 period!
Hope this helps!
Cheers !!

9 EASY ways to Take Screenshots (Print Screen) on Chromebook?

Today there are over 25 million Chrome OS users and more being added each day, wondering on the missing ‘Print Screen’ button? and Where do the screenshots go on a Chromebook? So here is a simple guide on how to take a screenshot on a Chromebook or Chromebox or any Chrome OS device.

Don’t worry, its fairly simple to take a screen shot.

How to Take Screenshots (Print Screen) on Chromebook?

On Chromebook use ctrl + window switch key, On Chromebox use ctrl + F5 to take a full screenshot and use additional Shift key to take partial screenshot.

INDEX

1 Hot to take FULL screenshot Using a keyboard on Chromebook? Jump to Topic
2 How do you take a cropped screenshot on a Chromebook? Jump to Topic
3 Chromebook Tablet mode – Using the side buttons to capture screen Jump to Topic
4 Using a chrome extension to get screenshot Jump to Topic
5 Using a stylus to get screenshot Jump to Topic
6 Use built-in menu of Chrome OS laptop running Chrome OS Jump to Topic
7 Use Screenshot Apps Jump to Topic
8 Use Google Assistant – Using Voice commands Jump to Topic
9 Using the Pixelbook Pen Jump to Topic
10 OTHER TIPS AND TRICKS
10.1 How to paste screenshot on Chromebook?
10.2 How to edit screenshots?
10.3 Where is the switch window button on Chromebook located?
10.4 Where do the screenshots go on a Chromebook?
Jump to Topic
11 Chromebook Screenshot Not working
There can be multiple reasons if the screenshot is not working, I have tried to provide compiled information on what can be the probable reasons and solutions to resolve the issue.
Jump to Topic

1) Using a keyboard on Chromebook

To capture your entire screen

Hold down ctrl + || window switch key
Applicable for : Pixelbook, ASUS Chromebook Flip, Samsung Chromebook Pro, Dell Chromebook 11, Acer Chromebook Spin 11, Acer Chromebook 15, Acer Chromebook R11, HP Chromebook 13,14, google chromebook
How to capture your entire screen on Chromebook
Back to Index


2) How do you take a cropped screenshot on a Chromebook?

Applicable for : Pixelbook, ASUS Chromebook Flip, Samsung Chromebook Pro, Dell Chromebook 11, Acer Chromebook Spin 11, Acer Chromebook 15, Acer Chromebook R11, HP Chromebook 13,14, google chromebook
Hold down ctrl + shift + || window switch key.
Now the Chrome’s cursor will be shown like a cross-hair (temporarily).
Simply press and hold on the trackpad and drag your cursor to select the area of the partial window to capture then release the trackpad or mouse button.
How to capture Part of Screen on Chromebook

Now you will get a pop-up notification to open the saved screenshots

You can click on the pop-up notification to see the screen shot or choose in between the options at the bottom of the screenshot notification window will allow you to copy the image, and / or annotate it.
Chromebook screenshot pop-up notification

While using an external keyboard

Applicable for : Pixelbook, ASUS Chromebook Flip, Samsung Chromebook Pro, Dell Chromebook 11, Acer Chromebook Spin 11, Acer Chromebook 15, Acer Chromebook R11, HP Chromebook 13,14, google chromebook
External keyboard option is available while you use the Chrome-powered desktop (also known as a Chromebox) or when you have plugged in an external keyboard into your Chromebook.
In both cases, the keyboard mostly uses a standard function key row instead of Chrome’s dedicated button row.
In which case the function keys do the same job as Chromebook top row buttons, and hence F1 goes back, F2 goes forward, and F5 button works as the “switch window” button on standard keyboards.
And so the screenshot command functions using Ctrl + F5.
Use the key combinations as ctrl + F5 and ctrl + shift + F5, respectively.
Capture Screen using external keyboard on Chromebook
Back to Index


3) Chromebook Tablet mode – Using the side buttons to capture screen

Now while you are using the Chromebook on a 360-degree hinge like a Pixelbook in TABLET mode and want to capture the screen, then what?
I am sure you will not like to swing the keyboard back around simply to press keys and take a screenshot!
In such a case, you can simply take a screen shot by pressing the
power + volume down keys simultaneously.
These keys are located on the side of Chromebook, this works exactly like you do on your Android phone.
However using this workaround, you will only be able to capture the entire screen 🙁 for capturing cropped screen, you will have to use the keyboard!
Note : to use this method you must be running Chrome OS 64.0.3282.134 or later
Chromebook Tablet mode - Using the side buttons to capture screen
Back to Index


4) Using a chrome extension to get screenshot

Since the built-in image capture and editor tools for Chrome OS are a bit cumbersome, I am suggesting some alternatives like using apps and extensions on Google’s Chrome Web Store to help adding extra flavor on functionality.
Here are my best picks:
You can try using a chrome extensions like Nimbus Screenshot & Screen Video Recorder, which provides more power to capture video too along-with the static screen shots.
As the name implies, Nimbus has additional capabilities like instant uploading and sharing, customization of hot keys, managing screen shots, adding watermarks and mainly capture screen (entire or fragment) selected or scroll.
Download the Chromebook screen capture alternative extension Nimbus Screenshot & Screen Video Recorder
Chromebook screen capture alternative Nimbus Screenshot & Screen Video Recorder
My second pick is Clipular Chrome App which allows you to save, edit, and annotate screenshots. Best part I like is that it can also save screenshots directly to Google Drive!
Third choice is FireShot Chrome App which can save an entire page as an image without multiple screenshots.
Fourth App choice is File System for Dropbox best for you to put things into Dropbox folder in the standard file browser. Just copy your screenshots over from the Downloads folder.

Final and best choice is Screen Capture Extension By Google ( download link )

Now this is the Google-made, Screen Capture extension which will assist you taking a screenshot of your browser window for the visible part of a tab, the whole page, or a user-defined region.
It allows you to scroll up or down while defining a region, so your Chromebook’s small screen isn’t a problem.
This extension also intelligently filters out the floating objects during scrolling, so you capture the image of that object only once. After your screenshot is taken, you can edit it immediately in the browser.
Save To Google Drive ( bonus extension suggestion by me!)
Save to Google Drive extension will let you save the image directly to your Google drive. This is specially useful when you are using the Chromebook in guest login mode, making you risk free of loosing the screenshots after logout.
Back to Index


5) Using a stylus to get screenshot

If you have a Samsung Chromebook Plus or Pro or sprung for the Pixelbook and its pen, you have an additional option available.
First remove the stylus from the side of tab. Then from the Stylus tool menu (which is available at the lower right corner of screen) select “capture screen” to capture the whole screen, or select “capture region” and draw a selection using pen to capture just partial area of the screen.
See below screenshot of available stylus menu from stylus tools.
Using STYLUS for Screen capture on Chromebook
Back to Index


6) Use built-in menu of Chrome OS laptop running Chrome OS

Here is Step by Step approach to use built-in menu of Chromebook to take a screenshot
1) Log on to your Chrome OS laptop.
2) Open the Image or Photo or Video Story that you wish to screenshot.
3) Now click Gear icon displayed at the bottom-left corner of the desktop screen. (See image below)
4) You will get list of menu options, select over the Accessories menu to get submenu of Screenshot (See image below)
How to Take a Screenshot in Chromebook laptop
5) You will get options like, Grab the whole desktop / Grab the current window / Select area to grab.
6) Select desired option (Radio button) – If you select grab area, you can select an area manually by dragging the mouse over it.
Tip : Uncheck the Include pointer checkbox, this will not display the mouse pointer in the screenshot 🙂
7) Finally you can click Take Screenshot from the bottom-right corner to capture the screen.
Back to Index


7) Use Screenshot Apps

Another alternative is to use the screenshot apps like:

  • Awesome Screenshot – download app
  • Lightshot – download app

Back to Index


8) Use Google Assistant

Using Voice commands

This is the most simplest method I have ever used!
All that you have to do is invoke your friend the Google Assistant.
Give a voice command “Okay Google, take a screenshot” and the Pixelbook will take the screenshot for you as well as prompt you to open the screenshot in any of the supported apps installed on Pixelbook.
If you don’t use any of the App to open it, screenshot will automatically get vanished after few seconds and will not be stored.

Using Keyboard

Alternatively you can use the dedicated Assistant key on your Pixelbook.
And then type in “take a screenshot”. and the Pixelbook will take the screenshot for you as well as prompt you to open the screenshot in any of the supported apps installed on Pixelbook.
Similar to the voice command, the screenshot is not saved unless you do so using an app.
Back to Index


9) Using the Pixelbook Pen

Your Pixelbook Pen, if you have purchased this accessory, can help you take screenshots From the Pixelbook pen menu that appears on the drawer, select:
Capture screen – to take a screenshot of the entire screen
Capture region – to take a screenshot of an area of the screen.
Back to Index


10) OTHER TIPS AND TRICKS

10.1) How to paste screenshot on Chromebook?

While you work on Windows and use the “Print screen” button, the screen capture automatically gets copied into the windows clipboard. Thus you can simply go to any other application like word, PowerPoint or paint and paste the screenshot from memory.
However unfortunately the Chrome OS doesn’t save screenshots as copied images to memory (clipboard)
So to copy the screenshot to clipboard on Chromebook for using say into an image editor, look at the notification window above the system clock and click on Copy to clipboard button, now press ctrl + V to paste it to another application.

10.2) How to edit screenshots?

You can use the Chrome’s built-in image editor to edit the screenshots, which allows modifications like crop, rotate, brightness adjustment etc.
Steps to follow for editing image –
Step 1: Open the Downloads folder, Select the screenshot image you wish to edit and double-click it to open in the image viewer.
Step 2: You will see a pen icon  in the bottom right corner of the window, click it to enter in the image editing mode.
Step 3: Use the available tools like crop, rotate, and brightness adjuster which will be available in the edit mode (located at the the bottom of the window.)
Step 4: Edit the image as desired using all tools, once done simply click the pen icon to finish your edits.
Note : This built-in editor will overwrite on original image, I mean you do not have any save-as option. So I suggest to make a copy of original image before editing it.

10.3) Where is the switch window button on Chromebook located?

The Switch window button is represented by multiple squares and typically located in the topmost row, in between the
Full-screen and Brightness down buttons.
However please note that the keys referenced above may appear in different locations depending upon the manufacturer and/or model of your Chromebook.

10.4) Where do the screenshots go on a Chromebook?

By default, your screenshot image files on Chromebook are locally saved to the “Downloads” folder and available also in offline mode. The images in the download folder are automatically labeled with the date and time they were recorded.
So simply go to the downloads folder, and open up the screenshot or edit it or copy it to another folder.
The extension of screenshot image file is PNG. So your image file will looks something like “Screenshot 2020-08-25 at 4.21.18 PM.png” by default, so if you wish, you can always rename it to new name.
Tip while using the guest account on Chromebook
While you have logged in using the guest account, the “Downloads” folder is emptied after the guest logs out, so all those screenshots will be deleted.
So to preserve the screenshots during guest use, make sure you copy the files to an SD card or upload it to Google Photos or Google Drive before you logout from guest account.
Back to Index


11) Chromebook Screenshot Not working

There can be multiple reasons for screenshot not working on your chromebook, here are some suggestions to check things to make it happen.

11.1) Wrong keyboard and language settings

If the ctrl + || window switch key combination is not working, one of the possible reasons it to have wrong keyboard and language settings, which changes the behavior of keys.
Go to the keyboard settings and make sure that the box is Unchecked for “Treat top-row keys as function keys.” With the function key box checked, you may get the error specified above.
Please refer to the guide on 
— How to Choose keyboard language & special characters on Chromebook? — See official Ref guide here
— How to Change language on Chromebook? — See official Ref guide here

11.2) Screenshots do not work if you have a context menu open.

11.3) Error message — “An error occurred Failed to save screenshot”

Trial 1 — Please check if the hard disk drive is full, you may not have FREE space left for saving the screenshots
Trial 2 — This can be an access (authorization) issue. Log out and try the screenshot using Guest mode. If that works then contact your Admin or check your accessibility settings.
Trial 3 — Check your default download directory.
chrome://settings-frame/ > Show Advanced Settings > Downloads: > Download Location: > Downloads
Go into settings and change the directory to the pre-configured download directory on your chromebook.
changing default download directory to solve screenshot problem in chromebook
Trial 4 — Enable an extension called: ‘Save to Google Drive”.
Trial 5 — Sometimes when the Downloads are set to Drive, then Chromebook will try to save it to Google Drive, and if you have network connection problems, then it will throw this error. So try changing settings to the local Downloads folder and see if it works.
Trial 6 — if you are using a micro-sd card or USB, reasons can be the download folder is USB drive and you have a faulty USB port, faulty drive, or not getting enough power to the medium, due to which Chromebook is unable to save it to the specified drive. Again in such case changing the download folder by removal of micro-sd card and / or USB would work.
Trial 7 — If you have tried all the above solutions and still problem persists, as a last resort you can try Reset Chrome settings to default  — See official Ref guide here
Trial 8 — Reset your Chromebook hardware, Remember that this is to be tried as a last resort ONLY if you do not have any option left and you have tried all above trials. — See official Ref guide here

WARNING:
Files are saved in the ‘Downloads’ folder by default but they are temporary and can be deleted when you run low on space. If this happens, you will see the warning:
“Caution: These files are temporary and may be automatically deleted to free up disk space.”
They will also be removed when you do a powerwash, a recovery, have profile errors, or forget the password you first used to when adding your profile.
Powerwash is — Reset your Chromebook to factory settings — See official Ref guide here

How to Take Screenshots (Print Screen) on Chromebook

How to take a Screenshot on Chromebook?

Well you have bought a HP Chromebook 11 or Samsung Chromebook Series 3 which surely are cheap alternatives to Windows or Mac laptops.
However cheap alternative will have its own pros and cons, like Chromebook do required a Wi-Fi connection to do most of the operations.
Or you will not find a simple Print Scr Key! Which helps in taking a screen shot like a breeze!
So my pictorial guide above will surely help you learning ways to take a screenshot on Chromebook.
If you have liked this guide, do put in comments below, since this website is simply dedicated to taking screen shots on various gadgets, it will help me understanding if I shall do such more websites on particular subjects.
Cheers !!

  • « Previous Page
  • 1
  • 2
  • 3

Jumbo discount offer

Our site is hosted on SiteGround

Get Mega Discount on SG Hosting

Amazon Prime

What's New on Amazon Prime this Week?

HowzBuy.com

About us
Contact us

JOBS

Apply Now

Legal

Privacy Policy
Terms & Conditions

Test Videos

Chipolo video

Archives

Copyright © 2025 · News Pro Theme on Genesis Framework · WordPress · Log in

This website uses cookies to improve your experience. We'll assume you're ok with this, but you can opt-out if you wish. Cookie settingsACCEPT
Privacy & Cookies Policy

Privacy Overview

This website uses cookies to improve your experience while you navigate through the website. Out of these cookies, the cookies that are categorized as necessary are stored on your browser as they are essential for the working of basic functionalities of the website. We also use third-party cookies that help us analyze and understand how you use this website. These cookies will be stored in your browser only with your consent. You also have the option to opt-out of these cookies. But opting out of some of these cookies may have an effect on your browsing experience.
Necessary
Always Enabled
Necessary cookies are absolutely essential for the website to function properly. This category only includes cookies that ensures basic functionalities and security features of the website. These cookies do not store any personal information.
Non-necessary
Any cookies that may not be particularly necessary for the website to function and is used specifically to collect user personal data via analytics, ads, other embedded contents are termed as non-necessary cookies. It is mandatory to procure user consent prior to running these cookies on your website.
SAVE & ACCEPT