I was pretty familiar with using my iPhone, and when I wanted to take a screenshot, simple known way was to press the power and home buttons simultaneously. But with my New iPhone X with edge-to-edge display that stretched across the face of the iPhone X did not have any Home button at all? So I had to learn new way of capturing the screen for sharing moments from my videos, game scores & chats from Twitter and FB. With introduction of latest iPhone XS, iPhone XS Max, and iPhone XR series it will be interesting to know, how exactly do you capture the screen now?
Simply all the latest XS series also do not have home buttons, hence they will also follow the same new button combo to take screenshots.
Well I found that its pretty simple and intuitive operation and jotted down the step-by-step guide for you.

How to take a screenshot on iPhone X, iPhone XR, iPhone XS, or iPhone XS Max?
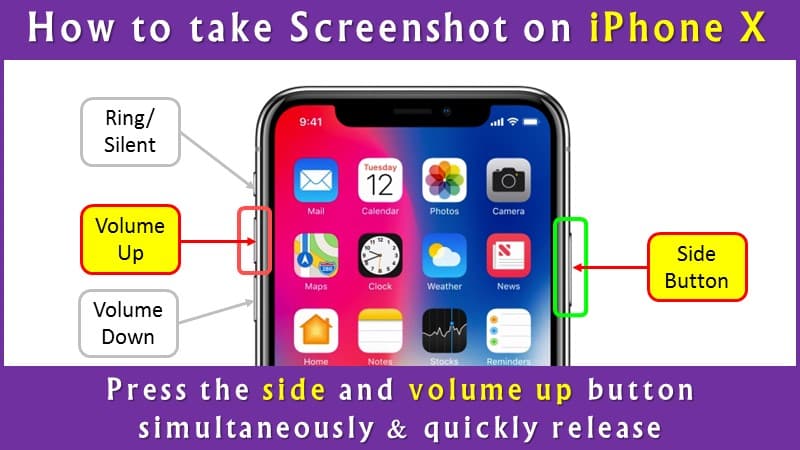
Press and hold the Side button on the right side and Volume Up button on left side of iPhone simultaneously, then release them quickly to get a screenshot on iPhone X (iPhone 10), iPhone XS, or iPhone XS Max and iPhone XR.
Applicable to : iPhone X, iPhone XS, iPhone XS Max, and iPhone XR
1) Open the App or video or game console or Social network window (chat) you want to capture.
2) Set up everything on the screen exactly the way you want it for the screenshot.
3) Press and hold the Side button (previously known as Sleep/Wake button) on the right side and Volume Up button on left side of iPhone X, iPhone XS, or iPhone XS Max simultaneously, then release them quickly.
Note : This is where it replaces the Home button step from previous iPhones.
4) The screen will flash white and you will get confirmation of camera shutter sound (if your sound is enabled).
5) The screenshot thumbnail will appear at the bottom left corner of your screen.
6) If you wish to edit the image snap, or share it to an iMessage conversation, WhatsApp, Slack or mail then simply Tap on the image. You can choose whether to save the screenshot to your Camera Roll or delete it.
6.1) Or simply swipe it to the left and it will disappear from the display.
6.2) If you don’t dismiss the screenshot by swiping to the left, it will disappear automatically after a few seconds and save to your camera roll.

Taking screenshots with AssistiveTouch
Applicable to : iPhone X (iPhone 10), iPhone XS, iPhone XS Max, and iPhone XR
Using AssistiveTouch, you can take a one-handed screenshot anytime by tapping on the Assistive Touch button followed by the screenshot button, here is how to do it on your iPhone.
Step-by-Step Guide
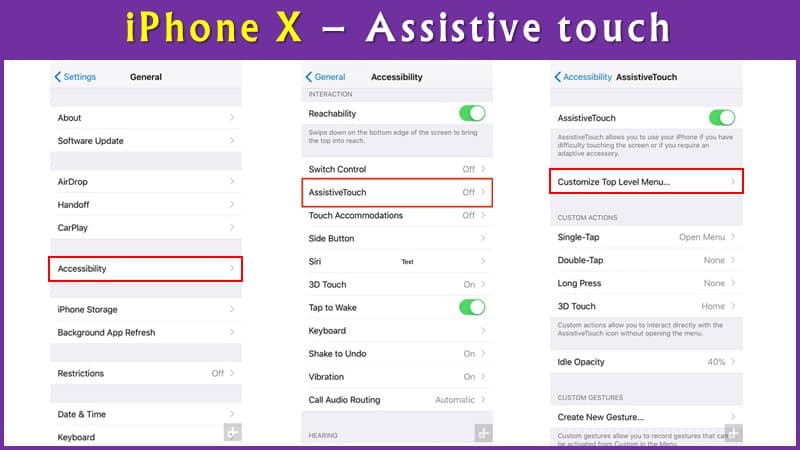
1) Turn on AssistiveTouch — Settings > General > Accessibility and toggle AssistiveTouch
You can perform more complex touch-based actions, including pinching, activating 3D Touch, or multi-finger swiping using AssistiveTouch feature.
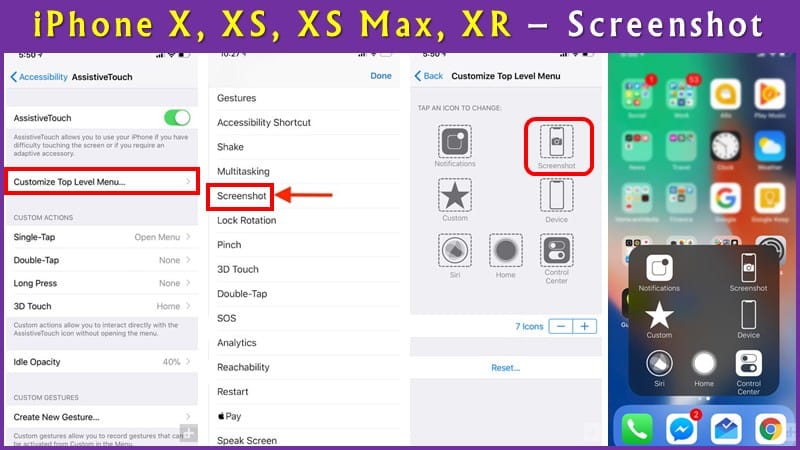
2) Select actions on the AssistiveTouch menu — tap Customize Top Level Menu
Here you can tap an icon to change it or add an additional one by pressing the plus sign icon in the bottom right-hand corner.
A list of different choices will come up and you can scroll down to add Screenshot.
You can choose the menu to open up through single-tap, double-tap, long press, or 3D touch.

3) Capture the screenshot —
3.1 — If you have set Open Menu, then press the AssistiveTouch button to open the menu and tap the Screenshot option.
3.2 — If you have chosen only AssistiveTouch to perform screenshots, then you can tap on the button.
With either of above settings, your iPhone display will briefly flash white with camera shutter sound, to indicate screen capture worked successfully.
4) View, edit, and share the screenshots —
Now the things work perfectly as I have already described in the beginning.
AssistiveTouch, photos will be saved the same way as with screenshots taken using physical buttons.
By tapping on it, you can crop, magnify, or mark up the image, and then share it on social media or text messages.
How to record your iPhone X (iPhone 10) or iPhone XS, XR screen?
Well now that you have learned to take a screenshot on your new iPhone XS then its easy task to further learn to record the screen too, I mean video recording of screen.
Step-by-Step approach explained
1) Settings >> Control Center >>Customize Controls >> Tap the plus sign next to Screen Recording.
2) You are ready to record phone screen now.
3) To start recording, simply open the Control center and tap the Round record button.
4) All your recordings will be saved in the Photos app on your iPhone.
Problems faced while taking a screenshot on iPhone X, XS, XR
When I got my hands on iPhone X the first time and learned to take screen snaps, I also learnt the fact that, the two buttons which generate a screenshot are placed almost in front of each other (on both sides), so ergonomically when I used to hold the phone for some other reasons it caused misfiring of screenshots without wanting!
Which means it was far too easy to accidentally get unintentional screenshots when getting the phone out of the pocket or bag or just picking it up off the table!
Or even I got nice screenshots of my alarm/clock app every morning I wake up! For every snooze, there’s a screenshot! 😛
Or while using the phone in landscape mode and trying to adjust volume, I got auto-screenshots, or turn the screen off, mostly during watching a video.
It was not really so much annoying and frustrating, but irritation for sure since I have to wait looking at the fading notification at bottom left corner or swipe it left to make it disappear faster!
And I was not shocked to see that there were many like me on this earth!
Just for info, see redditor mrqpa thread below –

So many days I was wondering on how to avoid accidental screenshots on iPhone X?
Unfortunately I could not find switch settings that can disable this feature or even could not locate any third-party solutions to remap the buttons or prevent the iPhone X from taking screenshots.
Luckily I came to know that with iOS 12 beta release ( source ), which is Apple’s latest operating system, they have released a fix to prevent accidental screenshots on the iPhone X 🙂
Update 19 Sept 2018: iOS 12 screenshot issue resolution
iOS 12 OS is available for download and Business Insider confirmed that issue of accidental screenshots has been addressed to a large extent with new iOS release. ( Source News ) what it means that accidental screenshot issue will also get addressed on all the latest 2018 iPhones, including the newly launched iPhone XS and XS Max, and the iPhone XR/
In latest beta update in iOS 12 the process of taking a screenshot remains the same, only refinement is done in the command registration process, hence if these two buttons gets pressed simultaneously and your device display is OFF or in sleep mode, then it won’t generate a screenshot. Well it will not completely eliminate the issue, which will still persist when I am using the phone for some other reasons and the screen is awake.
Specially remember that iPhone X has the Raise to Wake feature!
Anyway, this update only disables the screenshot function for a second or two when your iPhone is locked and asleep. May help me at least reducing some unwanted clutter of multiple pictures of my Home screen !
However I will need to wait till the final version of iOS 12 gets releases since I am not that expert user to dare downloading the Beta version and trying it upfront 😛 or even I do not have any intention to joint their developer or public beta programme.
[ Note : If at all you are willing to test the Beta version of Apple OS, you may like to join their Public Beta program by registering with your Apple ID – Click Apple site Sign Up page here ]
My workaround till the arrival of New iOS update!
Since I was not aware of arrival of bug fix from Apple, till that time I had my own workaround!
The first thing I learnt was to immediately delete each accidental screenshot as & when it’s taken, by tapping on the preview of the screenshot in the bottom left and Delete screenshot. (But again its annoying and painful)
Second thin I did was buying a phone case with stiff buttons, this surely helped me by making it harder to inadvertently active the screenshot feature, while it also gave nice protection for my iPhone X from any calamitous drops, which I inadvertently do!
But this is not an elegant solution, since it also spoils looks of my beautiful iPhone X and again if I want to take out my phone out of case, it generates a record, it takes a screenshot!
And the most stupid thing I tried is not holding the phone from top! Behavioral change !! Ouch .. it didn’t worked at all 😛 I can’t change myself at this age, may be apple has to change!
My suggestions to Apple to avoid accidental screenshot issue!
I know I am not an expert in this field, but I am a common man, I can really suggest what I feel appropriate.
Why not Apple provides an alternative method for taking a screenshot?
- Follow what many Android phones have since years! Simply stagger the power button and volume button, little study and expertise on User Experience (UE) is needed, that’s all? or using a common sense!
- Increase the delay time of holding the buttons simultaneously. (in line with Android)
- Why not using a three finger swipe down which is currently available on the Apple’s own iPad. What do you say?
- Another suggestion is simply add an on-screen confirmation of the screenshot, ask “Are you sure you want to take the picture?”
- Or even change it so that you need to hold down all three physical buttons on the phone to take a screenshot!
- When you drag left it saves the screenshot, extend the logic, just drag right to delete it (not a smart suggestion, but at least its a workaround!)
Bottom line
To me whoever says what! iPhone is the best!!
No matter once you fall in love with Apple, all minor issues get sorted out.
And well with beta iOS 12 release, it is seen that Apple do takes customer issues seriously (even after Steve!)
So best luck!
Enjoy!!
Cheers !!
Leave a Reply