• Amazon.com
  • Amazon.in
  • home
    • baby guide
    • HowzBuy.com

How to take a screenshot on Huawei Phone? P10 Lite, P10, P10 Plus, Mate 10 Lite

Huawei is known for their value for money products including smartphones, from budget to high end phones they have reached almost every part of the world. Having said that each manufacturer has his own specialty of features in their smartphones so as Huawei. So while you own a Huawei smartphone and want to take a screenshot or printscreen it is important to learn How to take a screenshot on Huawei Phone?
Here in this post you will learn the simplest method to the most advanced method of taking Knuckle screenshots which is specialty of Huawei smartphones!
So Huawei  has taken the most intuitive method into actual with use of knuckle to command the phone in an easy way, just read through to get the complete info.

How to take a screenshot on Huawei Phone?

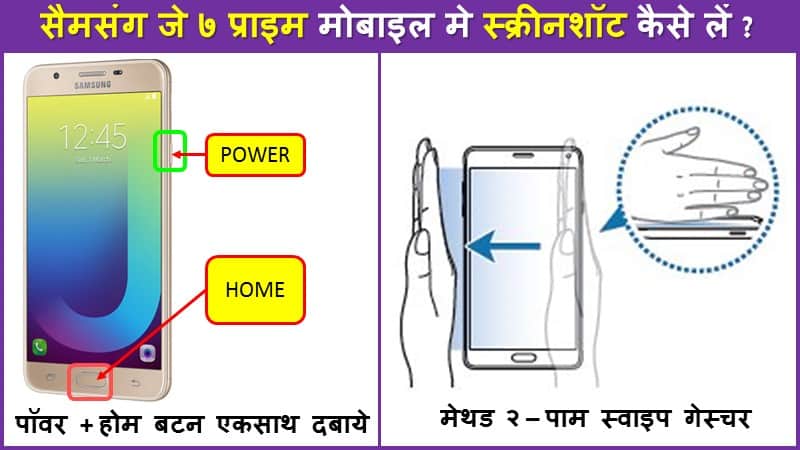
Simply press and hold the Volume Down and Power buttons simultaneously for just a few moments (2-3 seconds), with a flicker of screen Huawei device will generate a screenshot for you. Or if you own an advanced model, use your knuckle to take a screenshot using gesture feature.
So lets learn more magical methods of How to Take a Screenshot on Huawei Phones?

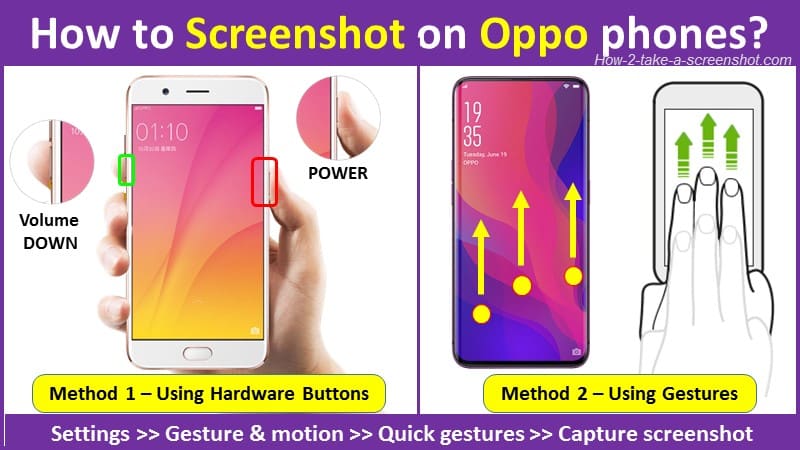
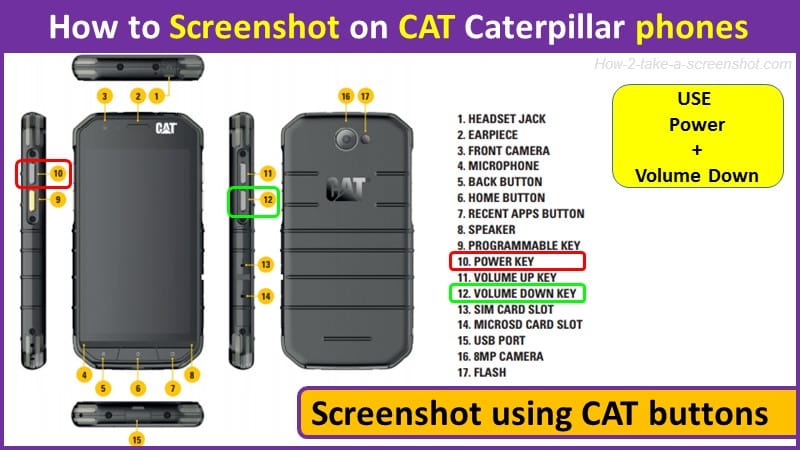
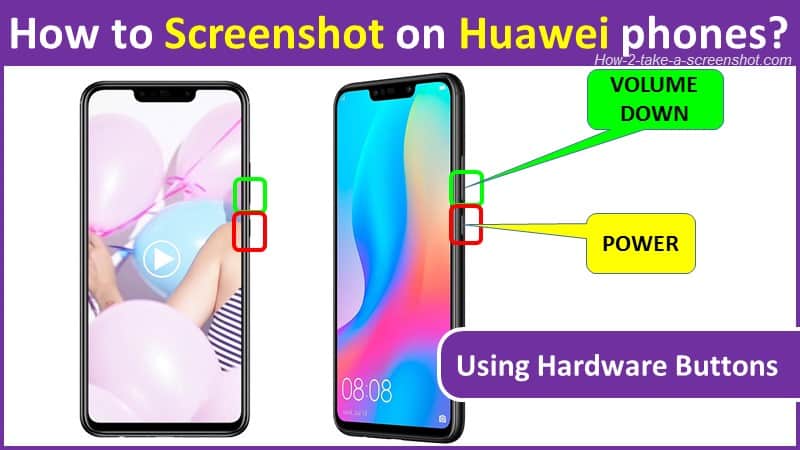
Method 1 — Using Hardware buttons, Basic Android method

Taking a screenshot (printscreen) is a feature that comes pre-loaded on the Android system, regardless the Android firmware version that is discussed.
Applicable models : Huawai Mate 9, Huawai P10 Lite, Huawai P10 and Huawai P10 Plus, Huawei Mate 10 Lite
1) Open the screen of which you want to take a screenshot, like a chat application Snapchat, Instagram or WhatsApp, even a window of web browser.
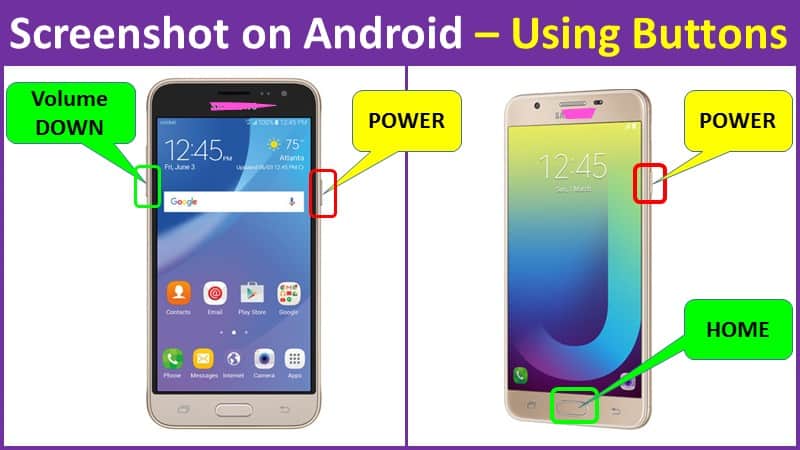
2) Locate the Volume Down and Power button both located on the right hand side of your Huawei smart phone.
3) Now to take a screenshot, simply Press and hold the Volume down and Power button button simultaneously for up to 2-3 seconds or till you hear the camera shutter sound indicating the screenshot has been taken by your phone successfully with an animation of screenshot.
4) The animation stays for a while and if you wish to edit it on the fly simply tap it to get editing options, where you can edit, save and share it immediately across social platforms, email it or do whatsoever you wish to.
5) If you do not select the animation, the screenshot has been saved to the device Gallery >> Screenshots folder.
6) Go to Gallery folders and edit or share photos across social network like facebook, twitter,etc.,
How to Screenshot on Huawei phones using buttons?

Method 2 — Using Hardware buttons, for taking a scroll shot

Applicable models : Huawai Mate 9, Huawai P10 Lite, Huawai P10 and Huawai P10 Plus, Huawei Mate 10 Lite
Scrollshot is needed when you wish to capture a long scrolling screen, might be a web-page of lyrics or a chat with your friend, a page of book, something that won’t fit in one go on the mobile screen and hence screeshot it once is a tedious task.
But with your Huawai phone feature of scroll shot, you will be able to take a long screenshot easily.
1) Go to the screen of which you wish to take a long screenshot or I can say a scrolling screenshot.
2) Use standard hardware button method to generate the screenshot, means hold down on the Power button and Volume down buttons simultaneously for 2-3 seconds or till you hear the camera shutter sound with an animation of screenshot.
3) Now before the screenshot animation disappears from screen, tap on the Scrollshot option
4) As soon as you tap the Scrollshot option, immediately, your Huawai phone will start scrolling down on the screen and add / append / stitch it to the original screenshot. Keep tapping until you scroll down till end or you want to long screenshot.
5) The Long scrollshot will now appear on your display for your inspection or sharing or deleting or editing.
Many phones you need to download and use an external app for taking long screenshots but Huawai phones you have builtin facility to take a long screenshot which is also an easy task indeed.
How to Screenshot on Huawei phones using gesture control?

Method 3 — Knuckle Smart screenshot (printscreen)

Now most of the smartphones like Samsung, OnePlus have their own methods of taking screenshots using gesture controls, so as Huawei phones, something really different which no other phone in market is using of as called as knuckle smart screenshot feature.
Remember that this will surely need some practice to use this smart feature, but I am sure once you are used to it, you will love using it.
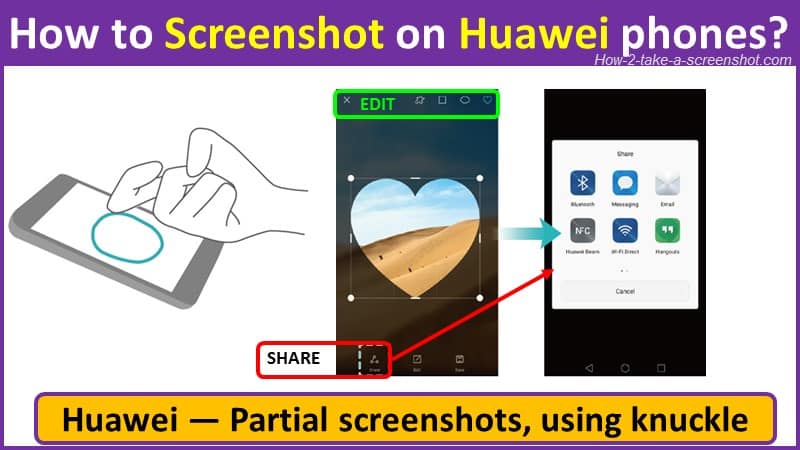
On a simple gesture it will take full screenshot or partial screenshot as per your wish.
Step-by-Step guide on How to take a Knuckle Smart screenshot
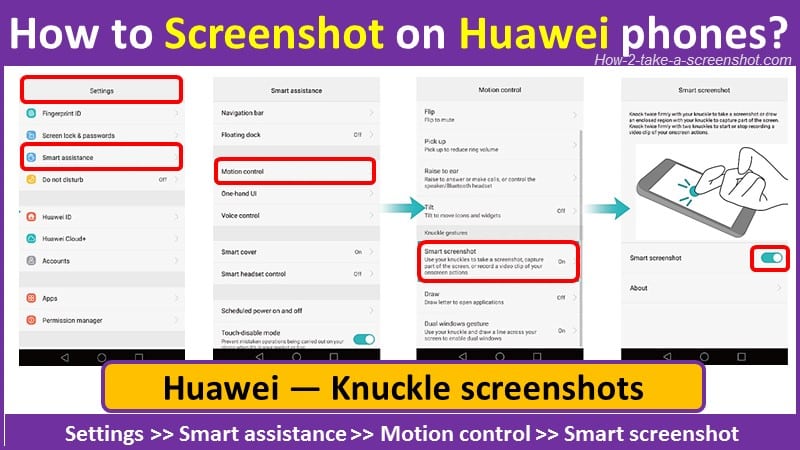
1) First you need to enable the Smart screenshot feature on your Huawei smartphone
Go to phone’s Settings >> Smart assistance >> Motion control >> Smart screenshot
See the image for more clarification on where to find these settings on your Huawei phone.
2) Open the screen of which you want to take a screenshot, like a chat application Snapchat, Instagram or WhatsApp, even a window of web browser.
3) When ready to take a screenshot, all you have to do is knock firmly on the screen with your knuckle to take a full screenshot.
To take a partial screenshot, knock once and without lifting your hand, draw a circle or square to capture selected area of screen.
To take a scrolling screenshot, knock once and draw an “S” to start a scrolling screenshot.
To start a video recording of your phone screen, knock twice with two knuckles at the same time
Tip: Don’t give up immediately, since using this Knuckle Smart screenshot feature is somewhat tricky so in the beginning you may feel frustrated, but believe me it works.
How to take Partial screenshots on Huawei using knuckle?

Where are my screenshots saved in Huawei phone?

After you take a screenshot using any of the above specified method, the screenshots are saved to the gallery >> screenshots folder automatically by your device.
You can any time go to the folder and edit or share your screenshots over social media or email them.

Summing up:

In this post you have learnt different methods to take a screenshot on Huawei smartphones.
From basic method to most advanced methods in step-by-step approach.
As said first method is basic and will work on any of the Huawei phone model where as the advanced methods like gesture (knucke knocking method) will work only on advanced models from Huawei.
If you want me to add more methods of taking screenshots using external apps please let me know and I will add them.

How to take a screenshot on Oppo phone? A, R, Find, F1, Joy Series

One of the latest upcoming Chinese brand is Oppo with affordable range of mobiles from the beginners phones to very advanced phones. So the method of taking screenshot also differs from base model to the advanced model of Oppo phones. In this post I have answered mostly asked question How to take a screenshot on Oppo phones? and I will cover it for most of the famous models from Oppo like Oppo A37, Oppo A57, Oppo A59, Oppo A83, Oppo R9s Plus, Oppo R9s, Oppo R9 Plus, Oppo F1, Oppo F1s, Oppo F1 Plus, Oppo N3, Oppo Find 7A, Oppo Joy 3, OPPO Realme 2. If any of the model is missing please let me know and I will update it immediately.
So now that you have bought an Oppo smartphone and want to capture & share things like a high game score or interesting note from a website or maybe your snapchat, insta or whats app chat, an email .. anything that you can see on the mobile screen can virtually be captured (not always without them knowing!) but yes, and to take a screenshot on oppo phone I will be telling you very basic method to advanced methods too.
Now its important to know that all Oppo smartphones are running on ColorOS, which is a form of customized Android based Operating System. So since the foundation belongs to an Android OS, obviously the method of taking a screenshot also matches (mostly) with an Android smartphone.

How to take a screenshot on Oppo phone?

Simplest way to take a screenshot on Oppo phone is to long press Power button and Volume Down buttons simultaneously, and the phone takes a screenshot with camera sound + animation to save it to Gallery >> Screenshots.
Since the methods vary depending upon some models in Oppo phones, I will divide it into simple methods to advanced methods and explain Step-by-Step approach to you. Please keep reading this post till end to learn all methods and feel free to experiment and ask questions (if you have any)

INDEX – How to take a Screenshot (printscreen) on Oppo Phones?

1 Method 1 – Using Hardware Buttons Jump to Topic
2 Method 2 – Using Screenshot Toggle Jump to Topic
3 Method 3 – Gestures – Three finger method Jump to Topic
4 Method 4 – Taking long screenshots Jump to Topic
5 Method 5 – Using external Apps Jump to Topic

How to take a Screenshot on Oppo phones?

Method 1 – Using Hardware Buttons

Applicable to models : Oppo A37, Oppo A57, Oppo A59, Oppo A83, Oppo R9s Plus, Oppo R9s, Oppo R9 Plus, Oppo F1, Oppo F1s, Oppo F1 Plus, Oppo N3, Oppo Find 7A, Oppo Joy 3, OPPO Realme 2.
This is basic method used on any Android phone and hence applicable to all Oppo phone models listed above. It uses hardware buttons combination and do not require any special skills or external App installation.
Step-by-Step method to take a screenshot (print screen)
1) Unlock your Oppo phone
2) Now go to the screen you wish to take snapshot of, like email, chat application like Instagram, Snapchat, Whats App or a game console.
3) Locate Power and Volume down buttons on your Oppo phone (see image snap in this post)
4) Long press Power + Volume Down buttons simultaneously for 2-3 seconds or until you hear a camera shutter sound with flash animation of screenshot shown as reducing size thumbnail.
5) If you click the thumbnail immediately then you will be able to edit it on the fly and share it too on social network. However if you miss to do so, the screenshot will be saved to the Gallery, which you can edit or share later.
Note : You can locate the screenshot in Gallery >> “Screenshots” folder
Go to Index


Method 2 – Using Screenshot Toggle

Applicable to: Oppo A37 onwards, Oppo N3, Oppo Find 7A, Oppo Joy 3 , may be available in your model – see and try it yourself
Step-by-Step method to printscreen
1) Unlock your Oppo phone
2) Now go to the screen you wish to take snapshot of, like email, chat application like Instagram, Snapchat, Whats App or a game console.
3) Drag down the notification bar from the top and you will see Screenshot toggle from available list of Active Quick Settings.
4) Press the Screenshot toggle and phone will generate screenshot for you and save to the Gallery.
Note : If you are not able to see the “screenshot toggle” in your Quick Access settings icons list in the Notification bar, then from settings >> go to >> Active List of Toggles and add Screenshot Toggle and save it.
Go to Index


Method 3 – Gestures – Three finger method

Applicable to : Oppo N3, Oppo Find 7A, Oppo Joy 3, OPPO Realme 2
Oppo with its higher range of smartphones do compete with some of the most advanced phones from Samsung, so as they also features some of the top methods like using the gestures to do some tasks.
Now in these high end models, Oppo uses the smart gestures to control the phone functions like taking a screenshot. One of the gesture is using three fingers swiping across the screen, let’s see how to do it.
Step-by-Step method to use three fingers
1) Goto the Settings menu by swiping down on the notification shade and tapping on the gear icon.
Settings >> Gesture & motion >> Quick gestures >> Capture screenshot.
2) Be ready with the content you want to capture, like chat, images from Insta, Snapchat or Facebook etc.
3) Now, place three fingers on the screen, align them side by side, with light touch motion, pull the three fingers towards the screen top or from bottom, remember you need to do it for some distance and not the full screen, done. So easy.
4) If your gesture is identified rightly (after some practice its EASY) with a flash on the phone screen and a confirmation camera shutter sound, phone generated screenshot will be shown in the center of screen.
5) You can tap the screenshot to edit it on the fly or just leave it to get saved to the Gallery.
Note : The screenshot will get automatically saved to your phone’s Photo Gallery, so you can edit it later or share it on social apps.
Go to Index


Method 4 – Taking long screenshots

Applicable to : OPPO F5, OPPO A57,  OPPO A37, OPPO F7, OPPO F3
This method is really useful while you wish to take long screenshots like a webpage having lyrics or whats  app chat message, only thing is that the page you wish to long screenshot on Oppo mobile needs to be scrollable.
See this simple animation and then follow the steps given below –
How to take long screenshot on Oppo phone?
Step-by-Step guide to take long screenshot on Oppo mobile
1) Open the screen you wish to take a long screenshot like a webpage (it should be scrollable plz)
2) Now press the POWER + Voulme UP buttons simultaneously, you will see a pop-up menu on right hand side of Oppo phone screen.
3) Tap “Next Page” and the phone will scroll to show animation, keep pressing “Next Page” till the end of page.
4) Then press “SAVE” button from the pop-up menu and your complete long page screenshot is generated and saved to Gallery.
Note : By using this method you will be able to take maximum 8 Screen captures.
Go to Index


Method 5 – Using external Apps

Finally you can also use ready-made Apps from the Store to capture screenshot in easy ways on Oppo phone.
I am just giving few apps, however there are numerous apps on store which can be tried on your Oppo phone to take a screenshot, feel free to try them up and tell me in comments how you felt them?
Download from Google App store Links
Screenshot Easy – Download
Screenshot – Download
Screenshot touch – Download
Go to Index


Bottom line

Each smartphone in market has its own specialties and everyone wants to be different, so as the methods of using some features on these smartphones, so it is evident that you need to learn them quickly.
Here in this post I have shown you the most simple methods you can use to take a screenshot on your Oppo phones.
This post covers some of the most popular models from Oppo such as Oppo A37, Oppo A57, Oppo A59, Oppo A83, Oppo R9s Plus, Oppo R9s, Oppo R9 Plus, Oppo F1, Oppo F1s, Oppo F1 Plus, Oppo N3, Oppo Find 7A, Oppo Joy 3.
If you feel any model is missing from this list and you are unable to take a screenshot on some new model, please let me know and I will modify this guide for you.
Remember that all screenshots will automatically be saved to the  “Screenshots” folder on your media gallery.
Also note that the screenshot resolution may change from model to model, as an example a screenshots taken using Joy 3 will be set in 480 x 854 pixels.

How to take screenshot on CAT phones? S30, 31, 40, S41, 60, 61, T20

CAT smartphones are rugged and tough to sustain abusive environments and famous among people who specially work in an environment where the phone can get into contact with water (sea side fisherman), dust, grass (farming), vibrations (carpenter). The famous S series from Caterpillar Smartphone (CAT) includes CAT S30, CAT S31, CAT S40, CAT S41, CAT S60, CAT S61 (with finger glove), CAT T20 (tablet) models. In this post you will learn on How to take a screenshot on any of these CAT smartphones?
Specially since these phones are designed to be used in tough conditions, most of the time people will be wearing gloves while using these phones and hence taking a screenshot is somewhat challenging task. So I will be recommending a very basic but powerful method which will help you doing this task without taking the gloves out 🙂
And when you are not using gloves buy have wet hands, you can opt in for the voice command system, which will help you taking screenshot without touching the CAT phone itself, so the screen will not get dirty with your hands touching.
There are three different methods which I shall be explaining in this post
First using hardware buttons
Second using Google Assistant
And Third using third party apps installation on your CAT smartphone.
Let’s see them one by one in details with Info graphics –

How to screenshot (print screen) on CAT Caterpillar Smartphone?

Press Volume Down button and Power button simultaneously and hold until you hear a camera click sound, the screen will flash once to indicate that screenshot has been taken by your CAT phone.
Applicable to : CAT S30, CAT S31, CAT S40, CAT S41, CAT S60, CAT S61 (with finger glove), CAT T20 (tablet)
How to Screenshot on CAT Caterpillar phones?
Below method will be extremely useful while you want to take a screenshot wearing your gloves, buttons are distinctly and prominently available and easily operable by (thick) fingers.
Step-by-Step guide to take screenshot (print screen)
1) Unlock the CAT phone
2) Locate the screen, photo, messaging app, social app screen or any other screen that you wish to take snap of
3) Now locate the Power and Volume down buttons (see below image showing the button locations)
4) Simply Press Volume Down button and Power button simultaneously and hold for 2-3 seconds.
5) You will hear a camera click sound, and the screen will flash once to indicate that screenshot has been taken by your CAT phone.
6) The image will be stored to your CAT device Gallery >> Screenshots folder.
How to Screenshot on CAT phones using google assistant voice guide?

Method 2 – Print screen (screenshot) Using Google Assistant

Applicable to : CAT S30, CAT S31, CAT S40, CAT S41, CAT S60, CAT S61 (with finger glove), CAT T20 (tablet)
On most of the modern smartphones, Google Assistant is inherently installed and available for ready to use.
Google Assistant, can help you multiple ways mainly sending the voice commands to your phone to do different tasks, one of which can be taking a screenshot or screen recording.
1) Make sure you have Google Assistant installed and enabled on your CAT phone.
2) Now load the image / text / content you want to capture like a chatting App WhatsApp, Facebook or web browser or video game etc.
3) Now long-press on the Home button or say “Okay Google” or “Hey Google” to launch the Assistant.
4) Now Google assistant is invoked and ready to take your command, Now say “Take a screenshot” or type the command in using your keyboard.
5) Your screenshot will be taken by phone and saved to your phone’s Photo Gallery, so you can edit it later or share it on social apps.

Bottom line

You can simply use the hardware combination buttons on all CAT phones to generate a screenshot easily and quickly.
Secondly you may like to do it using voice command using all time favorite Google Voice Assistant.
And lastly if at all you are App freak, then download some mostly used Screenshot Apps like Screenshot Plus or Screen record HD which will not required complex settings or technical knowledge, best thing is that your screenshots will be saved to the SD card instead of phone memory.
Download Screenshot Plus App from Google Playstore – Download here
Download Screen record HD App from Google Playstore – Download here

Words with Friends 2 Cheat Screenshot Guide

Words with friends cheat screenshot complete guide for you while using on any mobile phone or tablet. This post will explain you how to upload a screenshot of the app version of Words With Friends and what can be the problems faced after uploading the screenshot. Please keep in mind that screenshot upload feature works only on mobile or tabs and not from desktop or laptop.
As you know that Words with Friends is one of the most famous multiplayer word game, which is very much similar to the classic board game Scrabble.
Best part of this game is that it can work on cross-platforms, hence you can play with your friends on an Android mobile or even Any Apple iOS/iphone and all Windows phones and tablets, as well as kindle fire and social networking sites such Facebook.
This website helps you cheat and win in popular word games such as Words with Friends and hence it is important to know how to upload words with friends 2 cheat screenshot on this website.
Other option is to type in your tiles and search the Words With Friends cheat tool which will provide a full list of playable, legal words sorted by length and with point values included.

How to upload words with friends 2 cheat screenshot?

AS I told you one way is to type in your tiles, which is again a cumbersome task 😛 who is going to do it?
So best and quickest way is to upload a screenshot of the app version of Words With Friends from your mobile or tablet.
Note : This feature is not available on desktop computer or laptop.
Step-by-Step Guide to upload screenshot —
1) Open any of the games like Words With Friends 2, Words With Friends Classic, or the Facebook Messenger game “Words With Friends.” (All Games download links are given below for quick reference if needed)
2) Go to any of these games which you are playing.
3) Zoom out the game board is to FULL extent, also make sure that the screen is not covered by any other advertise or text or anything else on your screen.
4) Depending upon the device you are using, take a screenshot, for quick reference I have given below how to take screenshot on any Android or Apple iOS device.
5) Now go to WWF Cheats and tap “Upload Screenshot”
Words With Friends 2 Cheat Screenshot

Tips to take a screenshot to get correct and fast results

Once you upload any scan image, then further the computer uses OCR software to recognize each text in tile and then feed it back to algorithm to resolve it using internal word dictionary replacing valid and legal words, which means the inputs of screenshot must be clear and clean and understandable content.
Follow below easy tips to get correct results
1) Make sure that whole game board is visible which means you have to zoom out fully to get complete board visibility and the WWF Cheat will be able to  scan every tile properly (OCR needs clear texts)
2) If you want to get correct and valid results, then make sure that all your playable tiles are on the tile rack, and not on the game board.
3) Make sure that screen only have the tiles and nothing else, like if you are on Facebook then there may be Chat Heads active, or if you are on mobile App then some app icons maybe visible on trays, or you may have some notification floating pop-ups on screen overlaying and obstructing tiles. All such things can cause issue in Optical Character Recognition (OCR) and hence WWF Cheat my give incorrect results.
4) NO Zoomed-in Game Board in screenshot:
Simply double tap the game-board so that it zooms out completely before you take any screenshot.
5) Nothing should cover the screen:
If you have any screen overlays like a weather forecast! or app notification which is shown generally in semi transparent colors, it will surely obscure your game-board or tile rack. So surely the OCR & Solver software will have issues resolving the puzzle!
So avoid any chat heads, volume sliders, alerts, app drawers, game badges or anything that is partially or fully covering screen is not acceptable even though it is in semi-transparent mode showing below text partially.
6) No Screen Dimmers Please:
Any screen dimmer you are using to save battery shall be turned OFF, instead you may like to use original device brightness controls to save the battery. Generally it is seen that the screen dimmers interfere with OCR analysis delivering incorrect results.
7) Avoid uploading any Low Resolution and Low Quality Screenshots:
Lowest phone display resolution can be 480 pixels.
If you have screen resolution below it will result into incorrect interpretation of tiles and hence may report errors or wrong results OR even it may not show any results!
If your phone setting for screenshot is JPEG, then I suggest to change it to PNG format. Although PNG images will be slightly heavier in size than a JPEG image, they will be more clear and hence OCR software will work correctly, and what you want here is best and fastest results.
So before you generate a screenshot set the screenshot to PNG. My website provides guide on image format changing for various devices, please explore the same if you don’t know how to do it.
8) Avoid uploading any Cropped Screenshots:
The algorithm must see the complete tile to understand and resole the puzzle correctly, so if you upload any cropped screenshot, it may understand it partly giving correct solution for that part, but not as an entire tile board! and this is not what you want? right ?
So make sure to include the complete tile even you wish to crop other details from the screenshot.
9) Check if the Game has latest updates:
Yes, the word finder will always be tuned to resolve the latest app screens and hence it is important to check that your App has got all the latest updates before you generate and upload any screenshots.
Remember that the word finder is only designed to work with the latest versions of WWF.
10) Uploading screenshots of any unsupported Game:
I have already specified list of supported games as well as given their download links in this post (Refer below section for links)
In case you upload any other games tile screenshot, the software may not be able to resolve it correctly.
Either your upload will fail or you can try using the anagram solver to find answers for many games the board solver isn’t intended for!
Tip for Samsung phone users: Move your EDGE tab higher on the screen (at least above the bottom of the game board)


How to Screenshot on any Android Phone ?

Hold the Power Button and Volume Down buttons simultaneously for at least one full second.
Or Hold the Power Button and Home buttons simultaneously for at least one full second.
See Info-graphics below which is self explanatory
How to take a Screenshot on this Phone?

How to Screenshot on any iOS device ?

Briefly tap the Power button and Home buttons simultaneously.
On iPhone X, use Power button and Volume Up buttons simultaneously.
See Info-graphics below which is self explanatory
how to screenshot on ios using buttons

Word Game Download links —

Words With Friends 2 word game — Download from iTunes / Download from Google Playstore
Words With Friends Classic —  Download from iTunes / Download from Google Playstore
Facebook Messenger game “Words With Friends.” —  Download from FaceBook App


An extensive reference is taken from official website to write this post —
https://www.wordswithfriendscheat.io/wwfc-manual.php#wwf_common_issues

How to take a Screenshot on this Phone?

If you are searching on How to take a Screenshot on this Phone? then you are on the right page. Yes, I will be guiding you precisely on this subject depending upon the phone model you are using and keeping in mind the latest introductions in year 2018, I have also included the latest models of mobile in this post. In case you are not able to locate your model or have not understood method to take printscreen on your mobile please let me know by putting comments in below section.

Android Phones –

If you are using Android phone, stay on this page and search for respective model number in the table given below.

Apple Products –

If you are using any of Apple products then I have written detailed posts, here are links to jump to them

  • iPad or iPad Pro or iPhone or iPad mini or iPad 2  or ipad air 2 – Goto the Topic
  • Phones on iOS 7, 8, 9, 10 and 11 – Goto the Topic
  • iPhone X – Goto the Topic

How to take a Screenshot on This Phone?

Press POWER BUTTON + VOLUME DOWN Buttons simultaneously for 2-3 seconds to generate a screenshot on any Android phone.
Capturing a screenshot on an Android device is pretty simple. Press the unique button combination on your smartphone or tablet and you can capture and share a screenshot in a matter of seconds.
If you know the mobile company name and model then goto the table given below the post to directly get the link or simply follow the following method on your Android phones to take a screenshot.
How to take a Screenshot on this Phone?

How to Take a Screenshot on Any Android phone?

Method 1 : Using hardware buttons

Applicable to : Acer, Asus, Google Nexus, Google Pixels (Pixel 2, Pixel 2 XL) , HTC U series (up to U12+), All  other HTC phones, Huawei, Honor, Lenovo, All LG phones, Motorola, OnePlus, Galaxy S8 and later, Sony, ZTE phones
Applicable to Operating System : Ice Cream Sandwich (4.0) and Above
Note : For OLD phones with OS Android 2.3 and Below no facility to take screenshot will be available.
If you are using simple Android phone, then easiest way is to use the phone buttons to generate a screenshot.
Step-by-Step Guide
1) Unlock your Android Phone
2) Open the screen you want to take screenshot like a photo, any App ,web browser window, email etc.
3) Press Power button and Volume Down button simultaneously for 2-3 seconds
4) The phone will generate a snapshot with light camera shutter sound and flashing an animation, now you can release the buttons.
5) Your screenshot will be saved to the phone memory or if you click quickly on the screenshot thumbnail, then it will directly show you the edit buttons.
HTC U12+ phones: Press and hold the power button until your phone vibrates, and then tap the virtual home button on the navigation bar while still pressing the power button

Method 2 : Using Home button (for those phones having only home button)

Applicable to : Galaxy S7 and earlier
For some of the latest phones, they will only have a home button like an iPhone in that case you can use the following process to generate a screenshot.
Step-by-Step Guide
1) Unlock your Android Phone
2) Open the screen you want to take screenshot like a photo, any App ,web browser window, email etc.
3) Press Power button and HOME button simultaneously for 2-3 seconds
4) The phone will generate a snapshot with light camera shutter sound and flashing an animation, now you can release the buttons.
5) Your screenshot will be saved to the phone memory or if you click quickly on the screenshot thumbnail, then it will directly show you the edit buttons.

How to take a Long Screenshot on This Phone?

Samsung models

Samsung Note 5 – Use ‘Capture more’ allowed you to take a single long screenshot of a page, from the top and scrolling all the way to bottom, in one file.
Samsung Galaxy S8, S9, S9 Plus – Use ‘Scroll capture’
1) Enable Smart capture from Advanced settings.
2) Open the screen / webpage you want to take a snapshot.
3) Take a screenshot using any standard method you know like using hardware buttons.
4) After taking screenshot, you will see options at the bottom of phone screen, tap on Scroll capture (previously “capture more”) button.
5) Keep tapping or pressing the Scroll capture button to scrolling down the page until you cover the complete screen.
6) Done, long screenshot saved on your Samsung phone.

Long scrollshots on Huawei smartphones

Applicable to : Huawei Mate 9 and Mate 10 models ( EMUI 5.0 )
Step-by-Step guide
1) Open the screen / webpage you want to take a snapshot.
2) Hold down on the Power button and Volume down buttons simultaneously for 2-3 seconds.
3) You will hear camera sound with an animation of thumbnail to confirm that screenshot is taken by your Huawei phone. Before the animation disappears, tap on the Scrollshot option.
4) Your phone will start scrolling down the screen until you tap on the screen which tells it to stop.
5) The scrollshot will now appear on your display for you to inspection.
6) From here, you can Edit it or Share on social media, or Delete on the fly.
If you don’t take any action it will be saved to the image gallery under Screenshots folder.

How to take a screenshot without touching the phone ?

How to take screenshot without hands
You can use the Google Assistant mostly available on all Android phones, which allows you to send voice commands to your phone to do different tasks, one of which can be taking a screenshot or screen recording.
1) Locate the image /content you want to capture on the screen like a chatting App WhatsApp or web browser or video game etc.
2) Long-press on the Home button or say “Okay Google” or “Hey Google” to launch the Assistant.
3) Now either say “Take a screenshot” or type the command in using your keyboard.
4) You will not get editing options but your screenshot will be saved to your phone’s Photo Gallery, so you can edit it later or share it on social apps.

How to take scrolling screenshots on any Android device

If your phone inherently does not support taking a long scrolling snapshot and you still want to capture long screen like a webpage, WhatsApp chat, or any other chat application or an email then you can use the external apps from play-store.

Using an App from Google Playstore –

a long webpage or long conversation can be captures using different Apps from Playstore, however for some of the latest phones from Samsung and Huwai etc. you get this facility built-in without loading any external App.

1) Stitch & Share: big screenshot / scrolling screenshots

1) Download and install Stitch & Share from Google Play – FREE Download link
2) Using your device’s unique button combination, capture the first screenshot
3) Scroll down within the app, keeping a small portion of what was in the first screenshot visible and capture the next screenshot
4) Repeat the previous step until you have captured everything you want to appear within the screenshot
5) Swipe down on your notification panel and tap the Stitch & Share notification
6) Tap the green arrow icon in the bottom right corner to save or share your screenshot
If the generated screenshot doesn’t align properly, Stitch & Share allows you to adjust where the images overlap by tapping the scissors icon. The app also includes editing features which allow you to highlight text or insert a blackout bar (great for hiding someone’s name, email or phone number). The free version only offers one color for highlighting, but you can get rid of the ads, get more highlighter colors and eliminate the Stitch & Share watermark with a $0.99 in-app purchase.

2) Stitch & Share: LongShot

LongShot has a few other useful tools. Capture Web Page will open a screen with a URL bar at the top. You can enter any webpage and take a long screenshot. The Select Images tool will allow you to merge previously taken screenshots (or any other images). Here’s an example of what you can do with LongShot.

  1. Download and install LongShot from the Play Store.
  2. Open the app.
  3. Toggle Auto capture on (this will automatically take screenshots as you scroll).
  4. Tap the Capture screenshot button.
  5. Floating green Start button will appear.
  6. Go to the screen you wish to capture.
  7. Tap the Start button and slowly scroll.
  8. Tap Done when you’re done.
  9. All the screenshots will appear on the next page. Tap Join to merge them.
  10. Adjust the screenshots to make a long screenshot.
  11. When you’re done, the screenshot will be in the LongShot folder.

Where are my screenshots saved on any Android Phone?

Once you take a screenshot using any of the above method, then the screenshots will be automatically saved by your phone in default location on device.
The captured screenshot is saved automatically to Gallery > Screenshots

How to email the Screenshot on Android?

When you take screenshot using any of the above methods, the animation of thumbnail will be shown, you can quickly tap the animation to select the screenshot image and use share options.
when you select share option of MAIL, you need to choose your email client (if there are multiple email clients line Gmail, Mail). Select it and it will directly head down to the mail client application in compose mode, the said image snap will be automatically attached to the email. Enter the details and press send mail.


If you want to back up your screenshots to Google Photos, you might need to tell your phone to do so. Open the sidebar in Google Photos, then Device Folder. Tap Screenshots, and flip the Back up & sync toggle. From there on out, all of your screenshots will be backed up to your camera roll in Google Photos.

Sr No

Phone company and model

Topic Link

1 Samsung Galaxy S9 Jump to Topic
2 Samsung Galaxy S9 Plus Jump to Topic
3 Samsung J7 Prime Jump to Topic
4 OnePlus 6 Jump to Topic
5 LG G2, LG G4, LG G6, LG V20, LG Stylo 2, LG Stylo PLUS 2, LG LG Stylo 3, LG stylo 3 plus, LG Stylo 4 Jump to Topic
6 CAT phones S30, 31, 40, S41, 60, 61, T20 Jump to Topic
7 Oppo phones
Oppo A37, Oppo A57, Oppo A59, Oppo A83, Oppo R9s Plus, Oppo R9s, Oppo R9 Plus, Oppo F1, Oppo F1s, Oppo F1 Plus, Oppo N3, Oppo Find 7A, Oppo Joy 3
Jump to Topic
8 Huawei Phones P10 Lite, P10, P10 Plus, Mate 10 Lite Jump to Topic
9 Moto phones Moto X 2014, Moto X Style and Moto X Pure edition, Moto X4, Moto G, Moto Force Z,  Moto Z Droid , Moto Z Force Droid, Moto E4 , Moto E4 Plus Jump to Topic
JioPhone
JioPhone 2
LYF Flame 2
LYF Flame 3
LYF Flame 4
LYF Flame 6LYF Flame 7LYF Flame 8
LYF Water 1
LYF Water 2
LYF Water 3LYF water 4
LYF water 5
LYF water 6
LYF water 7
LYF water 8
LYF water 9LYF water 10LYF water 11LYF Wind 7
LYF Wind 6
LYF Wind 4
LYF Earth 1
LYF Earth
Jump to Topic

Samsung J7 Prime me Screenshot Kaise Le? सैमसंग जे७ प्राइम मे स्क्रीनशॉट कैसे लें ?

सैमसंग जे ७ प्राइम मोबाइल मे स्क्रीनशॉट कैसे लें ? Samsung J7 Prime me Screenshot Kaise Le? इस पोस्ट में आप सीखेंगे की सैमसंग मोबाइल में स्क्रीनशॉट टच विज की मदद से कैसे ले सकते है।  ye post me aap sikhenge ki TouchWiz ke madad se screenshot kaise le.  देखिये पाम स्वाइप सुविधा की मदद से भी मोबाइल स्क्रीन का स्नेप लिया जा सकता है बड़ी आसानी से। आखिर आप को ये भी बताऊंगा की ये स्क्रीनशॉट सेव कहा हो जाते है और उसे कहासे देखसकते है। How to take screenshots on Samsung Galaxy J7 Prime?
इस आर्टिकल में आपको स्क्रीनशॉट लेनेके अलग अलग तरीके सिखने मिलेंगे। उसमेसे जो आपको आसान लगे वो आप यूज़ कर सकते हो।
सैमसंग गैलेक्सी जे ७ प्राइम ये बहुत अच्छा फ़ोन है और काम बजट में मिलता है। ये फ़ोन लेटेस्ट एंड्राइड ६.० मार्शमैलो ऑपरेटिंग सिस्टम पे चलता है जिसमे टच विज करके सुविधा उपलब्ध की गयी है।
अब ये टच विज क्या है ? ये सैमसंग की खुद बनाई गयी मोबाइल स्क्रीन स्किन है जो सब गैलेक्सी स्मार्टफोन्स में उपलब्ध है। इसमें मोबाइल स्क्रीनशॉट लेनेके अलग अलग तरीके उपलब्ध है।
अब मैंने तो सब तरीके यहाँ बताये है , जो आपको सही लगे वो आप इस्तेमाल कर सकते है।
अब अगर आप पहिलेसे एंड्राइड फ़ोन का इस्तेमाल करते है और पुराने फ़ोन में स्क्रीनशॉट लेना जानते है तो पहिला मेथड कुछ सेम है। पर दूसरा तरीका थोड़ा अलग है। तो पढ़ते रहिये आखिर तक।
अब जो दूसरा तरीका है उसमे तो आपको कोई भी बटन नहीं दबाना है। अब ये भी मई मैं आपको सीखने वाला हु।

अब देखते है दो तरीके सैमसंग जे ७ प्राइम मोबाइल पे स्क्रीनशॉट लेने के लिए इस्तेमाल करते है।

१) हार्डवेयर बटन्स यूज़ करके

२) पाम स्वाइप गेस्चर यूज़ करके

Samsung J7 Prime me Screenshot Kaise Le?

१) हार्डवेयर बटन्स यूज़ करके स्क्रीनशॉट कैसे लें ?

Applicable to : Samsung Galaxy J3 V / J3 (2016), Samsung Galaxy J7 Prime
पहिला मेथड है आपके फ़ोन पे से बटन्स का यूज़ करना , जो बहुतही आसान काम है।
निचे दिए स्टेप्स इस्तेमाल करे –
स्टेप १) फ़ोन को अनलॉक करे।
स्टेप २) आप जिस ऍप का या स्क्रीन का फोटो लेना चाहते है उसे ओपन करे।
स्टेप ३) अब फ़ोन पे पॉवर और होम बटन है वो दोनों एकसाथ कुछ सेकण्ड्स के लिए दबाये।
स्टेप ४) बटन को छोड़तेहि आपको कैमरा साउंड सुनाई देगा और स्क्रीन छोटा होते हुए दिखाई देगा। एक छोटा इमेज जिसे थंबनेल बोलते है वो दिखाई देगा।
स्टेप ५) अब आपका स्क्रीनशॉट लिया गया है और फ़ोन की मेमोरी मैं सेव किया गया है।
है न आसान तरीका ?
अब आगे का तरीका देखते है जिसमे आपको हाथ का यूज़ करके स्क्रीनशॉट लेना है।

२) पाम स्वाइप गेस्चर यूज़ करके स्क्रीनशॉट कैसे लेते है ?

Applicable to : Samsung Galaxy J3 V / J3 (2016), Samsung Galaxy J7 Prime
अब ये जो फीचर मैं बताने वाला हु ये लगबग सभी लेटेस्ट सैमसंग फ़ोन्स मैं उपलब्ध है जिसमे टच विज सुविधा दी गयी है। अगर आपका सैमसंग फ़ोन लगभग २०१६ या २०१७ का है तो भी ये सुविधा रहेगी (कृपया आपके फ़ोन का मैन्युअल चेक करे )
स्टेप १) आपको गेस्चर सुविधा एक्टिवेट करनी पड़ेगी। इसके लिए आप सेटिंग्स >> मोशन मेनू मैं जाये
स्टेप २) मोशन मेनू मैं आपको हैण्ड मोशन पे जाना है और वहाँपे पाम स्वाइप फीचर को सिलेक्ट करना है।
स्टेप ३) अब आप गेस्चर सुविधा यूज़ करनेके लिए तैयार है। तो जो स्क्रीन आप फोटो लेना चाहते है वो ओपन कीजिये।
स्टेप ४) अब आपको आपका हाथ चक्कुकि तरह पकड़ना है (अंगूठा ऊपर होना चाहिए ) लिए आप इस पोस्टमें दिए फोटोको देख सकते है। अब हाथको स्क्रीन पे रखें और एक साइड से दूसरी साइड कोने से कोने तक घसीटना है।
अगर आपका ये स्टेप सही रहा तो कैमरा का शटर साउंड आएगा और स्क्रीनशॉट लिया जायेगा।
ये थोड़ी प्रैक्टिस की बात है। आप थोड़े ट्रायल के बाद सिख जायेंगे।

आप के सैमसंग जे ७ प्राइम फ़ोन के स्क्रीनशॉट कहा सेव किये जाते है ?

जो स्क्रीनशॉट आप लेते है वो फ़ोन के ऊपर सेव हो जाते है , उसे ढूँढ़नेके लिए आपको जाना होगा
गैलेरी >> स्क्रीनशॉट


How to take a screenshot on Samsung Galaxy J7 Prime phone?

There are two methods available on your Samsung Galazy J7 Prime phone model, one of which is proven method used on all Anddroid phones and other method is somewhat new if you have rescently taken this phone.
Both methods are pretty easy and I will explain them one by one, you can use which ever you like and find easy.
Two methods to take screenshot are as follows –

  1. Using hardware buttons
    Applicable to : Samsung Galaxy J3 V / J3 (2016), Samsung Galaxy J7 Prime

  2. Using Palm Swipe Gesture method
    Applicable to : Samsung Galaxy J3 V / J3 (2016), Samsung Galaxy J7 Prime

First method to use hardware buttons is as follows –
Step 1) Unlock the phone
Step 2) Open the screen of which you wish to take a screenshot (any App like WhatsApp or browser window or facebook or photo etc)
Step 3) Press the Power and Home buttons simultaneously (see image above showing these buttons)
Step 4) When you leave these buttons you will hear a confirmation camera click sound with screen flicker animation, showing a thumbnail of image taken
Step 5) Done, your screenshot is being saved to mobile memoey
Second method is different and here you need to learn some hand (palm tricks), please see the image above in this post carefully where the palm position with respect to the screen is shown.
Step 1) Activate the gesture feature by going to Settings >> Motion menu >> Hand Motions >> check the Palm Swipe to capture check-box.
Step 2) Unlock the phone and open desired screen of which you wish to take a screenshot
Step 3) Now hold your palm like a knife (your thumb facing up – see the photo above in this post) and swipe it across the screen edge horizontally from either side, edge to edge (right to left or left to right).
Step 4) If things are right, you will hear confirmation camera shutter sound and screenshot will be taken by system.
I know you may not be able to do it right for the first time, but by practice you will soon learn to make the palm swipe motion smoothly and take a screenshot.
However for me at least, the first method itself looks attractive and simple.

Where to Find Saved Screenshots in my Samsung J7 Prime?

Once you take a screenshot, the captured image is automatically copied to phone.
Goto the Gallery and locate the Screenshots folder/album OR go to the Pictures > Screenshots folder where all the taken screenshots being stored by your system.
From here you can edit or share it across social network or delete, whatever you want to do with it.

Jio LYF phone me screenshot kaise le जिओ लाइफ मोबाइल स्क्रीनशॉट कैसे लें

रिलायंस जिओ का लाइफ स्मार्टफोन इंडियामै बहुत लोगोंके पास है, उनके कॉल की कीमते या फोनकी क़ीमतोंके कारण ये फ़ोन हर कोई खरीदता है | लेकिन बहुतसे लोगोंको लाइफ फ़ोन से स्क्रीनशॉट लेना बहुतही जटिल काम लगता है | और किसी ना किसी कारन स्क्रीनशॉट लेने की जरूरत पड़ती है। तो इस पोस्ट मै आप लाइफ मोबाइल फ़ोन पे से स्क्रीनशॉट लेना सीखेंगे | एकदम आसान तरीके से | आप ये सीखेंगे की लाइफ विंड, फ्लेम, अर्थ, वाटर में स्क्रीनशॉट कैसे लें ? LYF Mobile me Sscreenshot kaise le ? Jio phone me screenshot kaise le ?
लाइफ फ़ोन मैं बहुतही अच्छे फीचर्स है ! और उसे यूज़ करना और भी आसान काम है | सिर्फ आपको पता चाहिए की ये फीचर्स यूज़ कैसे करते हैं |
जैसे की आपको स्क्रीनके उपरका फोटो इंस्टाग्राम या फेसबुक या ट्विटर का पेज किसी को भेजना है, तो तुरंत आप उसका स्क्रीनशॉट ले के एक-दूसरेको भेज सकते हैं |
जैसे आप किसी वेबसाइट पे ब्राउज़िंग कर रहे हैं, और आपको उस पेज का फोटो किसीको सेंड करना है (किसी कारन, जैसे की फ़ोन नंबर, लोकेशन एड्रेस ) या आपको कोई चीज जो खरीदनी हैं उसका स्क्रीनशॉट लेके फोटो भेजना है | तो आप क्या करेंगे? जिओ के लाइफ मोबाइल मैं स्क्रीनशॉट कैसे लिया जाता है ?
आइये इस पोस्ट मैं सीखे |

How to Take a Screenshot on LYF smartphone ?

लाइफ फ़ोन में में स्क्रीनशॉट कैसे लें ?

Jio phone me screenshot kaise le ?

लाइफ के मोबाइल में स्क्रीनशॉट लेना बहुतही आसान काम है !
स्क्रीनशॉट लेने के लिए दो तरीके मैं बताने वाला हूँ,
पहिला तरीका आपको मोबाइल फ़ोन के बटन यूज़ करके स्क्रीनशॉट लेना सिखाएगा और दूसरा तरीका आपको आपका आवाज यूज़ करके, फोनको टच किएबिना स्क्रीनशॉट लेना सिखाएगा !
लाइफ अर्थ , फ्लेम, वाटर, विंड, लाइफ स्मार्टफोन में स्क्रीनशॉट कैसे लें ?

पहिला तरीका – एंड्राइड फ़ोन के बटन यूज़ करके स्क्रीनशॉट कैसे ले ?

१) आपका जिओ लाइफ फ़ोन अनलॉक कीजिये |
२) फ़ोन का पॉवर और वॉल्यूम बटन कहा है ये देख ले | मैंने ये दोनों बटन्स कहा होते है इस पोस्ट मैं फोटो डाला है वो देखे |
३) अब आपको जिस स्क्रीन का फोटो स्क्रीनशॉट लेना है उस स्क्रीनपर जाये |
( वो फोटो हो या वत्स ऍप का स्क्रीन, या फेसबुक, या ट्विटर का स्क्रीन हो सकता है )
४) अब आपको पॉवर बटन और वॉल्यूम डाउन बटन को एक साथ 2-4 सेकंड तक दबाना है |
५) इसके बाद जब आप ये बटन्स छोड़ देंगे तब आपके मोबाइल फ़ोन का स्क्रीन एक सेकंड के लिए फेंट हो जायेगा और एक कैमरा क्लिक साउंड आएगा, इसके साथ ही आउटलाइन फ्रेम भी आएगा जिससे आपको पता चल जायेगा की स्क्रीनशॉट लिया गया है |

दूसरा तरीका – गूगल असिस्टेंट यूज़ करके स्क्रीनशॉट कैसे ले ?

जिओ फ़ोन मैं और एक खासियत है गूगल असिस्टेंट की। . जो एक जबरदस्त फीचर है, जो यूज़ करके आप कोई भी काम आसानी से कर सकते है जैसे की व्हाट्स ऍप ओपन करना, ब्राउज़र विंडो ओपन करके सर्च करना और हां स्क्रीनशॉट लेना भी कर सकते है। वो भी फ़ोन को टच किये बिना, दूर सेन सिर्फ बोलेके (वॉइस कमांड देके )
अब ये आप कैसे कर सकते है जिओ और जिओ फ़ोन २ मॉडल मैं ये देखिये।
१) आपका जिओ लाइफ फ़ोन अनलॉक कीजिये |
२) अब आपको जिस स्क्रीन का फोटो स्क्रीनशॉट लेना है उस स्क्रीनपर जाये |
३) आपको पाहिले गूगल असिस्टेंट एक्टिवेट करना है फ़ोन मैं पहिलेसे इन्सटाल्ड है। एक्टिवेट करनेके लिए आपको फोनेके ऊपर माइक बटन है (कीपैड पे ) वो दबाना है और बोलना है “ओके गूगल”
४) अब गूगल असिस्टेंट दिखायेगा की वो आपकी बाते सुन रहा है। तो अब आपको बोलना है “टेक अ स्क्रीनशॉट”
५) गूगल अस्सिटेंट आपके लिए जो स्क्रीन दिखा रहा है उसका स्क्रीनशॉट ले लेगा।
नोट : अगर गूगल असिस्टेंट आपके फ़ोन के ऊपर नहीं दिख रहा है तो आपको जिओ स्टोर पे जाना है और उसे डाउनलोड करके इनस्टॉल करना है। फिर आपको पहिली बार उसे ओपन करके आपका आवाज सेट कर देना है। अब जभी आप बोलेंगे “ओके गूगल” तब ये ऑटोमेटिकली चालू हो जायेगा।

आप जिओ लाइफ फ़ोन के स्क्रीनशॉट कहा सेव किये जाते है ?

जो स्क्रीनशॉट आप लेते है वो फ़ोन के ऊपर सेव हो जाते है , उसे ढूँढ़नेके लिए आपको जाना होगा ।
गैलेरी >> स्क्रीनशॉट
नोट : याद रखे ये स्क्रीनशॉट वाले फीचर बेसिक जिओ फ़ोन्स मैं अवेलेबल नहीं है ।
अगर आपने कोई नया तरीका ढूंढ लिया है या आपको स्क्रीनशॉट लेने मैं कुछ तकलीफ है तो नीच कमेंट करे , उसमे आपका मॉडल नंबर लिखना न भूले और आपने क्या तरीके अपनाये जिससे स्क्रीनशॉट नहीं आया वो भी लिखे।


jio phone me screenshot kaise le

How to Take a Screenshot In Jio Phone?

Please note that the bsasic phone model of Jio does not support taking screenshot.

Method 1 to take a screenshot

This is basic method followed on most of the Android phones in market and useful and very easy to follow and try.
It is called as Button combination method.
follow this Step-by-Step approach
1) Unlock your Jio phone
2) Open the screen you want to take snapshot of like any image, or sms or chat
3) Locate the Power and Volume down button on your phone
4) Press both the Power and Volume down button simultaneously and hold for 4-5 seconds
5) Release the buttons and you will hear a camera click sound with blink of screen, indicating that the screenshot is generated by your phone and saved to the phone

Method 2 Use Google Assistant

To use this method you should have Google assistant loaded on your Jio smartphone model.
This will allow you to take a screenshot with a voice command.
1) Unlock the phone
2) Goto the screen you want to take a screenshot of
3) Activate Google voice assistant by pressing the microphone button and saying “Ok Google”
4) Now google voice assistant will show listening mode, now say “Take a Screenshot” and Google assistant will generate a screenshot for you.
5) Photo will be saved to the phone.


Where are the JIO LYF Screenshots Saved?

All the screenshots that are generate due to the screen capture process are stored in a separate folder under
Gallery > Screenshot on your device.


Please comment below if you are not able to take screenshot on your Jio mobile with model number and trials you did to take the screenshot.

This guide on how to take a screenshot on LYF Jio Mobile covers the following models

JioPhone
JioPhone 2
LYF Flame 2
LYF Flame 3
LYF Flame 4
LYF Flame 6
LYF Flame 7
LYF Flame 8
LYF Water 1
LYF Water 2
LYF Water 3
LYF water 4
LYF water 5
LYF water 6
LYF water 7
LYF water 8
LYF water 9
LYF water 10
LYF water 11
LYF Wind 7
LYF Wind 6
LYF Wind 4
LYF Earth 1
LYF Earth 2

It may not work on the following models and basic models

LYF Flame 1
LYF wind 1
LYF wind 2
LYF wind 3


References for photos and writing this post
https://www.jio.com/en-in/jiophone
https://www.jio.com/en-in/jiophone2

How to Take and Share screenshot & broadcast video on PS4 Pro

Gaming is Fun, Gaming is Sharing, Gaming is Group enjoyment too. So when it comes to all new latest PlayStation 4 (PS4) & PS4 PRO where you will be spending evenings or weekends on playing the favorite games, it also comes to some achievements to share with family and friends. Be it a perfect headshot or unlocking the new level or gaming high scores, you need to Share it on social networks like Twitter or FaceBook. Also in some cases while you get an error or a bug, you wish to share it in an online community to take help or simply to report it. Further you can broadcast the game live on YouTube.
Obviously the world leader Sony knows this and have inherently incorporated a simple and dedicated “SHARE” button on on your DualShock controller.
Its very easy to use it, all you have to do is simply know few keys that goes into combination to get different options and / or results.


Quick wrapup before we get into detailed procedure —

How to Take and Share screenshot on Sony PS4 ?

Press SHARE button to take a screenshot, Press and Hold SHARE button to get DISPLAY menu, Press SHARE button Twice to Start or Stop Saving Video Clip

INDEX

1 Important things to know before screenshot or broadcast on PS4/PRO Jump to Topic
2 How to Take and Share screenshot on Sony PS4 (PlayStation 4)? Jump to Topic
3 How to Take and Share screenshot on Sony PS4 PRO ? Jump to Topic
4 Where are my screenshots stored on Sony PS4? Jump to Topic
5 How to change your PlayStation 4 screenshot quality? JPEG or PNG? Jump to Topic
6 How to Store PS4 Image screenshots or videos to an external USB device? Jump to Topic
7 How to live-stream your PS4 gameplay to YouTube? Jump to Topic
8 How to live-stream your PS4 PRO gameplay to YouTube? Jump to Topic

Now:

Before you take and share screenshots on PS4, simply note down the following important points —

1 — The first time you connect to an online service like Twitter or Facebook from the PS4, you must enter your login credentials (username and password) for the online services.
Note 1 : If you do not have an social share account, you may like to create one by visiting the respective online service’s website. (Twitter or Facebook)
Note 2 : Depending upon the compression policy of the service you are using to share, a screenshot might be compressed by the system when it’s shared.
2 — PS4 & PS4 PRO allows only 1 screenshot upload at a time.
So even social networks like Twitter and Facebook allows multiple pictures uploading from other devices, here in SONY PS4 you have limitation to upload single image at a time.
Note : Methods for deleting uploaded screenshots vary depending upon the online services, hence you may please refer to the respective website of the online service.
3 — Depending on the displayed content or the state of the system, sometimes system may not allow to take a screenshot.
Yes, In certain situations (either gaming or using menus)  you may not be allowed to take a screenshot. Possible situations are some game opening screens or cut-scenes that maybe deemed as spoilers by the game developers or the state of system may not allow to do so.
Go back to Index


So now that you are aware of the basics before getting onto actual job of taking a screenshot on the Sony PlayStation 4
Lets go ahead to learn how you can share your great gaming moments with your family and friends.
How to Take and Share screenshot on Sony PS4 & PRO?

2) How to Take and Share screenshot on Sony PS4 (PlayStation 4)?

Option 1 : Screenshot and share immediately

1) Press “SHARE” button and immediately release it.
2) The on-screen action will be paused and you will get a “SHARE MENU” popup screen.
3) Now from here you can directly select “SHARE SCREENSHOT” option and send the captured screen image directly to the social media and your PSN activity feed

Option 2 : Screenshot and Save

1) Press & HOLD the “SHARE” button on your PS4 DualShock controller for at least one second.
This will open up the share menu as shown below.
screenshot share menu on ps4 pro game controller
2) Now you can, press the triangle △ button to save the screenshot.
Tip : If you want to discard the screenshot, simply press the circle ○ button on the PS4 controller.
3) OR to share the screenshot on the fly, press the Share button again, or Press X Button and choose the Upload Screenshot option. (See the main image of this post)
Here you have an option to choose which screenshot you would like to share by navigating to the screenshot image or video of your choice.
4) Look at the SHARE SCREENSHOT option in main image, you will see different options to choose the online service or social network you want to share it to.
5) Select the service like Facebook or Twitter. (Optional – Enter a comment)
6) Select Upload.
7) Done. Yes, you have shared your first screenshot from the Sony PlayStation 4 🙂
Go back to Index


3) How to Take and Share screenshot on Sony PS4 PRO ?

(PlayStation 4 PRO)

PS4 PRO provides you different resolutions for the screenshots you take

  • Option 1: 2160 pixels (4K resolution) or
  • Option 2: 1080 pixels (2K resolution).

— Game recording is available in up to 1080p. (This is limited to 720p on standard PS4 systems)
— HDR is not supported.
How to Take and Share screenshot on Sony PS4 PRO ?
Please note that these image resolution options can be changed through the SAHRE menu, which you can be accessed via the Quick menu by long pressing the PS button.
Go back to Index


4) Where are my screenshots stored on Sony PS4?

All your captured Screenshots are stored in the Capture Gallery
To reach the Capture Gallery, press the PS button and navigate through the home screen menu.
Device sorts out the media into screenshots and videos on its own, and within that in folders by game.
From here, you can select any image file you want to share and press the Share button, to get the above explained options to upload or share on Twitter or Facebook etc.
Go back to Index


5) How to change your PlayStation 4 screenshot quality? JPEG or PNG?

Default PS4 setting to save screenshot is JPEG image.
If you wish to get richer images than this, you can try changing the format in which your PS4 saves screenshots.
Switching from JPEGs to PNGs – How to do it?
How to change your PlayStation 4 screenshot quality
Step-by-Step guide (see above image which shows all the screens required to set PNG image format)
1) Main menu >> select Settings.
2) Settings >> select Sharing and Broadcasts
3) Sharing and Broadcasts >> Screenshot Settings.
4) Select Image Format >> Change from JPEG to PNG.
5) Now all your screenshots on PS$ will be saved in PNG image format.
NOTE:  PNG images will take-up a bit more space than JPEGs did but you will get better quality of the screenshot images.


6) How to Store PS4 Image screenshots or videos to an external USB device?

Lastly you don’t want your device to be full of images and videos apart from the main games, the storage is costly though.
So you can simply attach a USB storage device which is formatted to exFAT and FAT32 (so that you don’t face any comparability issue) to export the native image files as JPGs.
How to do it?
1) Plug in USB device
2) Navigate to the Capture Gallery from the home menu.
3) Locate the image/video content you want to share and press the Options button
4) You will get a menu on the right side of the screen, locate “Copy to USB Storage Device” Option. Highlight it  and press X.
Note : You can select as many screenshots as you would like to export in bulk to the device you have plugged in.
5) All your exported content will be automatically transferred to USB device under the folders PS4>SHARE>Screenshots, and then again sorted by games.
The export process is really easy and quick.
Go back to Index
PS4 broadcasting on youtube using share button

7) How to live-stream your PS4 gameplay to YouTube?

Step 1 : Link SEN account to YouTube account
—  Go to Settings >> PlayStation Network/Account Management >> Link with Other Services
— Select YouTube and sign in using your YouTube account credentials.
— Wait to get confirmation on account linked.
Step 2: broadcast using YouTube
— While you are playing your game, press the SHARE button to open the “Broadcast Gameplay” menu.
— Now select YouTube as service to broadcast. (if asked you have to agree to the YouTube terms of service to enable streaming)
— Done, you are LIVE on internet 🙂
Note : You can also personalize broadcast details such as Microphone/PlayStation Camera inclusion, and the display of Spectators Comments.
Go back to Index


8) How to live-stream your PS4 PRO gameplay to YouTube?

— You need to follow the same process as explained before for the PS4
Just note down the additional information as given below for PS4 PRO model as given below —
1) You can’t Broadcast in 4K from your PS4 Pro system, but you can Broadcast in up to 1080p (60fps) depending on broadcast service used and bandwidth.
YouTube — Up to 1080p (60fps) is available – quality may vary depending upon YouTube network traffic.
Twitch — 1080p (60fps) is available.
DailyMotion — 1080p (60fps) is available (Only for selected verified DailyMotion account holders.)
2) HDR is not supported.
Go back to Index


References for this post are taken from below websites
https://www.playstation.com/en-us/explore/accessories/gaming-controllers/dualshock-4/

How to take Screenshot on LG Stylo 4 ? G6/4/2, Stylo 3/2/PLUS

Every new phone in market has some or the other innovative feature and LG Stylo 4 also has some. Yes, it features Smart Rear Key, which allows screenshot by double taping the fingerprint sensor located at the back of phone. Also the Capture+ drop down option adds quick option to take a screenshot.

How to take Screenshot on LG Stylo 4?

Simplest method is to use Power button and Volume down (-) keys simultaneously. But New innovative method of using Smart Rear Key, which allows quick capture by just twice touching the fingerprint sensor located at the back of phone.
Here in this post I have explained following 5 methods to take a screenshot on LG Stylo 4 phone.

Method 1) Using hardware buttons Power + Volume key

Method 2) Using Capture+

Method 3) Using scroll capture

Method 4) Using Smart Rear Key

Method 5) Using Google Assistant

Also at the end of post I have explained How to write notes on a screenshot? which is also unique feature of this LG Stylo 4 phone.
How to take a Screenshot on LG Stylo 4?

Method 1) Using hardware buttons Power + Volume key

This is standard method of taking a screenshot on Android phones.
Applicable to : LG G2, LG G4, LG G6, LG V20, LG Stylo 2, LG Stylo PLUS 2, LG LG Stylo 3, LG stylo 3 plus, LG Stylo 4
Step-by-Step Guide
1) Prepare the screen with photo or image you want to screenshot.
2) Now Press and hold the Power/Lock key and the Volume Down (-) key simultaneously for a second.
3) When you leave buttons, with a blink & shutter sound, the Screenshot will be saved to the Screenshots folder in Gallery.


Method 2) Using Capture+

Applicable to : LG G2, LG G4, LG G6, LG V20, LG stylo 3 plus, LG Stylo 4
This feature needs to be enabled first before using it.
Goto Settings >>  General >> Shortcut keys >> turn on Open Capture+
Now open the screen you want to take a screenshot, and drag the status bar downwards, then tap Capture+ icon LG Stylo 4 capture plus icon to take a screenshot
Status bar is the top bar where you normally see all status icons, the time and the battery level.
Note : When the screen is turned off or locked, you can quickly access Capture+ by pressing the Volume Up (+) key twice. To use this feature, tap Capture+


Method 3) Using scroll capture

Like most of the modern phones, LG Stylo 4 allows to capture extra long content like a webpage or whatsapp chat or an email or any long text / image message.
For this you can use the scroll capture feature.
Step-by-Step Guide
1) Open the screen you want to long capture like a browser window.
2) Drag the notifications panel downwards and then tap Capture+ >> Extended to capture the entire screen you are currently viewing as a single image file.
Note : Remember that the App you are viewing must be capable of scrolling downwards, i.e. support the scroll capture feature.


Method 4) Using Smart Rear Key

LG Stylo 4 has a new feature to use your fingerprint to quick shutter, quick screenshot, and control notifications.
For quick capture 2 touch of fingerprint sensor will make the work.
Take a screenshot: Double-tap and hold the fingerprint sensor.
Its so simple!
See the main image for this post demonstrating this method.


Method 5) Using Google Assistant

Lastly, one of my most favorite voice command method, which is available on most of the Android phones, so as in LG Stylo 4 phone.
The Google Assistant can take a screenshot for you with voice command without even touching it.
Step-by-Step Guide
1) Locate the image /content you want to capture on the screen.
2) Long-press on the Home button or say “Okay Google” or “Hey Google” to launch the Assistant.
3) Now either say “Take a screenshot” or type the command in using your keyboard.
4) You will not get editing options but your screenshot will be saved to your phone’s Photo Gallery, so you can edit it later or share it on social apps.


How to write notes on a screenshot?

Sometimes you wish to do some Writing of notes on the screenshot to provide some details like marking on a map or recipe details. Here is how to do it –
1) Tap O >> QuickMemo+ >> 📷
2) When the screen / map / image / photo or anything you wish to capture is open on your screen, press ⭕ to take a photo, then tap OK.
2) The screenshot taken will appear as the notepad background theme. And Memo tools will also appear at the top of the screen. Tap T or ✎ to write notes on the photo.
3) You can crop the image (if required) and add notes as desired or write notes by hand on the photo / snap.
4) Tap ✓ and save the notes on your device.
5) Saved notes (with snap) can be viewed in either QuickMemo+ or Gallery.
Note : If you like to save all generated notes in the same location every time, then select the Use as default app checkbox ☑ before selecting an app.


LG Stylo 4 specs and features - using GIF capture

Bottomline

All new LG Stylo 4 has a FullVision display that delivers clearer picture quality, and a more vivid visual experience.
It has Portrait Mode which allows blurred background photos like a professional camera.
The thing that I liked the most is you can simply pull out the Stylus and begin writing on the screen without even turning it ON !
Making this device more powerful and smart by use of innovative screenshot features like using the fingerprint sensor is very good idea, it has made the task simple and quick too.
Other options like extra long screenshots using scroll capture with simple drop down menu selection also reduced the complex keystrokes and any layman can also use it to take website pages long screenshots easily.
Further editing and sharing the screenshots is also easy and happens only on a tap of button, the QuickMemo+ allows adding text to photos before sharing, that too you can do using the stylus.
Lastly the GIF capture allows you take snippets of video, edit them with your stylus, and sharing them with friends.
Overall a great package by LG.
Hope this helps!
Cheers!!

4 EASY ways to Screenshot (Print Screen) on OnePlus 6 [UPDATE]

Newly launched OnePlus 6 has its own special methods to take a screenshot other than the standard methods used in all Android phones. I will be explaining these simple methods one by one in this post. And worth to mention that the three-finger Gesture method is just Wow! Once you use it, you will fall in love with it. So lets go ahead to learn How to take a Screenshot in OnePlus 6?
Update 11 Sept 2018 :
Latest news is that OnePlus 6T will have in-display fingerprint sensor, I expect to have new screenshot method like introduced by Samsung in Galaxy S9 series. ( Scroll capture in S9 )

How to take a Screenshot on OnePlus 6?

You can use standard button combination of Power + Vol button OR use three-finger gesture OR use Google Assistant to take full screen snap or a scrolling screenshot on your OnePlus6 Phone.
There are below four methods which are simple and quick to use,

INDEX

1 Screenshot using OnePlus 6’s buttons Go to Topic
2 Take a Scrolling Screenshot on the OnePlus 6 Go to Topic
3 How to Use the OnePlus 6 Screenshot three-finger Gesture – OnePlus 5, OnePlus 5T, and OnePlus 6 Go to Topic
4 Google Assistant Go to Topic

Screenshot using OnePlus 6 power and volume buttons

1) Screenshot using OnePlus 6’s buttons

Everyone who has taken screenshot at least once on his android phone knows this method.  Oldest and proven method to use phone’s physical buttons, same works in case of OnePlus 6 too.
Step-By-Step Guide
1) Ensure that all the content you want to capture, is visible in the phone’s screen
2) Now, press both, the Power button and the Volume Down button together simultaneously for couple of seconds.
Note : The power button is located on the right hand side of the phone and the volume buttons are located on the left hand side (See image above which clearly shows button locations)
3) Leaving any one of the button will make your phone’s screen flash and the screenshot you took will appear for few seconds in middle of the screen.
4) While the screenshot thumbnail is visible on the screen, a toolbar will appear at the bottom of the display that lets you edit or share the image. By clicking the toolbar you can either edit the image snap or share on social network quickly. Remember that the toolbar will disappear in few moments, so if you wish to take action do it immediately.
Note: clicking the pencil edit button will present you a full set of tools to customize the image. Good for sharing funny photos, circling text in an email or drawing on images!
5) Your screenshot will be saved to your phone’s Photo Gallery, so you can edit it later or share it on social apps.
Go to Index


How to take a Scrolling Screenshot on OnePlus6

2) Take a Scrolling Screenshot on the OnePlus 6

Similar to Scroll capture provision on Samsung s9, You get a scrolling screenshot option in OnePlus phone.
Excellent for taking a screenshot of webpage or whatsapp chat message, an email or any long article which is more than single screen.
When you select the scrolling screenshot option, the OnePlus 6 will take continuous screenshots by moving further down the screen, while doing so it captures multiple screen snaps and stitches automatically to get single image file.
You have an option to stop scrolling process by tapping on the display, or the phone automatically stops at the end of page or it reaches a maximum image file size.
Step-by-Step guide
1) Ensure that all the content you want to capture, is visible in the phone’s screen
2) Now, press both, the Power button and the Volume Down button together simultaneously for couple of seconds.
3) Leaving any one of the button will make your phone’s screen flash and the screenshot you took will appear for few seconds in middle of the screen.
4) At the same time you will see a toolbar at bottom of screen, Tap on Scrolling Screenshot option on the bottom right side of the pop-up toolbar (rectangle phone icon – See the image above)
5) The phone will automatically scroll to take continuous screenshots, at any time you can Tap the screen to stop or it will go on till end of page.
Go to Index


How to Use the OnePlus 6 Screenshot using three-finger Gesture

3) How to Use the OnePlus 6 Screenshot three-finger Gesture?

Applicable to : OnePlus 5, OnePlus 5T, and OnePlus 6
OnePlus’ has variety of gesture navigation controls, you can use simple menu of different gestures to give different commands and launch different actions.
And one of the most intuitive gesture action added in OnePlus 6 is the use of three fingers to quick capture of screen snap. I think among all the latest phones this feature is liked by me the most.
So simple and quick three-finger gesture to take a screenshot, wow, simply superb, well done OnePlus R&D team. Congratulations !!
Step-by-Step Guide
1) Goto the Settings menu by swiping down on the notification shade and tapping on the gear icon.
Settings >> Navigation Bar & Gestures option >> Part way down the list >> under the System gestures subheading, toggle on Three-finger screenshot.
2) Make ready the content you want to capture, on the phone’s screen.
3) Now, place three fingers on the screen, aligned side by side as shown in above picture and info-graphics. With simple touch motion, pull the three fingers towards the screen top (or you can do vice versa, i.e. top to bottom), nothing so great, you need not swipe throughout the screen but only for certain distance.
4) If you go right, the phone screen will flash and with camera shutter sound you will get picture of screenshot at the middle of screen.
5) While the screenshot thumbnail is visible on the screen, a toolbar will appear at the bottom of the display that lets you edit or share the image. By clicking the toolbar you can either edit the image snap or share on social network quickly. Remember that the toolbar will disappear in few moments, so if you wish to take action do it immediately.
Note: clicking the pencil edit button will present you a full set of tools to customize the image. Good for sharing funny photos, circling text in an email or drawing on images!
6) Your screenshot will be saved to your phone’s Photo Gallery, so you can edit it later or share it on social apps.
Go to Index


4) Google Assistant

Lastly, another proven method works on most of the Android phones, so in OnePlus models.
Use my most favorite, Google Assistant to take a screenshot.
Step-by-Step Guide
1) Locate the image /content you want to capture on the screen.
2) Long-press on the Home button or say “Okay Google” or “Hey Google” to launch the Assistant.
3) Now either say “Take a screenshot” or type the command in using your keyboard.
4) You will not get editing options but your screenshot will be saved to your phone’s Photo Gallery, so you can edit it later or share it on social apps.
Go to Index


How to take a Screenshot on OnePlus 6

Where do I find the completed Screenshots?

Now that you have learnt taking a screenshot successfully on your brand NEW OnePlus 6 Phone, you need to know what to do next.
First thing is that you immediately get a tool pallet below the screen to edit the images on the fly before sharing or using across social platforms or in your presentations.
You can also share them using the share button below the screenshot.
However these options will disappear in a moment and if you miss editing or sharing, simply head down to your phone’s photo gallery where the screenshots are saved for further editing and sharing.
And I know you will love to learn How to Make Mobile Phone Screenshots Realistic and Beautiful – Read my guide below 
https://how-2-take-a-screenshot.com/mobile-case-for-fitting-screenshot/

  • « Previous Page
  • 1
  • 2
  • 3
  • Next Page »

Jumbo discount offer

Our site is hosted on SiteGround

Get Mega Discount on SG Hosting

Amazon Prime

What's New on Amazon Prime this Week?

HowzBuy.com

About us
Contact us

JOBS

Apply Now

Legal

Privacy Policy
Terms & Conditions

Test Videos

Chipolo video

Archives

Copyright © 2025 · News Pro Theme on Genesis Framework · WordPress · Log in

This website uses cookies to improve your experience. We'll assume you're ok with this, but you can opt-out if you wish. Cookie settingsACCEPT
Privacy & Cookies Policy

Privacy Overview

This website uses cookies to improve your experience while you navigate through the website. Out of these cookies, the cookies that are categorized as necessary are stored on your browser as they are essential for the working of basic functionalities of the website. We also use third-party cookies that help us analyze and understand how you use this website. These cookies will be stored in your browser only with your consent. You also have the option to opt-out of these cookies. But opting out of some of these cookies may have an effect on your browsing experience.
Necessary
Always Enabled
Necessary cookies are absolutely essential for the website to function properly. This category only includes cookies that ensures basic functionalities and security features of the website. These cookies do not store any personal information.
Non-necessary
Any cookies that may not be particularly necessary for the website to function and is used specifically to collect user personal data via analytics, ads, other embedded contents are termed as non-necessary cookies. It is mandatory to procure user consent prior to running these cookies on your website.
SAVE & ACCEPT