If you are searching on How to take a Screenshot on this Phone? then you are on the right page. Yes, I will be guiding you precisely on this subject depending upon the phone model you are using and keeping in mind the latest introductions in year 2018, I have also included the latest models of mobile in this post. In case you are not able to locate your model or have not understood method to take printscreen on your mobile please let me know by putting comments in below section.
Android Phones –
If you are using Android phone, stay on this page and search for respective model number in the table given below.
Apple Products –
If you are using any of Apple products then I have written detailed posts, here are links to jump to them
- iPad or iPad Pro or iPhone or iPad mini or iPad 2 or ipad air 2 – Goto the Topic
- Phones on iOS 7, 8, 9, 10 and 11 – Goto the Topic
- iPhone X – Goto the Topic
How to take a Screenshot on This Phone?
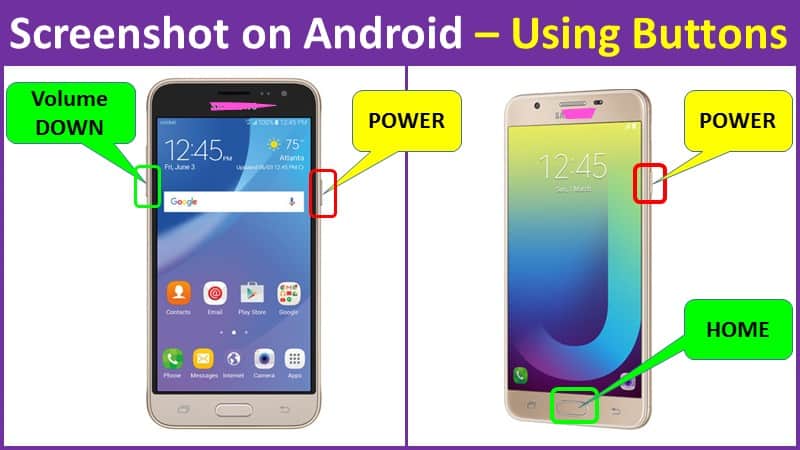
Press POWER BUTTON + VOLUME DOWN Buttons simultaneously for 2-3 seconds to generate a screenshot on any Android phone.
Capturing a screenshot on an Android device is pretty simple. Press the unique button combination on your smartphone or tablet and you can capture and share a screenshot in a matter of seconds.
If you know the mobile company name and model then goto the table given below the post to directly get the link or simply follow the following method on your Android phones to take a screenshot.

How to Take a Screenshot on Any Android phone?
Method 1 : Using hardware buttons
Applicable to : Acer, Asus, Google Nexus, Google Pixels (Pixel 2, Pixel 2 XL) , HTC U series (up to U12+), All other HTC phones, Huawei, Honor, Lenovo, All LG phones, Motorola, OnePlus, Galaxy S8 and later, Sony, ZTE phones
Applicable to Operating System : Ice Cream Sandwich (4.0) and Above
Note : For OLD phones with OS Android 2.3 and Below no facility to take screenshot will be available.
If you are using simple Android phone, then easiest way is to use the phone buttons to generate a screenshot.
Step-by-Step Guide
1) Unlock your Android Phone
2) Open the screen you want to take screenshot like a photo, any App ,web browser window, email etc.
3) Press Power button and Volume Down button simultaneously for 2-3 seconds
4) The phone will generate a snapshot with light camera shutter sound and flashing an animation, now you can release the buttons.
5) Your screenshot will be saved to the phone memory or if you click quickly on the screenshot thumbnail, then it will directly show you the edit buttons.
HTC U12+ phones: Press and hold the power button until your phone vibrates, and then tap the virtual home button on the navigation bar while still pressing the power button
Method 2 : Using Home button (for those phones having only home button)
Applicable to : Galaxy S7 and earlier
For some of the latest phones, they will only have a home button like an iPhone in that case you can use the following process to generate a screenshot.
Step-by-Step Guide
1) Unlock your Android Phone
2) Open the screen you want to take screenshot like a photo, any App ,web browser window, email etc.
3) Press Power button and HOME button simultaneously for 2-3 seconds
4) The phone will generate a snapshot with light camera shutter sound and flashing an animation, now you can release the buttons.
5) Your screenshot will be saved to the phone memory or if you click quickly on the screenshot thumbnail, then it will directly show you the edit buttons.
How to take a Long Screenshot on This Phone?
Samsung models
Samsung Note 5 – Use ‘Capture more’ allowed you to take a single long screenshot of a page, from the top and scrolling all the way to bottom, in one file.
Samsung Galaxy S8, S9, S9 Plus – Use ‘Scroll capture’
1) Enable Smart capture from Advanced settings.
2) Open the screen / webpage you want to take a snapshot.
3) Take a screenshot using any standard method you know like using hardware buttons.
4) After taking screenshot, you will see options at the bottom of phone screen, tap on Scroll capture (previously “capture more”) button.
5) Keep tapping or pressing the Scroll capture button to scrolling down the page until you cover the complete screen.
6) Done, long screenshot saved on your Samsung phone.
Long scrollshots on Huawei smartphones
Applicable to : Huawei Mate 9 and Mate 10 models ( EMUI 5.0 )
Step-by-Step guide
1) Open the screen / webpage you want to take a snapshot.
2) Hold down on the Power button and Volume down buttons simultaneously for 2-3 seconds.
3) You will hear camera sound with an animation of thumbnail to confirm that screenshot is taken by your Huawei phone. Before the animation disappears, tap on the Scrollshot option.
4) Your phone will start scrolling down the screen until you tap on the screen which tells it to stop.
5) The scrollshot will now appear on your display for you to inspection.
6) From here, you can Edit it or Share on social media, or Delete on the fly.
If you don’t take any action it will be saved to the image gallery under Screenshots folder.
How to take a screenshot without touching the phone ?

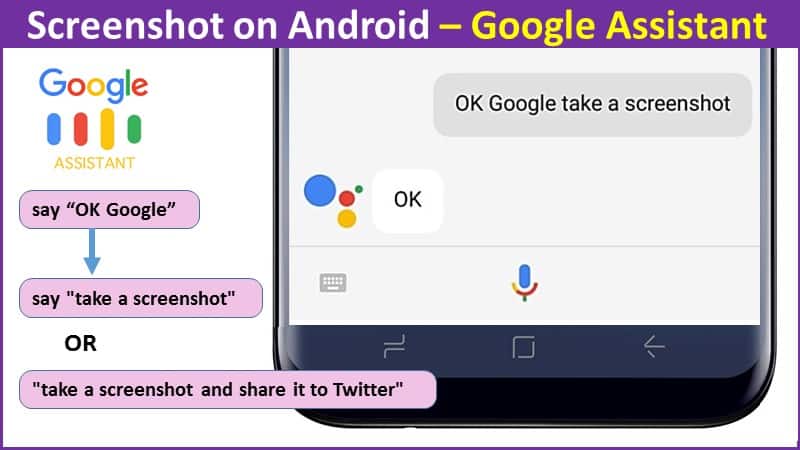
You can use the Google Assistant mostly available on all Android phones, which allows you to send voice commands to your phone to do different tasks, one of which can be taking a screenshot or screen recording.
1) Locate the image /content you want to capture on the screen like a chatting App WhatsApp or web browser or video game etc.
2) Long-press on the Home button or say “Okay Google” or “Hey Google” to launch the Assistant.
3) Now either say “Take a screenshot” or type the command in using your keyboard.
4) You will not get editing options but your screenshot will be saved to your phone’s Photo Gallery, so you can edit it later or share it on social apps.
How to take scrolling screenshots on any Android device
If your phone inherently does not support taking a long scrolling snapshot and you still want to capture long screen like a webpage, WhatsApp chat, or any other chat application or an email then you can use the external apps from play-store.
Using an App from Google Playstore –
a long webpage or long conversation can be captures using different Apps from Playstore, however for some of the latest phones from Samsung and Huwai etc. you get this facility built-in without loading any external App.
1) Stitch & Share: big screenshot / scrolling screenshots
1) Download and install Stitch & Share from Google Play – FREE Download link
2) Using your device’s unique button combination, capture the first screenshot
3) Scroll down within the app, keeping a small portion of what was in the first screenshot visible and capture the next screenshot
4) Repeat the previous step until you have captured everything you want to appear within the screenshot
5) Swipe down on your notification panel and tap the Stitch & Share notification
6) Tap the green arrow icon in the bottom right corner to save or share your screenshot
If the generated screenshot doesn’t align properly, Stitch & Share allows you to adjust where the images overlap by tapping the scissors icon. The app also includes editing features which allow you to highlight text or insert a blackout bar (great for hiding someone’s name, email or phone number). The free version only offers one color for highlighting, but you can get rid of the ads, get more highlighter colors and eliminate the Stitch & Share watermark with a $0.99 in-app purchase.
2) Stitch & Share: LongShot
LongShot has a few other useful tools. Capture Web Page will open a screen with a URL bar at the top. You can enter any webpage and take a long screenshot. The Select Images tool will allow you to merge previously taken screenshots (or any other images). Here’s an example of what you can do with LongShot.
- Download and install LongShot from the Play Store.
- Open the app.
- Toggle Auto capture on (this will automatically take screenshots as you scroll).
- Tap the Capture screenshot button.
- Floating green Start button will appear.
- Go to the screen you wish to capture.
- Tap the Start button and slowly scroll.
- Tap Done when you’re done.
- All the screenshots will appear on the next page. Tap Join to merge them.
- Adjust the screenshots to make a long screenshot.
- When you’re done, the screenshot will be in the LongShot folder.
Where are my screenshots saved on any Android Phone?
Once you take a screenshot using any of the above method, then the screenshots will be automatically saved by your phone in default location on device.
The captured screenshot is saved automatically to Gallery > Screenshots
How to email the Screenshot on Android?
When you take screenshot using any of the above methods, the animation of thumbnail will be shown, you can quickly tap the animation to select the screenshot image and use share options.
when you select share option of MAIL, you need to choose your email client (if there are multiple email clients line Gmail, Mail). Select it and it will directly head down to the mail client application in compose mode, the said image snap will be automatically attached to the email. Enter the details and press send mail.
If you want to back up your screenshots to Google Photos, you might need to tell your phone to do so. Open the sidebar in Google Photos, then Device Folder. Tap Screenshots, and flip the Back up & sync toggle. From there on out, all of your screenshots will be backed up to your camera roll in Google Photos.
Sr No |
Phone company and model |
Topic Link |
| 1 | Samsung Galaxy S9 | Jump to Topic |
| 2 | Samsung Galaxy S9 Plus | Jump to Topic |
| 3 | Samsung J7 Prime | Jump to Topic |
| 4 | OnePlus 6 | Jump to Topic |
| 5 | LG G2, LG G4, LG G6, LG V20, LG Stylo 2, LG Stylo PLUS 2, LG LG Stylo 3, LG stylo 3 plus, LG Stylo 4 | Jump to Topic |
| 6 | CAT phones S30, 31, 40, S41, 60, 61, T20 | Jump to Topic |
| 7 | Oppo phones Oppo A37, Oppo A57, Oppo A59, Oppo A83, Oppo R9s Plus, Oppo R9s, Oppo R9 Plus, Oppo F1, Oppo F1s, Oppo F1 Plus, Oppo N3, Oppo Find 7A, Oppo Joy 3 |
Jump to Topic |
| 8 | Huawei Phones P10 Lite, P10, P10 Plus, Mate 10 Lite | Jump to Topic |
| 9 | Moto phones Moto X 2014, Moto X Style and Moto X Pure edition, Moto X4, Moto G, Moto Force Z, Moto Z Droid , Moto Z Force Droid, Moto E4 , Moto E4 Plus | Jump to Topic |
| JioPhone JioPhone 2 LYF Flame 2 LYF Flame 3 LYF Flame 4 LYF Flame 6LYF Flame 7LYF Flame 8 LYF Water 1 LYF Water 2 LYF Water 3LYF water 4 LYF water 5 LYF water 6 LYF water 7 LYF water 8 LYF water 9LYF water 10LYF water 11LYF Wind 7 LYF Wind 6 LYF Wind 4 LYF Earth 1 LYF Earth |
Jump to Topic |
Leave a Reply