• Amazon.com
  • Amazon.in
  • home
    • baby guide
    • HowzBuy.com

How to take a screenshot on Apple Watch? Problem resolution

Do you know that your Apple Watch is also capable of taking a screenshot? Yes, like any other device like iPhone, iPad, Android smartphones, tablets or computers Apple Watch can also take a screenshot to record things for you. Only thing you should know is how to take screenshots on Apple watch? and How to enable screenshots on Apple Watch? Reason being that in latest versions of watchOS, Apple has disabled the ability to take a screenshot by default.
Its evident that the screenshots from Apple Watch are necessary for social sharing with friends your achievements, activities on sites like Facebook or Twitter. Even sometimes you may need to share the issues / problems faced to forums related to apple watch.
Since sometimes you will need it, in this post you will learn about Apple watch capability to take a screenshot and device settings which you can do to enable this facility. Also at the end of post I have written about the problem you will / might face after enabling the screenshot feature, however there is a simple workaround which is also given with guide to address it.
So first thing that you need to learn is –

How to enable screenshots on Apple Watch?

As step one, you need to enable the settings from the Apple watch to take a screenshot. (remember that in latest version of WatchOS this setting is switched off and hence it is necessary to follow these steps)
Follow these simple steps to do so –
Step 1) Connect your Apple Watch to iPhone
Step 2) Open the Apple Watch App on your iPhone
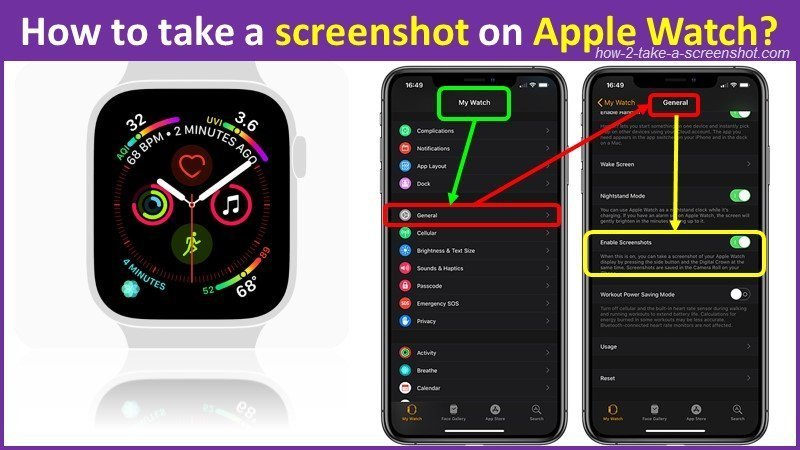
Step 3) See the image snap shot below, and goto >> My Watch Tab
Step 4) Goto >> General settings menu
Step 4) Scroll down to the bottom and you will see Settings of “Enable Screenshots” – Tap to toggle the settings to turn it ON.
Now you are ready to go!
How to take a screenshot on Apple Watch?

How to take a screenshot on Apple Watch?

Once you have done the initial settings, your Apple watch is ready to take a screenshot on your wish.
Remember that method for taking a screenshot on an Apple Watch slightly differs from the standard iPhone or iPad.
In an iPhone or iPad pressing the Home and Power button at the same time will generate a screenshot for you.
However since there is no Home button on your Apple watch, you have to use the Digital Crown. It’s simple, just follow these simple steps to do it.

Method 1

Step 1) Be ready with the screen you want to capture on Apple watch.
Step 2) Now Press and hold the side button on the Apple Watch , and without releasing it, immediately tap the Digital Crown.
Step 3) The watch screen will flash and with the sound of a camera’s shutter screenshot will be generated.

Method 2

Step 1) Be ready with the screen you want to capture on Apple watch.
Step 2) Now Press and hold the side button and Digital Crown button simultaneously.
Step 3) The watch screen will flash and with the sound of a camera’s shutter screenshot will be generated.
Note : Sometimes you may launch Siri or Friends by accident, but after some practice you will be able to capture screenshots perfectly!
how to take screenshot on Apple watch animation

Where to find captured screenshots on Apple Watch?

Once the screenshot is generated using any one method above, they will be automatically stored on to the connected iPhone device in the iPhone Photos app.
So to access and view the screenshot you just captured, open the iPhone’s Photos app, here you can look at the photos as well as edit them or share them onto social network or even delete them.
Photos app >> Photos tab >> screenshots
You may also find it in iCloud Photo Library depending upon which storage media you have configured on your iPhone.

Screenshot interferes with pause or resume a workout buttons

Remember that with enabling screenshot feature you will also face an issue, this is due to the fact that the Apple watch uses a new shortcut to pause or resume a workout which requires you to simultaneously press both the Digital Crown and the Side button?
So while you enable the Screenshot option, now when you take a screenshot, you pause or resume a workout … or you can say that you will generate a screenshot every-time you pause or resume a workout!
So this will be felt as nuisance to some people ..
So as a countermeasure or to prevent this thing to be happening, the watchOS 3 includes a new feature that can automatically pause your workout when you stop moving and resume when you start moving, saving you from manually pausing or resuming it.

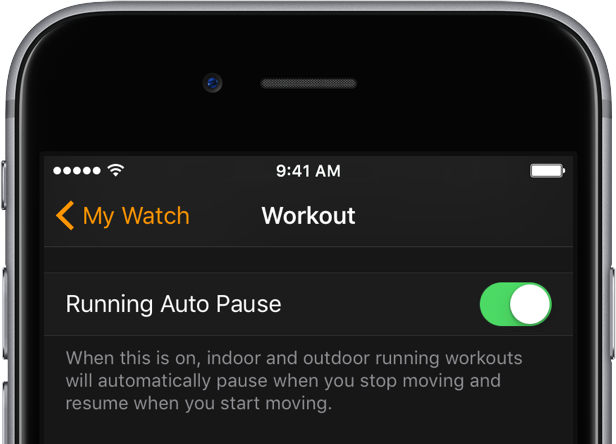
How to enable Auto Pause to prevent screenshots?

Now to enable the Auto Pause feature follow these simple steps.
Step 1) Open Apple Watch companion App
Step 2) Goto My Watch >> Workout 
Step 3) Slide to the ON position the Running Auto Pause button
Note : watchOS 3 is available as a free software update for the original Apple Watch, Apple Watch Series 1 and Apple Watch Series 2.
“When this is on, indoor and outdoor running workouts will automatically pause when you stop moving and resume when you start moving,” notes Apple.
How to auto pause workouts on apple watch?

References for writing this post are taken from various websites including Apple official website

https://support.apple.com/en-us/HT204673

Fake Paytm Payment Receipt App – Illegal to use it for fraud

When I read the news of someone using a fake paytm payment receipt generator App to cheat the shops buying goods but not paying actual amount, I got quite surprised and decided to dig into which are these apps and can someone really use it to do fake payments? Plz keep in mind that my study is limited to educational and research purpose only and I strongly recommend refraining using such apps for illegal or unethical purpose.
So lets begin by going through the news which attracted my attention !

Fake Paytm payment receipt generator app used to dupe stores!

2 students held for using fake Paytm to dupe supermarket store of Rs 30,000

Shopkeepers duped of Rs 7,000 by using fake Paytm app

Fake Paytm app used to con shopkeepers in Hyderabad

Now if you read the news carefully you will get names of fake apps which can help you generating the payment receipts without using actual paytm app! Again note that this is illegal use and those people using it got jailed by police, so do not ever think and attempt it.

These Fake apps are not available on Google Play Store

First thing I did is searched on Google play store for fake paytm payment apps and found that no such app is available on the official google play store!
It clearly shows that Google does not support any such activity which can encourage illegal activities, which is really good gesture from Google.
So I went on and Googled it for any such App available on other websites and found similar apps.
I downloaded most of them and found that only one is working find which is called as Spoof Paytm App, all other apps were asking for unnecessary permissions like using the phone book, calling permissions, location services which I felt totally irrelevant and suspicious, so I uninstalled such apps immediately.

So I downloaded the following apps and tried / tested it on my mobile

WARNING:
I took care to use a Android mobile phone which is formatted and do not have any contacts and financial apps / information available so as to protect myself from any damage using Apps out of Google Play store.
I also suggest you not to try installing any unknown apps on regular use mobile, since it can cause damage by stealing important information from your mobile phone.
So lets have a look at the first App that I tried –

Spoof Paytm APK – download link

fake paytm payment receipt app download free
Out of all apps downloaded the Spoof Paytm app works as it says, what I mean that it does generate a Paytm fake payment receipt copy which looks exactly same as the real Paytm payment receipt.
All you have to do it download and install the App.
Also this app does not ask for any extra permissions from you for location or contacts etc. which I felt comparatively safe to try for.
After you open the App, all you have to do it enter the Name, Phone number (to which you are going to show payment), amount paid, wallet balance – and after you press submit button, it immediately shows a fake payment receipt, precisely looking like a real receipt!
Again one more time I would like to WARN you from using it for any illegal or unethical purpose
The second app I came to know through the news (refer to both news I have given at the beginning of this post) is about Paytm Prank app, hence I Googled for this app and downloaded it.

Paytm Prank Apk – download link

This App does not work at all
First bad thing about this app is that it asks for permissions for making phone calls as well as know location of your device, so looks like a Spam app.
Anyway since I loaded it on a mobile which does not have any contacts or important data, I gave permissions to get location and call permissions to the App.
However it does not work at all? It stuck to the main screen and do not give any further options to generate a payment receipt.


Why its possible that people used fake paytm app to deceive shopkeepers?

Since Paytm is used and accepted widely, most of the people including me, prefer to use Paytm at shops. This surely saves burden on CASH carrying to buy things.
My own experience is that many times when I show my mobile screen of payment successful the shopkeeper gets convinced and do not bother to check in his mobile for receipt … in some cases he checks but due to his mobile internet connectivity issues or tower signal poor, he is not able to verify if he has received the payment or not.
Sometimes the mobile number is the owners phone, and he has gone somewhere, so worker in shop do not have any way to verify the payment, but to believe what the customer showed him as confirmation of payment.
Now this is where the catch is!
If you see all the three news I have shared in the beginning of post, you will realize that due to many practical reasons, there are many chances that someone can simply use some fake app to generate fake payment receipt, show it to the shopkeeper and get the goods for FREE! and by the time the shop owner is aware that he is duped, he can’t do anything at all .. since there are no records kept of mobile number etc …
Take an example of Spoof Paytm App … if someone slightly modifies it to read the QR code and populate the required fields like name and phone no etc .. then what?
In fact when I loaded Spoof Paytm App . .I found that it is really easy to generate fake payment receipt in seconds and shopkeeper will get fooled with the originality of mock receipt!
The app is able to read the QR code and display the phone number.
The App also generates fake random Transaction Txn ID and adds to the receipt!
The complete UI looks precisely like original Paytm App!
I will say this is same as someone using fake currency, only this way is fake digital currency.

What is Solution ?

From the Shop owner side

I think the solution is taking similar actions we do for the fake currency.
Yes, check and confirm.
The shop owner must ensure that he is able to receive payment notification. If not, he should not accept digital payments from customers.
Another option is that the apps like Paytm, shall enable providing notification of alternate mobile numbers in case main mobile is out of range or authorize two mobile numbers against one business account, at least for notifications.
One more option is to record customer mobile number and confirm by calling upfront, this will ensure that he is able to call the customer later, in case payment is not received.

From Paytm side or any other payment app side

Block such apps from Google App store – However I found that even such apps are removed from the official Google App store, they are available on other websites for download. I am not sure how this can be banned, however I believe that requesting Google can make them disappear from the Google web search .. and once they disappear from Google search .. practically they will be useless …

references for this post are taken from –

how to create fake paytm receipt with 100% proof – note – This thread is archived by Reddit
fake paytm app – payment receipt generator

Does Tinder notify DM’s & Tinder profile screenshots?

Knowing that Tinder conversations disappear when any one of the two participants unmatches or deletes the account, it may be necessary for you to save the conversation or even the photos using simple screenshot method. But it can be an issue for you in case Tinder notifies the other user of your act? and there are chances of other partner being unmatching you immediately. So question is “Does tinder notify screenshots?” What I mean how many percent chances are there to the other person who swiped right to make your life? The fear of being caught on this dating app prevails in every mind on this earth though.

Any other method rather than taking a screenshot?

Other than taking screenshot there is a method to get a big file with all your conversation and matches every time you ask for it (Tinder call it as “updates”) and after that you will have to filter what you are looking for in order to be able to save it. But this method is tedious and wastage of time, so best way is to quickly take a screenshot of conversation using your phone (there are all methods available on this website, so simply find out suitable method for your phone or tab on how-2-take-a-screenshot.com
Alternatively you can also use the Tinder extension for Google Chrome – Download it here available for Windows / Mac and Linux.
So coming back to the point …

Does tinder notify screenshots?

As on today, Tinder app does not notify anyone after you take a screenshot of the direct messages or their Tinder profile. This information is updated as on Nov 2018 and may change in year 2020.
So first thing first … you have won a Tinder match 🙂
Now you began chatting with a girl (or a boy)!
You liked her and you have amazing conversations …
And you don’t want it to go terrible.
So its time for you to take a snap of the cutie you are chatting to brag with your friends …
OR simply want to consult with your expert friend on how to respond to the current situation / conversation, and hence you want to take and share a Tinder screenshot!
But, a fear strikes to your mind! what if Tinder app alerts the girl on you taking a snapshot?
You wonder How to take a Tinder snapshot without them knowing?
Its typical “snapchat” fear across world of love and dating.
Will Tinder notify her when you take a screenshot of her profile or conversation?

Does Tinder notify when you screenshot her Tinder Profile?

While most of you are skeptical about Tinder App notification to her when you screenshot her profile.
Well … I will say as on 2018 still you are lucky and the simple answer to this question is NO.

I mean Tinder currently does not send any sort of screenshot notification alert to other person, unlike Snapchat.

Ofcourse for Snapchat too I have found some workarounds of taking screenshots without them knowing … and they are written in very much detail in my post Snapchat – How to take screenshot?

Does Tinder notify when you Screenshot the Conversation?

Again, as of year 2018, Tinder App does not alert the other person even if you screenshot the messages and conversation you have been doing.
Your girlfriend will not see and know even if you screenshot her conversation, or if you screenshot her Tinder profile.

So, go ahead and feel free to take a screenshot of your heart’s desire 🙂

Though word of Caution from my side for Tinder users!

First caution!
Well even though what all I have said in true in 2018, rules may change in the year 2019, so keep an eye over any changes that Tinder app may make in future.
Maybe Tinder also want to go inline with Snapchat one fine morning and then you may loose your girlfriend!
So be aware and comeback to this post in year 2019, to recheck the status of app notification.
Second caution!
While you take some screenshots of any awkward convos to post on meme pages… or share it with your friend across other chat app …
Or want to post it to Facebook for asking some feedback and suggestions …
Be careful! You may hurt someones intimate genuinely … or by mistake you disclose some embarrassing things mentioned in your DM’s ….. Disclosing it publicly may even call for legal action from the other side!
So think twice before sharing the screenshots across any social media networks, it may not be always safe to do so.
Does Tinder notify screenshots?

Using Login Credentials on Tinder

You will need to provide either the mobile number or the Facebook account to login to Tinder, these are called as basic credentials (your email and password) in order to login / create a Tinder account.

Tinder Profile shaping information

Now that you have created Tinder account, its time to personalize it to your heart’s content!
Spices and flavor to life with more information about you, like your background, interests, hobbies, personality type etc will make your profile more interesting to get girls swiping right ….
May be adding some nice photos and videos will make the proposition more attractive ….
Lastly once you are proficient! you may like to buy some advanced features of Tinder by paying certain fees .. but again that you can do once you graduate in love making and dating 🙂 be patient … wait to get some real good stuff before proceeding with the payment options …


This article is up to date as on Nov 2018.

I try to keep it updated, and will notify as soon as something like adding Tinder notification happens.
So if you have reached this page and reading this, be sure that you are in the clear.
And btw, even if they add some notification, there will be workarounds to do it secretly like with snapchat, you will surely figure out how do it eventually. Do read my post Snapchat – How to take screenshot?
I wish you thousands of grandiose swipes and beautiful matches on this earth 🙂

Happy swiping!


References for this post are taken from –
Tinder website – Source
Swipe life – Source
Download Tinder App from Google store – Download link

What is Tinder Swipe surge?

Notifications to users when there’s a spike in Tinder usage in their area. Tinder says that activity during a surge is 15x higher and increases matchmaking potential by 250 %
Swipe Surge push notifications added by Tinder in USA in Nov 2018.
Swipe Surge – Introduced by Tinder in USA – Read Blog

How to take a screenshot on Xbox One? Record & Capture Clips

My nephew is gaming freak and during holidays he is 24×7 soldier in the games! He is master Xbox One gaming and as soon as he reaches a new milestone, he likes to brag about his achievements on social media with his friends. What is important is that he has learnt the great skills of taking strategically-timed screenshots at precise moment 🙂 So here in this post I will be passing on the skills on How to take a screenshot on Xbox One? updated for the year 2018-2019.
Now it is clear that methods described in this post will be useful for gaming purely on Xbox One, however in case you have connected to your computer to stream the games from Xbox One then you can use traditional methods of taking a screenshot on your desktop or laptop – I have already detailed out these methods on this website here.

How to take a screenshot on Xbox One?

Press Xbox button to open the guide, then press Y button to capture a screenshot, OR press X button to grab the video for last 30 seconds.
Okay above answer briefs you in short on basic method to capture a screenshot from your Xbox One remote control.
Now lets see it in Step-by-Step approach:
How to take a Screenshot on Xbox One
Step 1 : Simply start your game and start playing as usual, as soon as something cool happens, you either wants to Video record the clip or capture a screenshot.
Tip : You can also navigate to the location or position yourself your character how you want them to be when the screenshot is captured.
Step 2 : Press the Xbox button on your Xbox One remote controller. This will bring up a flyer menu from left side of screen (see the image above showing the menu in RED border) on lower right corner of which you will see a sub-menu showing three options – Screenshot / Record that / Capture Options.
Step 3 : Press “Y” button on remote control to take a Screenshot. The menu on the left hand side of the screen automatically closes, showing a message notification in the lower center part of the screen that your screenshot has been saved. This message will disappear just in few seconds.
Step 3 (how to video record) : Press “X” button to grab the last 30 seconds of video, this is extremely helpful to capture last moments of fight to achieve the record score, but remember to do this quickly as soon as you achieve the score, else you will loose the precious video recording of last 30 seconds. In fact my nephew uses this more often to brag on social media and his friends always appreciate the precise moment capturing skills.
How to grab last 30 seconds video on Xbox One?


How to take a screenshot on Xbox One using voice control?

Voice commands are usual and easy on your Xbox One controller. When you want to take a screenshot of what just happened using voice, all you have to do is to say ”Hey Cortana, record that!” OR To capture what just happened, say ”Xbox, record that!”
Learn more on Voice control of XBox One – See this voice guide


How to capture what’s going to happen next on Xbox One?

Now that you have learnt how to capture a screenshot (printscreen) and how to record the last 30 seconds video. Lets also learn how to record the complete game or what is going to happen now in the game (knowing that you will be achieving new highs or you want to teach someone special steps in gaming)
Here is a Step-by-Step guide:
How to capture what's going to happen next on Xbox One?
Step 1 : Start your game as usual. Now Press  Xbox button to open the guide.
Step 2: Press the Capture Options button asus ZenFone screenshot icon, which will show sub menu as shown in above image info-graphics. From this sbu-menu you have to select Record from now.
Step 3 : To end the clip recording, open the guide using Xbox button and press the X button. You will get a notification message as soon as your clip is saved. (it may take some time depending upon the size)

Managing Storage space on Xbox One

Note 1 : Clip recording can be done from 10 minutes depending upon the game clip resolution and available storage space, as a guide 10 minutes recordings can be done using internal storage space, however if it exceeds 10 minutes to 1 hour, then you need to capture the video to an external storage device.
External storage device can be simple USB HDD Drive upto 256 GB using USB 3.0 connector. To set saving to external HDD do the following settings –
Press the Xbox button >> System >> All settings  >> Preferences >> Broadcast & capture >> Capture location >> Select External.
Note 2 : Saving and sharing screenshots requires Xbox Live Gold. If you don’t have it, you can take screenshots on someone else’s home Xbox as long as someone with Xbox Live Gold is signed in.
Note 3 : Your Xbox allows you a few gigabytes of free cloud storage just for keeping Xbox Game DVR captures and screenshots.
You can export it either to your PC, or to your personal OneDrive cloud storage for saving the space and keeping data safe.
Xbox Live clips and screenshots will upload automatically to the cloud, until your storage is full.


Where to find captured screenshots on your Xbox One?

To see your screenshots, select Manage captures. Select any screen capture / screenshot / printscreen to see what you can do with it.
When using your Microsoft Account on a PC or via OneDrive.com, you will be able to find the screenshot under OneDrive\Pictures\Xbox Screenshots.
Step-by-Step guide:
Step 1 : Press the Xbox button on your Xbox One remote controller. This will bring up a flyer menu from left side of screen.
Tip : You can get the flyer menu anytime while you are in the middle of a game, or on your console’s home screen.
Step 2 : Use either the left analog stick or the D-pad to select the Broadcast & Capture menu shown at the top of the screen.
Tip : The Broadcast & Capture icon looks like a half-circle with a WiFi signal coming out of it.
Step 3 : Press the Capture Options button asus ZenFone screenshot icon and the Capture menu appears.
Step 4 : Select “Manage Captures” to show the Manage Captures screen, by default it shows all of the video clips and screenshots associated with your Xbox Live account.
Step 5 : To further sort it out, you get options to filter the results, say showing only the captured video clips or screenshots for this specific Xbox One or any other associated live Xbox One account.
Further you can also sort out the results to specific game, this eases out to pick required capture and share with friends.
Step 6 : After you apply all required filters, you can select the highlighted screenshot and press “A” to view that specific screenshot. Then the chosen screenshot appears on your screen.

Sharing Screenshots and captured videos with friends

Step 7 : When you select the Share icon with the A button. You can share the clip / screenshot to :

  • Your Xbox Live activity feed (Depending on your privacy settings, Public or friends will be able to see it).
  • A private message.
  • To an Xbox Club (you need to be member of club to share it)
  • A Twitter link.
  • To OneDrive.

How to set video clip resolution on your Xbox One?

While taking videos is essential, you also need to think on space it is going to consume on drive as well as time taken to share on social media. So sometimes it will be essential to lower down the resolution of captures specially for sharing on social media like Twitter, where it does not support 4K screenshots.
To set your clip resolution and capture location, press the Xbox button to open the guide, then go to Broadcast & capture > Advanced settings.
Tip : You can check the upload status of clips from the Manage clips page by selecting Upload Status from the filter.


How to delete screenshots from Xbox One?

After sometime you need to cleanup space and clutter of screenshots, hence it is equally important to learn how to delete the screenshots !
Step-by-Step approach:
Step 1 : Press the “Xbox” button on your remote controller to open the guide menu.
Step 2 : Press the Home button using “A“on your remote controller.
Step 3 : Open the guide menu and press the View button (to the bottom left of the Xbox button) which opens the “Recent captures”
Step 4 : Navigate to any recent clip or old clip (see previous guide paragraph in this post on Where to find screenshots), and select it with the A button.
From here, press delete to remove it from your console, from Xbox Live, or both. (see menu below)
xbox-screenshot-delete
Tip : If you are unable o find required clip, simply navigate to SEE ALL at the bottom of menu to open the Manage captures menu. Then find required screenshot, select it with the A button and then select the trash can icon with the A button to delete it.


How to manage Xbox One screen shots on a Windows 10 PC?

While using Xbox One with your windows 10 PC, you can use your Xbox Live, where you can access and download your screenshots quickly and easily using the pre-installed Xbox app.
How to manage Xbox One screen shots on a Windows 10 PC?
Step-by-Step approach:
Step 1 : Press the Start Menu ⊞ and type “Xbox” and open the Xbox app.
Note : For first time you need to sign in using your Microsoft Account. You will see a hamburger menu on the left side.
Step 2 : Open the hamburger menu in the top left corner with a mouse click.
hamburger menu >> Select Game DVR >> Click on On Xbox Live
You can then see your captures saved to the internet.
Step 3 : Select desired screenshot from the download list, and hit Download to save it, delete to remove it, or share to share it.
Step 4 : Your downloaded clips and screenshots are saved on to this local PC to defalut location C:\Users\UserName\Videos\Captures.


I hope this simple guide on Xbox One screenshots is useful for all of you.

11 ways – How to Take Screenshots (Print Screen) on Ubuntu Linux?

Well while Linux being one of the largest used open platform on earth, what makes it so popular? Yes, anyone can contribute improvising it. One of the main task of users and developers is to take and share screenshots and screen recordings to share across forums, emails for discussion on improving the Ubentu Linux platform. In this post you will learn simple ways on How to Take Screenshots (Print Screen) on Ubuntu Linux? updated with all the versions including Gnome in year 2018.
You may need to take screenshots for different reasons as well as may be complete screen or some part of window, edit them on the fly or just share it on the fly?
And I know this can be done at a click or voice command or using Apps on Android or iOS, while it comes to Linux, you will be able to use standard methods of using keys as well as many special tools assisting you to take screenshots which have different flexible options which you will learn on this web page.
Most of these tools will not only facilitate taking screenshots with ease but also allows you to modify the screenshot for adjustment of borders, depth, color and do a lot more after capturing screenshot of a particular application or a whole window or partial window.
While you will get thousand different programs and tools online to take screenshots on Ubentu, I will be focusing on few of them which are popular and flexible packaged with many features they provide.
Lets see and learn various ways to take printscreen or screenshot or video (screencast) —

INDEX

Method 1 : Using Keyboard shortcuts?
Method 2 : How to screencast on Linux?
Method 3 : Using gnome-screenshot
Method 4 : Use Imagemagick [import command]
Method 5 : Shutter tool
Method 6 :  Kazam
Method 7 : Gimp
Method 8 : Deepin Scrot [ SCReenshOT ]
Method 9 : ScreenCloud
Method 10 : Flameshot
Method 11 : Lookit


How to Take Screenshots (Print Screen) on Ubuntu Linux ?

Method 1 : Using Keyboard shortcuts?

Surprisingly the keyboard shortcuts are similar to the windows system!
So taking screenshots of your desktop, a window, or partial area can be done using the following keyboard shortcuts which are globally known:
— Use Prt Scrn key to take a screenshot of the desktop.
— Use Alt + Prt Scrn key combination to take a screenshot of a window.
— Use Shift + Prt Scrn key combination to take a screenshot of partial area you want on the screen.
After you take a screenshot using any of the above methods, Linux will automatically generate a image file and save in your pictures folder.
Home folder >> Pictures folder >> Image file name will begin with Screenshot + the date and time it was taken.
— If you do not find your screenshot into Pictures folder, just check and the images might be saved in your home folder instead.

How to copy the screenshot to Clipboard?

— Simply hold down Ctrl with any of the above shortcuts to copy the screenshot image to the clipboard instead of saving it to local device. Once on clipboard you can simply use it on the fly to paste it into any other application directly from the clipboard.
Note : While you use these shortcuts, in Linux desktop environments like KDE Plasma, Gnome, XFCE, system will either take a screenshot or will start a program for taking screenshots.

Where to find PrtScn key in Linux?

Well its easy to locate the Print screen keys on your keyboard, just look at the upper right corner of the keyboard.
Just remember that the “Print Screen” key may be written as PrintScreen, PrntScrn, PrntScr, PrtScn, PrtScr, PrtSc or a similar abbreviation, this may vary depending upon the keyboard make and which part of world you are located in!
Go to Index


Method 2 : How to screencast on Linux?

Sometimes only screenshots may not help since you may need to demonstrate a process which generated the error or bug or maybe part of the game you are playing! who knows?
So you can learn making a  video recording of what is happening on your screen using basic key combinations.
Lets see them Step-by-Step:
1) Press Ctrl + Alt + Shift + R keys together to start recording what is happening on your screen.
2) You will see a red circle on the top right corner of your screen when the recording is in progress.
3) Once done, you can Press Ctrl + Alt + Shift + R keys again to stop the recording.
4) The video will be automatically saved by system into Home folder >> Videos folder [ with a file name that starts with Screencast that includes the date and time it was taken.]
Note : If your device do not have a Videos folder, the videos will be saved in your home folder instead.
Go to Index


Method 3 : Using gnome-screenshot

You can use gnome-screenshot utility which is built-in the GNOME Desktop Environment, to take a screenshot.
You can either use the graphical interface or from command line mode (gnome-screenshot)
You can Launch the screenshot tool as shown in below image —
How to take screenshot on gnome
Step-by-Step guide:

To capture the Entire Screen:

From the UI as shown above, select “Grab the whole desktop” and click “Take Screenshot” to take a screenshot with entire screen.
Alternatively : From the command-line:
Use the command “gnome-screenshot” to grab the whole desktop screenshot.
This command shall take a screenshot and provide a dialog to save it.
$ gnome-screenshot

To capture only Current Window: 

From the UI as shown above, select “Grab the Current Window” and click “Take Screenshot” to take the screenshot of the current active window alone.
Alternatively : From the command-line:
Use the command $ gnome-screenshot -w

To capture a Screenshot with time Delay:

From the UI as shown above, Set the “Grab after a delay” to the required number of seconds, mostly helpful while you take screenshot of navigation or video.
Alternatively : From the command-line:
Use the command $ gnome-screenshot -w -d 2
for an example -d 2 is used for delaying the screenshot for 2 seconds.

To capture Partial screen area:

From the UI as shown above, select “Grab a Particular area” and click “Take Screenshot”  this will allow you to take a particular rectangle area of the screen.
Alternatively : From the command-line:
Use the command $ gnome-screenshot -a
After you enter this command, the mouse pointer will be changed, then you can simply drag and select partial area of the screen to take a screenshot.

To include or exclude Window Border:

From the UI as shown above, select/deselect “Include the Window Border” option, which facilitates to include or exclude the window border.
Alternatively : From the command-line:
Use the command $ gnome-screenshot -w -b
This command will include the window border along with the screenshot.
Use the command $ gnome-screenshot -w -B
This command will exclude the window border from the screenshot.
Go to Index


Method 4 : Use Imagemagick [import command]

ImageMagick is one of the best and powerful open-source software suite used for editing, converting and displaying image files in more than 200 image formats.
You can use it for taking screenshots of selected portion of the screen.
Good part is that imagemagick also includes a native X-window GUI for Unix-like systems which helps make rendering of images easy. It is licensed under Apache 2.0 License.
Imagemagick also provides a number of bindings for various languages like: PerlMagick (Perl), Magickcore (C ), Magick++ (C++).

1) Install the software :

use apt-get on debian/ubuntu : $ apt-get install imagemagick
Using imagemagick, you can take screenshot in the following ways:

2) take entire Desktop Screenshot:

You can capture the entire screen using the “-window root” option.
$ import -window root Pictures/Image6.png
This command takes the screenshot of whole screen with all active windows and save in the file name & location provided by you in the command.

3) take Partial area screenshot:

$ import Pictures/Image7.png
Running this command converts mouse pointer into “Cross” symbol which can be clicked and dragged in window shape to select partial area of the screen and take screenshot of particular area.

4) Include the frame in screenshot:

$ import -frame Image8.png
Running this command, you can include the “frame” of the window.

5) Take Screenshot and Resize:

$ import -window root -resize 640 -pause 4 Pictures/Image9.png
Running this command, you can take screenshot and resize the screenshot. Pause option can be used to make a delay before taking the screenshots.
Tip : You can refer “man import” for more number of options supported by the import command.
Go to Index


Method 5 : Shutter tool

Shutter is image editing tool allowing powerful options to add text, hide private content by pixelating effect, upload image to hosting site and much more like taking a partial screenshot on Linux / Ubuntu.
Shutter is an open source tool written in Perl, available under GNU GPLv3 license.

1) Installing Shutter tool:

First you can install shutter on Ubuntu or Linux Mint using apt-get command as below:
$ sudo apt-get install shutter

2) Taking a screenshot:

Once you are ready with installation of shutter tool.
Simply open a new session by launching the shutter app, or select the window to capture from the shutter icon in notification bar.
Go to Index


Method 6 :  Kazam

Beauty of Kazam tool is that it can be used for video recording as well as taking still screenshots.
Also good part is availability of a GUI which can interface to provide you easy to choose options for screencasting or taking partial or full window screenshots.
Other thing which I like the most is its silent mode, which allows to start screencasting without GUI.
Kazam was the first secreencaster with on the fly encoding and screenshot feature.

How to take screenshot using kazam?

Look at the available GUI, which is so simple.
With a click of button you will be able to select any one of the four options which are —
Fullscreen, All Screens, Window, Area and select capture.
When you select an area selection, system allows you to select the specific area, once done, you can simply press Enter key to capture.
Linux Ubuntu screenshot using kazam tool
Go to Index


Method 7 : Gimp

Gimp is Coded in C, GTK+ and distributed under GPLv3 license, FREE and open source image editor used for image manipulation, editing, resizing, retouching.
It provides you flexibility of expansion to the best using the scripting interface.
As a part of an image editing program, Gimp can also be used for taking partial and full window screenshots and edit the image for adding effects to it.
How to take screenshot using GIMP?
1) Open the Gimp GUI
2) go to File >> Create Screenshot >> Menu shown above will be seen >> Select suitable option >> Take Full or Partial Screenshot.
3) System will generate a screenshot, which then will be available on the GUI for editing, where you can edit the image, apply effects and share (as needed).
Go to Index


Method 8 : Deepin Scrot [ SCReenshOT ]

Deepin Scrot has some extra features that are currently not available in gnome-screenshot.
It is much powerful than default Gnome tool and much lighter than Shutter.
Again one more thing is that its a lightweight screen capture application used in Linux Deepin OS.
This tool facilitates addition of text, arrows, line and drawing onto the screenshot.
Scrot is tool developed by Tom Gilbert using C programming language, licensed under the BSD License and uses the imlib2 library to acquire and save images.
Note : Below mentioned commands are tested in Ubuntu 16.04 LTS, and scrot 0.8 version

1) Install Scrot

$ sudo apt-get install scrot

2) Command syntax

$ scrot [options] [filename]
Note: The parameters in [] are optional.

3) take entire Desktop Screenshot:

When you run scrot without any command line options, by default it captures the entire screen as well as the captured file is saved with a date-stamped filename in the current directory.
However if you wish to customize the image file name and location, simply use the following command.
$ scrot [image-name].png
This command takes the screenshot of whole screen with all active windows and save in the file name & location provided by you in the command.

4) take current window screenshot:

$ scrot -u
This command takes the screenshot of the currently focused window.

5) take screenshot of a particular window:

$ scrot -s
If you have multiple windows open and wish to capture a particular window then using this command and then clicking on that particular window will generate snapshot of that selected window.

6) Include the frame in screenshot:

$ scrot -ub
Running this command, you can include the “frame” of the window.

7) Delayed screenshots

$ scrot –delay [NUM]
$ scrot –delay 5
above command allows you to introduce a time delay while taking screenshots.
Further if you like to add countdown during the screenshot process, simple modify the command as –
$ scrot –delay [NUM] -c
$ scrot -d 5 -c

8) Adjusting the Image quality:

$ scrot –quality [NUM]
$ scrot –quality 10
This command allows you to adjust the quality of the screenshot image at the scale of 1-100.
High value = high size and low compression.
Default value is 75, however the effect differs depending on the file format chosen.

9) Generating thumbnails

$ scrot –thumb NUM
$ scrot –thumb 50
Above command allows you to  generate thumbnail of the screenshot.
This option requires a NUM value, which is basically the percentage of the original screenshot size.
Note: The –thumb option makes sure that the screenshot is captured and saved in original size as well.

10) Join multiple displays shots

$ scrot -m
Use above command to gran and join multiple screenshots.
Go to Index


Method 9 : ScreenCloud

ScreenCloud is basically a cloud based, free, open source, simple, easy to use and cross-platform tool for taking and sharing screenshots.
You can get ScreenCloud for Linux, Windows and Mac OS X.
Download and install ScreenCloud here
ScreenCloud to take screenshot on Linux

Taking a Screenshot:

You can use 3 hotkeys or simply click the ScreenCloud tray icon giving you quick access to screen capture features!

ScreenCloud Uploads:

Once you take a screenshot using ScreenCloud, just save it to your computer or upload it to the web.
ScreenCloud automatically uploads your screenshot to cloud services or your own server. If you provide a URL to your server, ScreenCloud will automatically copy a link to the uploaded file.

Share Link:

Share link will automatically copy screenshot to your clipboard. You can then paste the link in an email or IM conversation. And anyone accesses this link can see your screenshot.
Go to Index


Method 10 : Flameshot

Flameshot is a easy to use, free, open source, simple yet powerful tool for taking screenshots.
It also has its own fully customizable GUI as well as supports keyboard shortcuts.

  • Have  a DBus interface.
  • Supports in-app screenshot edition.
  • Allows you to upload screenshots to Imgur.
  • Supports a system tray.
  • Download link to Flameshot

Go to Index


Method 11 : Lookit

Lookit is one more free open source, straightforward tool for taking and uploading quick screenshots on Ubuntu.

  • Allows to capture a partial area on your screen, entire screen, or active window.
  • Supports right-clicking on the dock icon to take a screenshot.
  • Allows quick uploading screenshots to FTP/SSH server, or shared on Imgur.

Go to Index


References for this post are taken from –

https://help.ubuntu.com/stable/ubuntu-help/screen-shot-record.html
https://help.ubuntu.com/stable/ubuntu-help/shell-introduction.html.en#activities


Final words

Hope my list of methods on How do you take a screenshot on Linux? will be helpful to you. If you are using any new method, please do share it in comments below and I will include it in main section with due credits.
Cheers!

Does Facebook notify when you screenshot?

Does Facebook notify when you screenshot? Well, simplest answer is NO, it does not notify. So let me tell you clearly that if you are thinking of your own privacy or do not want your friend to get notified while you take a screenshot on his or her Facebook profile pic, then unlike Snapchat where the other friend would be notified, in Facebook you can easily take a screenshot without them knowing 🙂

Does Facebook notify when you screenshot?

No, FB does not notify. You can take a screenshot of anything on Facebook without them knowing including the private messages, profile pictures and stories.
Having said that, if you are really concerned about own privacy then best way is to switch to Social Apps like Snapchat where the other side user is immediately notified if you take a screenshot of Snapchat story or limit your exposure on Facebook so that your photos are not used by someone else without your knowledge.
In fact as of today anyone who can see your Facebook public stories can not only screenshot the stories but also download the photos in high resolution.
And same is applicable even while using the chat App from Facebook as called as Facebook messenger, so when you take a screenshot of Facebook story or Facebook messenger, after taking a screenshot only your phone will notify you! that you have generated a screenshot, and no one else would even know or notified about it! and this may not happen even in near future!
In fact Facebook promotes sharing the content! it provides simple and direct sharing share option to your profile photo or stories which are public.
Now I will divide this post into Two main aspects

  1. Your profile picture and its privacy against screenshot by someone else
  2. Private messages sent over Instant messaging system in Facebook and it privacy against screenshot

What is Risk of profile picture stealing and how to arrest it on FaceBook?

Having said that FB has over 1.94 billion active Facebook users in a month, Facebook finally seems to have creeping security stage by stage, and the first attempt is to provide privacy to your profile Picture with new feature of Profile Picture Guard on the Facebook app for Android.
In real world there are thousands of unreal people creating fake Facebook profiles for some unwanted reasons and may misuse your profile picture for the same.
Some fake accounts may be created by stealing identities, profile information, profile pictures downloading the same from some real account! Further the account may be misused to target people you know or even cause some unknown amount of damage including financial as well as spoiling your prestige!
Hence it is very very important to protect your private information and the profile picture, which is fulfilled to some extent after Facebook introduced Profile Picture Guard last year.

How to Use Profile Picture Guard in FaceBook? profile picture guard facebook

Profile picture guard will surely help protect your current profile picture from misuse by someone without your consent.
When profile picture guard profile picture guard facebook is turned on:

  • On Desktop, Laptop or Android App, you will see Guard Shield profile picture guard facebook indicating that this profile picture is protected for privacy.
  • Only you and your Facebook friends can tag your current profile picture.
  • Other people who opens up your profile picture can’t tap Share, Send in message, Share externally or Download from your current profile picture on Facebook and on Desktop the picture will be downloaded as a HTML file instead of an image file.
    By default right click will be disabled on desktop version once the shield is ON.
    However there are serious limitations to this method, since on Android the standard screenshot method works even when the picture guard is ON or even on desktop or laptop you can easily use screen capture / printscreen button to take a screenshot.
    So FaceBook needs to bridge miles to get to the level of Snapchat and they are nowhere near by 1% also to the Snapchat security.
    So still real users may be discouraged from posting their real photos as profile pictures, hopefully this will be fixed soon to get it to more robust technique, at least I am happy to see that the direction set by Facebook is right.
    However still the new blue shielded border is a “visual cue” of protection, rather than any hard barrier and Facebook says that something as simple as adding a design overlay to a picture means that others are at least 75 percent less likely to copy it.

Does Facebook notify when you screenshot?

How to Turn on Profile Picture Guard in FaceBook?

To turn on profile picture guard for your current profile picture follow these simple steps —
1) Go to your profile and click your profile picture.
Note: When you turn profile picture guard on or off, you need to click on the top of your profile picture and not on Update Profile Picture.
2) Now Click on Options.
3) You will see the guard icon >> Click profile picture guard facebook Turn On Profile Picture Guard.
4) Click Save.
You will see now that a profile-picture-guard icon profile picture guard facebook is appearing on the bottom of your profile picture showing that it is protected.
Note : I tried switching ON this Profile Picture Guard feature from the desktop version (as mentioned on Facebook official guide), however said option is not available while tried on Desktop version but I was able to enable the guard from Android version.
Note 2 : The feature is not available in the US. It’s prime target appears to be countries in South Asia


Does Facebook notify when you screenshot the Private messages sent over Instant messaging system?

Now why someone wants to take a screenshot of private message?
Needless to say the reasons, may be they are intimate reasons or you wish to use the screenshot against the other person legally, without them knowing?
Maybe when you receive some nasty picture or a really disturbing comment in an instant message, you want to capture a screenshot to use as a proof against that person inside your company or report to the local authorities?
Well, unlike Snapchat or Instagram where private instant messaging systems are capable of notifying other side users about screenshot, Facebook does not notify the other user about screenshot even for the Private instant message.
So you can take a screenshot of private instant message and use it as per your wish!
One other GOOD thing is that even the person on the other side who has offended you (or in love with you!) deletes the offending photo and message from his account, it will still be visible in your account (since deleting chat or IM is one way action in Facebook) so you can still show / use your account to report to authorities, so protect the message at your end and do not delete it.
However, one BAD thing is that if the other person deletes the FB account before you take any legal action, the message may not show the senders name and show as “Facebook User” for the deleted account, so best way to initiate action without them knowing.

There is one more clear evidence showing that Facebook does not notify

Does Facebook notify somebody if I save one of their pictures? (Like snapchat)

Question :

Someone accidentally saved a photo from unknown account, and he was nervous that they might get a notification XYZ person downloaded your photo! or something like that
So question is that “Does facebook send those types of notifications to people?”

Answer from FaceBook help team

No, no one will know if you download or save their photos.
Facebook community guide (official guide question answer page) – Source


Bottom line

In the view of current incidents it is suggested to use privacy protection systems to its best, like the Profile picture shield provided by Facebook.
Other things do include checking all the privacy settings on Facebook carefully to protect vital information like birth date, current city, education details from becoming Public and limit it to your friends only.
And after reading this post if you feel that Facebook should notify the other user or you about screenshot of pictures, then do put comments below to provide inputs to designers and programmers (assuming that FB keeps an eye over internet happenings and being a good blog  gets automatic notification on user requirements using data collection algorithms)
Hope this helps!
Cheers!!


References for writing this post

Facebook official guide on Profile picture guard – Source

How to take a screenshot on ASUS ZenFone? where screenshots stored?

If you are fan of ASUS systems, you ought to try out the new Zenfone series from them. Asus introduced their latest smartphone in 2015 which is called as Zenfone 2, a 5.5-inch 1028p display phone with high-end specs with dual-SIMs. From there till latest model of ASUS ZenFone Max Pro M1, common thing that you need to learn is How to take a screenshot on asus ZenFone Series phones? 
After introduction of base model there are several upgrades launched till date by Asus like Asus Zenfone 2, Asus Zenfone 4, Asus Zenfone 5, Asus Zenfone 6, Asus Zenfone Max Pro M1 and for all of these phone owners like you, its important to learn on taking a printscreen or screenshot or screen snap may be for sharing with family and friends or using it inside a presentations.
Here you will learn various methods starting from very basic methods on generating a screenshots on Asus phones, later I will append this post with Asus laptops too.

How to take a screenshot on asus ZenFone and where do screenshots get stored?

How to Screenshot on Asus ZenFone?
There are different ways to capture the screenshot or printscreen on your Asus smartphone —

Method 1: Take Asus phone Screenshot using hardware buttons

This is the most basic method used in any of the Android OS phone in market and pretty simple, with only one hitch is that it needs some time of 2-3 seconds, which in case you are capturing a screenshot of a video becomes tricky since you ought to miss the scene you want to capture screen of. But lets begin with this basic method.
Applicable for : All series of ASUS phones, Asus Zenfone 2, Asus Zenfone 4, Asus Zenfone 5, Asus Zenfone 6, Asus Zenfone Max Pro M1
Step-by-Step approach
1) Main thing is locate the Power and Volume keys of your Asus Zenphone, remember depending upon the model these keys are located at different locations of phone.
To clarify see two different pictures given in this post for Original Asus ZenFone and latest ZenFone 2, there is difference in hardware button locations, for the original version the hardware buttons are located on right hand side of phone which are shifted in the ZenFone version 2 to the back side of phone (see snapshots below) the Power key is shifted on the top and volume keys on the back side in model ZenFone 2!
may be these changes are done to address some technical reasons or as an ergonomic improvements in placement of buttons, but both ways you should be aware where the buttons are located to take a screenshot.
2) Keep the screen ready of which you wish to take a screenshot, be it a website page or a social media screen like twitter or Instagram or whats app.
3) Now that you know button locations, simply Press and hold Power key and Volume Down key simultaneously for about 1 second. With a confirmation camera sound the device will generate a screenshot and show an animation thumbnail of the screenshot generated.
4) If you wish to share share or edit the captured screenshot, immediately tap on the thumbnail, else wait for a second till the screenshot thumbnail disappears and gets saved to the device automatically by the phone.
The screenshot image will be saved automatically to the folder >> Internal storage >> Screenshots.


Method 2: Take Asus Zenfone Screenshot with Recent Apps Key

Applicable for : Asus Zenfone 2, Asus Zenfone 4, Asus Zenfone 5, Asus Zenfone 6, Asus Zenfone Max Pro M1
On some Asus phones and tablets, you will be able to use this method, which is using the  recent apps key asus ZenFone screenshot icon located at the bottom of screen. See the image below —
How to take a screenshot on ZenFone 2
The recent apps key  asus ZenFone screenshot icon is mostly available on all resent Zenfone phones and tabs, which can be easily identified with a double-collapsed rectangular button at the bottom of the phone.
Step-by-Step approach to use this key for taking screenshot
1) Enable the recent apps key
Go to the Settings page settings >> Scroll down to “Asus customized settings” >> Tap on the “Recent app key” >> choose “Tap and hold to capture screen” when a pop up appears.
Alternatively depending upon the Asus smartphone model you have, you may have to  —
Tap on “Application” >> Tap “Settings” >> Choose “ASUS customized” from options. >> Choose “Key settings“>> Choose “Tap and hold to get screenshot”
2) Now that the recent apps key is enabled, you are ready to take a screenshot using this new key
3) Go to the screen you want to take a snapshot of like a social app or web browser window etc.
4) Simply Press and hold asus ZenFone screenshot icon icon for a second (long press) to capture the screenshot.
5) You will see an animation of captures screen, a thumbnail will appear on screen with a camera shutter sound. If you wish to edit or share share the screenshot immediately, simply click on the thumbnail or just wait till the thumbnail disappears from screen.
6) Your screenshot is now generated and save to the Gallery.
The screenshot image will be saved automatically to the folder >> Internal storage >> Screenshots.


Method 3: Screenshot from the Quick Settings Panel

Note that this method is only applicable for Asus Zenfone 2 and not on Zenfone 4/5 and 6.
Again you will need to do some simple settings before you use this method.
Step-by-Step approach
1) Pull down the “Quick settings” menu >> tap on the edit icon on top (located first one from the left >> Scroll down the tools list and find the “Screenshot” option >> Check the box besides it. >> After that, tap “Save”
You are done and ready to take a screenshot using pull down.
Note : Again here you need to know that at a time you can only have 4 tools enabled ! So, you may need to disable another tool when you check the “Screenshot”.
2) Now as usual go to the screen you want to capture.
3) Simply pull down the “Quick settings” panel and tap on the screenshot icon.
4) With a click sound a screenshot of the current screen will be captured by the device.
5) You can locate the generated Screenshots in the folder in Gallery.
The screenshot image will be saved automatically to the folder >> Internal storage >> Screenshots.
How to Screenshot on Asus ZenFone 2?

Method 4: Taking a screenshot on Asus phones using a Google Assistant

Other steps being same I will not go into details like keeping the screen ready etc.
However remember that you need to enable Google assistant before you use this feature.
Step-by-Step approach
1) Open the screen on which you want to take a screenshot
2) Now launch google assistant by long pressing home key.
3) Either Type or say “Take screenshot”.
4) Google assistant will generate a screen capture and save it to device.
Note : You can select if you want to save the screenshot in photos, Google Drive or share it through social share accounts immediately like WhatsApp, FaceBook or Instagram etc. However remember that in this case By default, it will not save it in your gallery. So you need to do it explicitly.

Screenshots are consuming space of Asus phones ? use this trick.

If you are worried that screenshots are consuming lot of space on your phone, then simple trick is to use external storage space which is mostly available for FREE.
Another advantage is that you will be able to access these screenshots from other devices like computers, tablets and phones.
In that case select the Google drive to save the screenshots.

Bottom line

I hope you have learnt different ways to take a screenshot on your Asus phones, although this is very much basis, but more important for those who don’t really know about taking a screenshot.
If you have found that this post is really useful for you, please share across friends and comment on this post.

How to take a screenshot on a Google Pixel 2, Pixel 3, XL ?

If you own a Google Pixel phone and want to printscreen, I mean to take a screenshot then it is as easy as you do it on any other Android phone on this earth 🙂 Only thing is that depending upon which OS version you are running you can get different options to choose to take a screenshot. Like on Android 7.1 you can use hardware button combination and on Android 9.0 or up you can use single power button. So lets learn How to take a screenshot on a Google Pixel or Pixel 2 or Pixel 3 or Pixel 3 XL smartphone?
With latest introduction of Pixel 3, there is slight change in the way you take a screenshot, however still many of you will be having older version of Pixel and hence I will be showing both the options that is old and new phones to take a screenshot or printscreen.
Lets see how.

How to take a screenshot on Pixel phone?

The first method we will see is advanced method, later I will also speak on what if you have an older version of phone and Android version too. Of-course the latest version will also be compatible with the old method (which I will show you later in this post)
How to Screenshot on Google Pixel phones?

Method 1 : Take a screenshot using Power button

Applicable to : Google Pixel or Pixel 2 or Pixel 3 or Pixel 3 XL
OS should be Android 9.0 and up to use this feature — See how to check Android version of Pixel
1) You can open any video, chat app like snapchat, whatsapp, instgram etc to see the screen that you want to screen capture or snap of.
2) Now simply press the Power button for a few seconds, you will see option to take screenshot, simply tap Screenshot.
3) Your device will generate a screen capture of the visible screen and save it automatically.
4) Look at the top of the screen, to see Screenshot capture icon like this one screenshot
4) Alternatively you can return to a Home screen to see the screenshot capture icon.
5) Swipe down from the top of a screen with the Screenshot capture icon screenshot
6) Just tap the “Screenshot saved” notification to see all your screenshots.
6) Alternatively you can open your device’s Photos app >> Tap Menu >> Tap Device folders and then Screenshots.


Method 2 : Take a screenshot using Power button

Applicable to : Google Pixel or Pixel 2 or Pixel 3 or Pixel 3 XL
OS should be Android 7.1 and up to use this feature — See how to check Android version of Pixel
1) You can open any video, chat app like snapchat, whatsapp, instgram etc to see the screen that you want to screen capture or snap of.
2) Now simply press the Power button and Volume Down buttons simultaneously for a few seconds. (both buttons are located on he right hand side of your Pixel phone)
3) After release of both buttons, your device will generate a screen capture of the visible screen and with a visible thumbnail of captured screen it will save it to the device automatically.
4) Look at the top of the screen, to see Screenshot capture icon like this one screenshot
4) Alternatively you can return to a Home screen to see the screenshot capture icon.
5) Swipe down from the top of a screen with the Screenshot capture icon screenshot
6) Just tap the “Screenshot saved” notification to see all your screenshots.
6) Alternatively you can open your device’s Photos app >> Tap Menu >> Tap Device folders and then Screenshots.


Method 3 : How to take a screenshot with Google Assistant?

I tried using this method, which is pretty standard method to take a screenshot on Android system, however in this case Google Assistant doesn’t allow to take screenshots using voice commands, not sure what is wrong with this, I need to explore more and come back again,
If you could do it on your Google Pixel any model phone then please let me know by putting comments below.


How to share your screenshot on Pixel?

To share a screenshot, view it and tap on Share share


How to edit your screenshot on Pixel?

View it in your device’s Photos app >> Tap More >> Edit in Markup.


Couldn’t capture screenshot on Pixel how to resolve

Well, you have learnt to take a screenshot on Google Pixel phone, but sometimes encounter error like “Couldn’t capture screenshot” or error message telling you that screen capture not possible.
Sometimes the screenshot is generated but somehow it is not found in the screenshots folder!
In such case you can check the following things to resolve the issue.

Check for Android updates:

The first and foremost thing you can do is to goto Google official page to get latest Android updates that may patch this issue. Generally updates are meant to patch bugs and probably it may resolve the screenshot issue.
Get to know if your Google Pixel phone needs an Android patch update here

Check your phone storage space:

Unknowingly you pump your phone with apps, movies, music and pictures getting its memory storage full, in such case the Phone will not be able to save the screenshot to local device. So try freeing up some memory to resolve the issue.
To do so first check how much device FREE memory is available by going to —
Settings settings >> Storage
If you see device is FULL, then delete some unwanted stuff to free up some extra space, and try taking the screenshot again.

Clear Cache:

In this case I recommend reading the Google own official guide on How to free space on Pixel device — Read Free up space Guide here —

Try renaming the screenshot folder:

Sometimes this workaround works!
Yes, simply rename the Screenshots folder to Old Screenshots or My Screenshots or something else
Now try taking a fresh screenshot, most of the times it addresses the issue.
Don’t ask me the technical reason behind this gimmick! It maybe the OS gets some issue with current destination folder and renaming it forces system to look for the correct one resetting the process / log, who knows?

Close all apps:

Yes, I know the phone is so powerful that it is able to handle multiple Apps at the same time, however sometimes, one or more Apps may create some interference in screenshot generation process.
In that case you can try screenshot process by closure of App one by one or all other apps together and see if that resolves the issue.


How to check & update your Android version of Google Pixel phone?

Now finally if you want to check what is your Android OS version loaded then you can do it in following simple steps :
Step-by-Step process to check Android version
1) Open Settings menu, you will see a wheel icon as shown settings.
2) Scroll the menu till you reach the bottom >> go to System >> Advanced >> System update
Alternatively if you can’t see ‘Advanced’ on your device >> then tap About phone. >> Android version >> Security patch level
Note: Make sure that you are connected to WiFi network or have mobile data ON to connect to internet.
3) System will check and alert you to download the latest Android updates >> Once you see an update notification >> tap the update action.

How to Take Screenshot for FaceTime on iOS 12?

As an Apple freak I am used to get shocks with each new introduction of models or OS upgrade! This times its all about update of iOS12/Mojave, where I saw the white circular FaceTime Screen capture button disappeared nor a toggle button on FaceTime settings! In short with iOS 12 OS upgrade the FaceTime Live Photo Button Stands Removed 🙁 So question is that How to Take Screenshot for FaceTime on iOS 12 in 2020?
Well surely nothing can replace the simple, quick and super useful Live Photo feature in FaceTime app and I am really wondering what made Apple think of removing the Live Photo button from FaceTime which was introduced just last year? This does not sound a good gesture at all, I used to it during all my FaceTime’s chats and its removal is genuinely frustrating.
With the announcement of iOS 12, FaceTime was set to receive its biggest update ever boasting the Group FaceTime calls wherein you will also be able to use Animoji or Memoji on the call.
The redesigned FaceTime look in iOS 12 shows thumbnails for everyone in what Apple calls “the Roster” along the bottom of the screen. As anyone from the group begins to talk his video which is — referred to as a Tile — will automatically moved to the top of the screen. The size of the tile is automatically determined by who is active on the call, with the Tile of the person talking slowly getting bigger the longer they talk.
Well as a research person I can understand the major revamp of  iOS 12’s support for calls with up to 32 people taking part simultaneously might have imposed serious technical limitation of taking screenshot of live chat, but whatsoever is does leave a void on filling the need with some alternate which I will try to narrate down here, I mean alternate methods to take a screenshot on FaceTime video calls.
I saw frustrated users giving feedback to Apple on removal of photo feature — Feedback thread on Apple official forum
so let’s get back to alternatives of

How to Take Screenshot for FaceTime on iOS 12 in 2018?

Now that you know the most favorite live photo button gone in latest iOS 12 FaceTime, you need to use the old traditional ways to take static screenshots during your FaceTime calls ! But no other option left for you by Apple !
Anyway lets look at these traditional options one by one (again!)
How to take Screenshot on iPad or iPad Pro

How to take a FaceTime screenshot on iPad or iPad Pro or iPad mini or iPad 2 or ipad air 2?

Applicability : iPad or iPad Pro or iPhone or iPad mini or iPad 2  or ipad air 2, iPhone 5s
1) While chatting on FaceTime video call, Press and hold the Sleep/Wake (on/off – POWER) button and Home button at the bottom of the iPad screen simultaneously, then release them quickly.
2) With a screen flash and camera shutter sound (if your sound is enabled) screenshot will be taken and saved to your camera roll.
Most important part while using this combination on FaceTime :
Unfortunately this combination is so deadly that you may end-up disconnecting the FaceTime video call itself! so be sure to master this technique well to hit both buttons simultaneously.
This will minimize the chances of accidentally activating Siri or if you are not so quick about it, then surely you will pull up the power-off screen!

2) How to take a FaceTime screenshot on iPhone ?

The procedure remains moreover same which I have already explained above, so I have not added the step-by-step explanation again, but only added an info-graphics below, which is self explanatory.
How to take Screenshot on iPhone

Where do facetime screenshots go on mac or iPhone?

To find the screenshots stored to your phone memory, go to Photos > Albums and tap Screenshots.
1) Launch the Photos app from your Home screen.
2) Goto Photos > Albums and tap Screenshots.
3) Alternatively you can locate the screenshots in the main Photos and Camera albums by scrolling through all photo library.


How to Screenshot on FaceTime iOS 12

FaceTime screenshot not Working / not Saving ?

When you update to iOS 12 there is quite possibility to face issues to take simple screenshot on your iPhone or iPad, in such case I suggest you to try the following workarounds —
Workaround 1: Mastering the button pressing sequence – Adding a time delay
Press the Power and Home button simultaneously as usual, but press the Home button after one second you press the Power button.
Workaround 2: Force restart you iPhone or iPad
Restart : Press and hold the iPhone or iPad’s home and power button, until the “slide to power off” occur. Slide to power off, after about 30 seconds, turn the iPhone or iPad again..
Force Restart : Press and hold the iPhone or iPad’s home and power button for minimum 10 seconds till you can see the Apple logo on the screen. Device will force restart.
Recheck taking the screenshot using standard methods described above in this post.
Workaround 3: Check the iPhone or iPad’s Home button is working
Simply check if the Home button on iPhone or iPad’s working for other operations, if not, head down to the local Apple store to repair it!
Workaround 4: Try iPhone or iPad’s System Repair Software to Fix any iOS System Related Issues or update the iOS to latest software version.


FaceTime screenshot notification with iOS 12 2018 update

Since the basic feature itself gone, no more notification, since you are using standard method of taking bland static screencapture (printscreen)


What are the FaceTime Improvements in iOS12 ?

FaceTime became famous rescently due to more and more people started communicating using this App as compared to the Messages and iMessage, mainly due to widespread availability of high speed internet allover the world and lower call costs, people are not needed to spend dollars to speak across the continents
So that is one of the reasons why Apple totally revamped the FaceTime in iOS 12 for the look and feel.
Here’s a short round-up on what all you will get in FaceTime for iOS 12

  1. Integration with iMessage
    — Start a FaceTime or Group FaceTime call directly from an iMessage conversation.
  2. Use Animoji or Memoji during Video Call
    — You will be able to use an Animoji or Memoji during FaceTime video call.
    — You can add live filters to your Animoji and Memoji
  3. Super Fancy camera effects – filters, texts, stickers
    — Now you will enjoy all the funky effects, built-in filters, text effects, shapes and sticker packs in the camera app, during FaceTime video call.
    — You can locate these effects in the new FaceTime Menu, however you will need an iPhone 7 or later model
  4. Apple Watch Audio Support
    — FaceTime audio will be available on Apple Watches too, so as to join a group chat–all during your exercise or running. The new Walkie Talkie Watch app utilizes FaceTime audio + Apple ID to participate in group chat with your friends and family

How to make and answer FaceTime calls on iPhone

— Read Apple official guide

How to add camera effects in FaceTime calls on iPhone

— Read Apple official guide

4 EASY ways to Screenshot (Print Screen) on Xiaomi Redmi phones

Congratulations for selecting one of the best ever Xiaomi Redmi 6 phone for its great features at best price ever. It has got all new features including NEW shortcuts to take a screenshot. So in this post you will learn simple ways of How to take a screenshot on Xiaomi Redmi 6, 6A, 6 Pro, mi a2?
Xiaomi Redmi 6 series has became popular and one of the best seller as on date, power packed but lighter on pocket phones with models Redmi 6, Redmi 6A and Redmi 6 Pro which have all new ways and tricks to take a screenshot or record a screen, and like you see that each manufacturer will have his own way of differentiating their phone, here also Xiaomi shows difference.
So, in this post you will learn four different ways to take a screenshot on Redmi 6, series phones.

How to take a screenshot on Xiaomi Redmi 6, 6A and 6 Pro?

All you have to do is to press Power + Volume Down buttons simultaneously and hold for 2-3 seconds to take a screenshot of display, with a click shutter sound phone will generate a screenshot and save to gallery.
Okay, lets see different methods in details for your Redmi phones.

INDEX – Xiaomi Redmi 6, 6A, 6 Pro, mi a2

1 Screenshot using redmi’s buttons – Using the phone buttons (traditional Android way) Go to Topic
2 Take a Scrolling Screenshot on the redmi Go to Topic
3 How to Use the Xiaomi Redmi 6 Screenshot three-finger Gesture – Xiaomi Redmi 6, 6A and 6 Pro Go to Topic
4 Google Assistant Go to Topic
5 Where do I find the completed Screenshots on Redmi? Go to Topic

How to Screenshot on Xiaomi phones using buttons?

Method 1: Using the phone buttons (traditional Android way)

Applicable models : Xiaomi Redmi 6, 6A, 6 Pro, mi a2
Like any other android phone you can use basic way of taking a screenshot using hardware buttons. Redmi 6 series phones possess ergonomically placed power and volume buttons which facilitates easy screenshot.
Step-by-Step approach:
1) Locate the Power and Volume down buttons which are placed on the right hand side of your phone.
2) Open the screen / image /  web-page you wish to take a screenshot of.
3) Simultaneously press Volume down and Power button for 2-3 seconds or till you hear camera click sound to grab a screenshot.
4) You will get a screen thumbnail as a preview in the top right corner, tap it to edit it or share it across social network (on the fly)
5) If you don’t tap it, then it goes automatically to the Gallery of phone where you can edit or share it later.
Go back to Index


Method 2: Using gesture control – the 3 finger swipe

How to Screenshot on Xiaomi Redmi phones?
Sometimes it consumes time to press two buttons and specially during playing a video, you may miss perfect time to take a screenshot.
In such a case you may like to use this new method to use gesture control. Don’t worry it is not that difficult at all.
Simple use your three fingers and swipe them down across screen to generate a screenshot.
Of-course remember that before using this new technique, you need to activate the 3 finger swipe option.
Step-by-Step method to activate and use 3 finger swipe method:
1) Go to the Settings >> In the search bar, type ‘screenshot’ >>Tap on the option ‘Take a screenshot’ >> Under the head ‘Optional Gestures and Button’, select ‘Slide 3 fingers down’. And you are ready to take screenshot.
2) Practice by taking some test shots, just slide down three fingers as shown in the info-graphics on this post. Your phone will generate a screenshot of displayed screen.
3) Follow the same process, like going to the screen you want to take a snap of, may be a social app like twitter, Facebook, snap-chat or Instagram
4) Simply swipe down with three fingers to get the screenshot.
Done, with some practice it is the most simple task to do on your Xiaomi Redmi 6, 6A and 6 Pro phones.
5) Once the screenshot is taken, you will see a floating thumbnail at the top right hand corner of your screen display. Tap on it to edit it or just leave it to disappear and saved automatically to phone memory.
Go back to Index


Method 3: Using the pull down notification panel

While your new Xiaomi phone features nice notification menu with many customization options, the same can also be used to take a screenshot easily.
Step-by-Step method:
1) Slide down the screen from the top of your Redmi 6 phone to get the notification panel on the screen.
2) You can see many one-touch shortcuts like WiFi, Data Connection, GPS etc. Pull this menu down till you see the screenshot icon showing a pair of scissors drawn on it.
3) Press the pair of scissors icon and the phone generates a screenshot of display.
4) Again like other methods you will see floating thumbnail at top right corner, tap it to edit and/  or share, leave it to disappear and get saved to gallery.
Go back to Index


Method 4: Using Voice commands – the Google Assistant

Applicable models : Xiaomi Redmi 6, 6A, 6 Pro, mi a2
Again one of my most favorite method which I use many times for many functions.
Yes, once you are used to the Google Assistant, then its very easy to get many tasks done without even touching the phone! It not only opens social apps, types messages for you but also takes a screenshots and share to the social apps on the fly.
Here is how you can do it.
1) Set up the Google Assistant on your Redmi 6 first.
2) Now open the screen you wish to printscreen I mean take a snap of
3) Now all you have to do is, first wakeup using keyword, “OK Google, take a screenshot.” It will take a screenshot for you.
Only in this case Google assistant will ask if you want to save the screenshot? but not a big deal.
Go back to Index


Where do I find the completed Screenshots on Redmi?

Yes, you have learned 4 easy and quick ways to take a screenshot on your Redmi series 6 phones.
Now what to do next?
When you take a screenshot, if you immediately tap on the displayed thumbnail, you can edit the images on the fly before sharing or using across social platforms or in your presentations.
However these options will disappear in a moment and if you miss editing or sharing, they are saved automatically to your phone’s photo gallery for further editing and sharing.
And I know you will love to learn How to Make Mobile Phone Screenshots Realistic and Beautiful – Read my guide below
https://how-2-take-a-screenshot.com/mobile-case-for-fitting-screenshot/

  • 1
  • 2
  • 3
  • 4
  • Next Page »

Jumbo discount offer

Our site is hosted on SiteGround

Get Mega Discount on SG Hosting

Amazon Prime

What's New on Amazon Prime this Week?

HowzBuy.com

About us
Contact us

JOBS

Apply Now

Legal

Privacy Policy
Terms & Conditions

Test Videos

Chipolo video

Archives

Copyright © 2025 · News Pro Theme on Genesis Framework · WordPress · Log in

This website uses cookies to improve your experience. We'll assume you're ok with this, but you can opt-out if you wish. Cookie settingsACCEPT
Privacy & Cookies Policy

Privacy Overview

This website uses cookies to improve your experience while you navigate through the website. Out of these cookies, the cookies that are categorized as necessary are stored on your browser as they are essential for the working of basic functionalities of the website. We also use third-party cookies that help us analyze and understand how you use this website. These cookies will be stored in your browser only with your consent. You also have the option to opt-out of these cookies. But opting out of some of these cookies may have an effect on your browsing experience.
Necessary
Always Enabled
Necessary cookies are absolutely essential for the website to function properly. This category only includes cookies that ensures basic functionalities and security features of the website. These cookies do not store any personal information.
Non-necessary
Any cookies that may not be particularly necessary for the website to function and is used specifically to collect user personal data via analytics, ads, other embedded contents are termed as non-necessary cookies. It is mandatory to procure user consent prior to running these cookies on your website.
SAVE & ACCEPT