My nephew is gaming freak and during holidays he is 24×7 soldier in the games! He is master Xbox One gaming and as soon as he reaches a new milestone, he likes to brag about his achievements on social media with his friends. What is important is that he has learnt the great skills of taking strategically-timed screenshots at precise moment 🙂 So here in this post I will be passing on the skills on How to take a screenshot on Xbox One? updated for the year 2018-2019.
Now it is clear that methods described in this post will be useful for gaming purely on Xbox One, however in case you have connected to your computer to stream the games from Xbox One then you can use traditional methods of taking a screenshot on your desktop or laptop – I have already detailed out these methods on this website here.
How to take a screenshot on Xbox One?
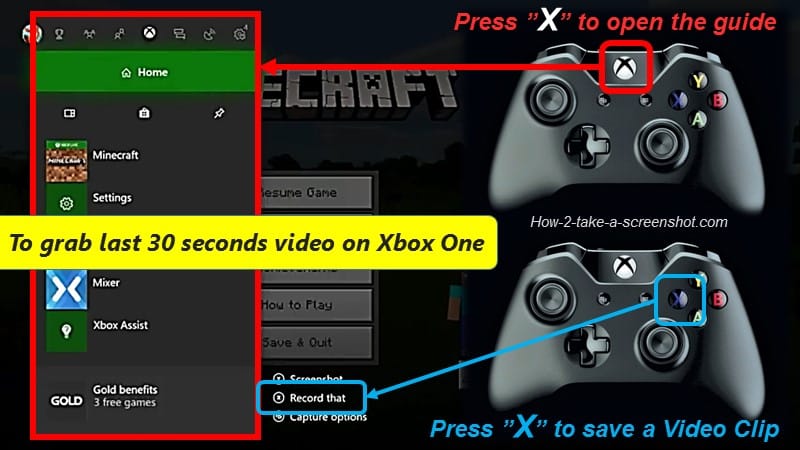
Press Xbox button to open the guide, then press Y button to capture a screenshot, OR press X button to grab the video for last 30 seconds.
Okay above answer briefs you in short on basic method to capture a screenshot from your Xbox One remote control.
Now lets see it in Step-by-Step approach:
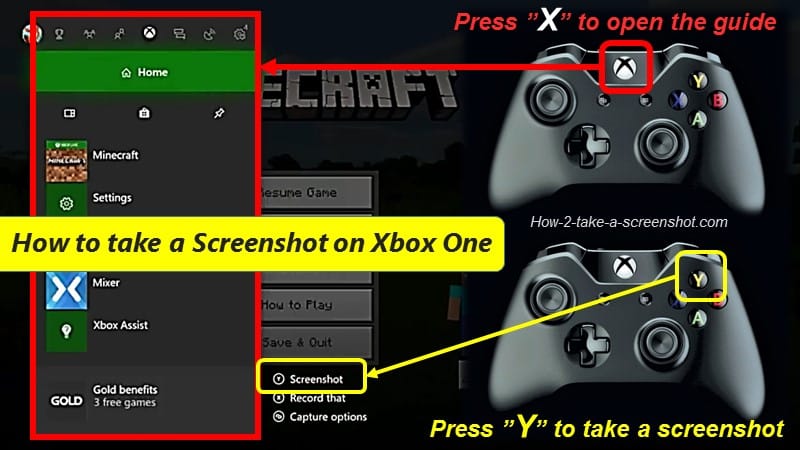
Step 1 : Simply start your game and start playing as usual, as soon as something cool happens, you either wants to Video record the clip or capture a screenshot.
Tip : You can also navigate to the location or position yourself your character how you want them to be when the screenshot is captured.
Step 2 : Press the Xbox button on your Xbox One remote controller. This will bring up a flyer menu from left side of screen (see the image above showing the menu in RED border) on lower right corner of which you will see a sub-menu showing three options – Screenshot / Record that / Capture Options.
Step 3 : Press “Y” button on remote control to take a Screenshot. The menu on the left hand side of the screen automatically closes, showing a message notification in the lower center part of the screen that your screenshot has been saved. This message will disappear just in few seconds.
Step 3 (how to video record) : Press “X” button to grab the last 30 seconds of video, this is extremely helpful to capture last moments of fight to achieve the record score, but remember to do this quickly as soon as you achieve the score, else you will loose the precious video recording of last 30 seconds. In fact my nephew uses this more often to brag on social media and his friends always appreciate the precise moment capturing skills.
How to take a screenshot on Xbox One using voice control?
Voice commands are usual and easy on your Xbox One controller. When you want to take a screenshot of what just happened using voice, all you have to do is to say ”Hey Cortana, record that!” OR To capture what just happened, say ”Xbox, record that!”
Learn more on Voice control of XBox One – See this voice guide
How to capture what’s going to happen next on Xbox One?
Now that you have learnt how to capture a screenshot (printscreen) and how to record the last 30 seconds video. Lets also learn how to record the complete game or what is going to happen now in the game (knowing that you will be achieving new highs or you want to teach someone special steps in gaming)
Here is a Step-by-Step guide:
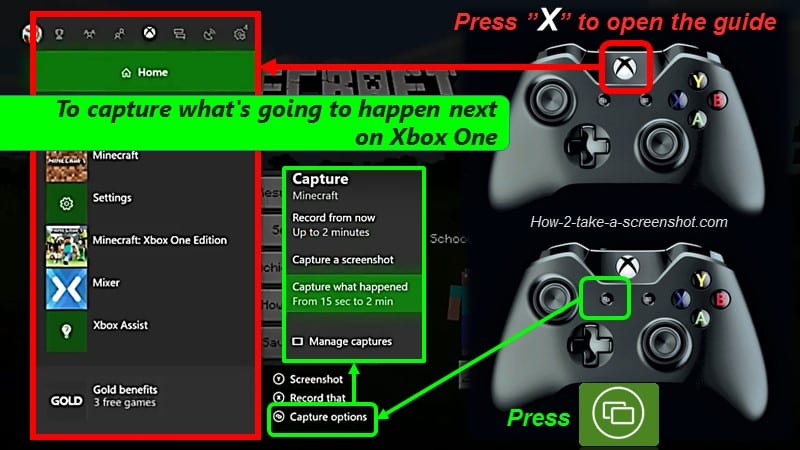
Step 1 : Start your game as usual. Now Press Xbox button to open the guide.
Step 2: Press the Capture Options button ![]() , which will show sub menu as shown in above image info-graphics. From this sbu-menu you have to select Record from now.
, which will show sub menu as shown in above image info-graphics. From this sbu-menu you have to select Record from now.
Step 3 : To end the clip recording, open the guide using Xbox button and press the X button. You will get a notification message as soon as your clip is saved. (it may take some time depending upon the size)
Managing Storage space on Xbox One
Note 1 : Clip recording can be done from 10 minutes depending upon the game clip resolution and available storage space, as a guide 10 minutes recordings can be done using internal storage space, however if it exceeds 10 minutes to 1 hour, then you need to capture the video to an external storage device.
External storage device can be simple USB HDD Drive upto 256 GB using USB 3.0 connector. To set saving to external HDD do the following settings –
Press the Xbox button >> System >> All settings >> Preferences >> Broadcast & capture >> Capture location >> Select External.
Note 2 : Saving and sharing screenshots requires Xbox Live Gold. If you don’t have it, you can take screenshots on someone else’s home Xbox as long as someone with Xbox Live Gold is signed in.
Note 3 : Your Xbox allows you a few gigabytes of free cloud storage just for keeping Xbox Game DVR captures and screenshots.
You can export it either to your PC, or to your personal OneDrive cloud storage for saving the space and keeping data safe.
Xbox Live clips and screenshots will upload automatically to the cloud, until your storage is full.
Where to find captured screenshots on your Xbox One?
To see your screenshots, select Manage captures. Select any screen capture / screenshot / printscreen to see what you can do with it.
When using your Microsoft Account on a PC or via OneDrive.com, you will be able to find the screenshot under OneDrive\Pictures\Xbox Screenshots.
Step-by-Step guide:
Step 1 : Press the Xbox button on your Xbox One remote controller. This will bring up a flyer menu from left side of screen.
Tip : You can get the flyer menu anytime while you are in the middle of a game, or on your console’s home screen.
Step 2 : Use either the left analog stick or the D-pad to select the Broadcast & Capture menu shown at the top of the screen.
Tip : The Broadcast & Capture icon looks like a half-circle with a WiFi signal coming out of it.
Step 3 : Press the Capture Options button ![]() and the Capture menu appears.
and the Capture menu appears.
Step 4 : Select “Manage Captures” to show the Manage Captures screen, by default it shows all of the video clips and screenshots associated with your Xbox Live account.
Step 5 : To further sort it out, you get options to filter the results, say showing only the captured video clips or screenshots for this specific Xbox One or any other associated live Xbox One account.
Further you can also sort out the results to specific game, this eases out to pick required capture and share with friends.
Step 6 : After you apply all required filters, you can select the highlighted screenshot and press “A” to view that specific screenshot. Then the chosen screenshot appears on your screen.
Sharing Screenshots and captured videos with friends
Step 7 : When you select the Share icon with the A button. You can share the clip / screenshot to :
- Your Xbox Live activity feed (Depending on your privacy settings, Public or friends will be able to see it).
- A private message.
- To an Xbox Club (you need to be member of club to share it)
- A Twitter link.
- To OneDrive.
How to set video clip resolution on your Xbox One?
While taking videos is essential, you also need to think on space it is going to consume on drive as well as time taken to share on social media. So sometimes it will be essential to lower down the resolution of captures specially for sharing on social media like Twitter, where it does not support 4K screenshots.
To set your clip resolution and capture location, press the Xbox button to open the guide, then go to Broadcast & capture > Advanced settings.
Tip : You can check the upload status of clips from the Manage clips page by selecting Upload Status from the filter.
How to delete screenshots from Xbox One?
After sometime you need to cleanup space and clutter of screenshots, hence it is equally important to learn how to delete the screenshots !
Step-by-Step approach:
Step 1 : Press the “Xbox” button on your remote controller to open the guide menu.
Step 2 : Press the Home button using “A“on your remote controller.
Step 3 : Open the guide menu and press the View button (to the bottom left of the Xbox button) which opens the “Recent captures”
Step 4 : Navigate to any recent clip or old clip (see previous guide paragraph in this post on Where to find screenshots), and select it with the A button.
From here, press delete to remove it from your console, from Xbox Live, or both. (see menu below)
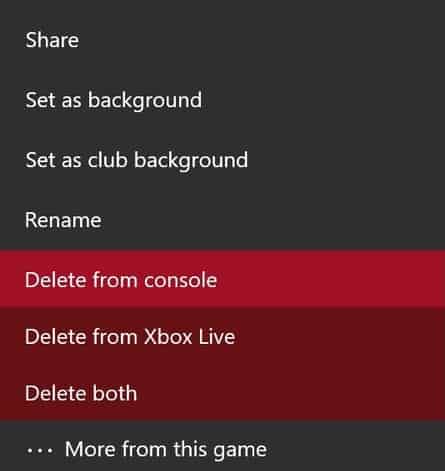
Tip : If you are unable o find required clip, simply navigate to SEE ALL at the bottom of menu to open the Manage captures menu. Then find required screenshot, select it with the A button and then select the trash can icon with the A button to delete it.
How to manage Xbox One screen shots on a Windows 10 PC?
While using Xbox One with your windows 10 PC, you can use your Xbox Live, where you can access and download your screenshots quickly and easily using the pre-installed Xbox app.
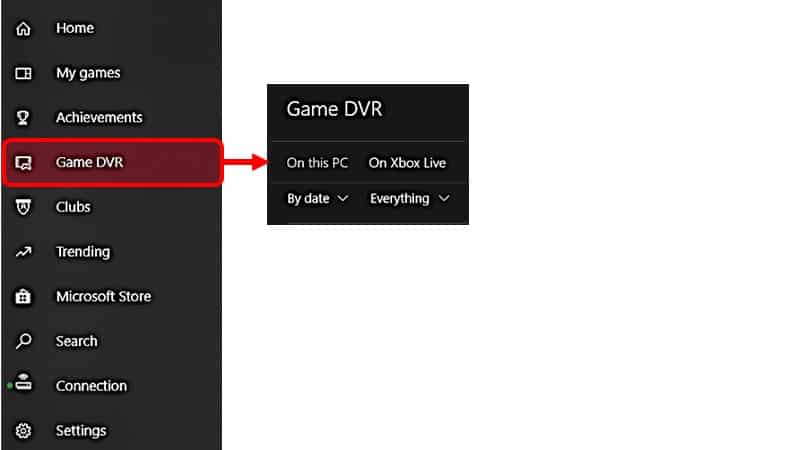
Step-by-Step approach:
Step 1 : Press the Start Menu ⊞ and type “Xbox” and open the Xbox app.
Note : For first time you need to sign in using your Microsoft Account. You will see a hamburger menu on the left side.
Step 2 : Open the hamburger menu in the top left corner with a mouse click.
hamburger menu >> Select Game DVR >> Click on On Xbox Live
You can then see your captures saved to the internet.
Step 3 : Select desired screenshot from the download list, and hit Download to save it, delete to remove it, or share to share it.
Step 4 : Your downloaded clips and screenshots are saved on to this local PC to defalut location C:\Users\UserName\Videos\Captures.
I hope this simple guide on Xbox One screenshots is useful for all of you.
Leave a Reply