• Amazon.com
  • Amazon.in
  • home
    • baby guide
    • HowzBuy.com

How to take a Screenshot on this Phone?

If you are searching on How to take a Screenshot on this Phone? then you are on the right page. Yes, I will be guiding you precisely on this subject depending upon the phone model you are using and keeping in mind the latest introductions in year 2018, I have also included the latest models of mobile in this post. In case you are not able to locate your model or have not understood method to take printscreen on your mobile please let me know by putting comments in below section.

Android Phones –

If you are using Android phone, stay on this page and search for respective model number in the table given below.

Apple Products –

If you are using any of Apple products then I have written detailed posts, here are links to jump to them

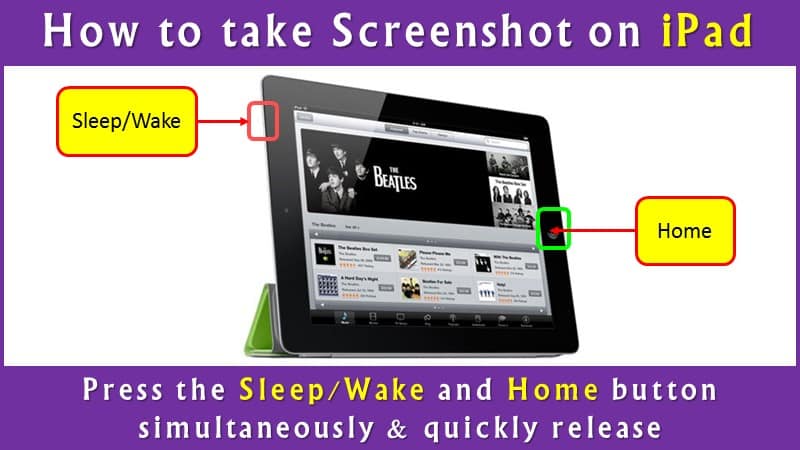
  • iPad or iPad Pro or iPhone or iPad mini or iPad 2  or ipad air 2 – Goto the Topic
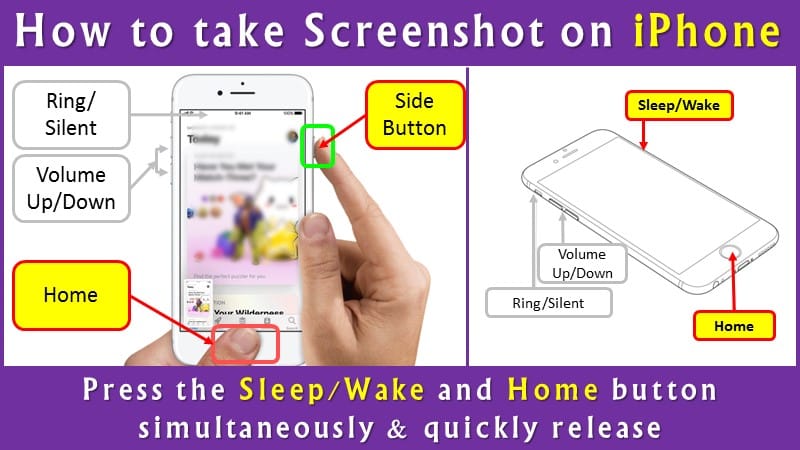
  • Phones on iOS 7, 8, 9, 10 and 11 – Goto the Topic
  • iPhone X – Goto the Topic

How to take a Screenshot on This Phone?

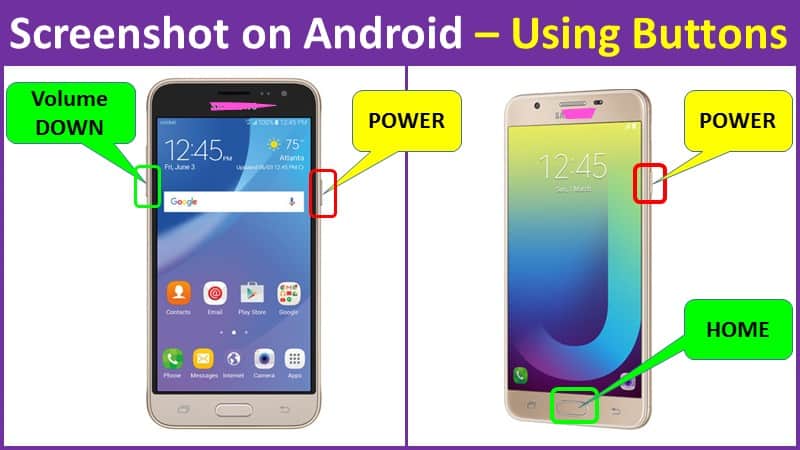
Press POWER BUTTON + VOLUME DOWN Buttons simultaneously for 2-3 seconds to generate a screenshot on any Android phone.
Capturing a screenshot on an Android device is pretty simple. Press the unique button combination on your smartphone or tablet and you can capture and share a screenshot in a matter of seconds.
If you know the mobile company name and model then goto the table given below the post to directly get the link or simply follow the following method on your Android phones to take a screenshot.
How to take a Screenshot on this Phone?

How to Take a Screenshot on Any Android phone?

Method 1 : Using hardware buttons

Applicable to : Acer, Asus, Google Nexus, Google Pixels (Pixel 2, Pixel 2 XL) , HTC U series (up to U12+), All  other HTC phones, Huawei, Honor, Lenovo, All LG phones, Motorola, OnePlus, Galaxy S8 and later, Sony, ZTE phones
Applicable to Operating System : Ice Cream Sandwich (4.0) and Above
Note : For OLD phones with OS Android 2.3 and Below no facility to take screenshot will be available.
If you are using simple Android phone, then easiest way is to use the phone buttons to generate a screenshot.
Step-by-Step Guide
1) Unlock your Android Phone
2) Open the screen you want to take screenshot like a photo, any App ,web browser window, email etc.
3) Press Power button and Volume Down button simultaneously for 2-3 seconds
4) The phone will generate a snapshot with light camera shutter sound and flashing an animation, now you can release the buttons.
5) Your screenshot will be saved to the phone memory or if you click quickly on the screenshot thumbnail, then it will directly show you the edit buttons.
HTC U12+ phones: Press and hold the power button until your phone vibrates, and then tap the virtual home button on the navigation bar while still pressing the power button

Method 2 : Using Home button (for those phones having only home button)

Applicable to : Galaxy S7 and earlier
For some of the latest phones, they will only have a home button like an iPhone in that case you can use the following process to generate a screenshot.
Step-by-Step Guide
1) Unlock your Android Phone
2) Open the screen you want to take screenshot like a photo, any App ,web browser window, email etc.
3) Press Power button and HOME button simultaneously for 2-3 seconds
4) The phone will generate a snapshot with light camera shutter sound and flashing an animation, now you can release the buttons.
5) Your screenshot will be saved to the phone memory or if you click quickly on the screenshot thumbnail, then it will directly show you the edit buttons.

How to take a Long Screenshot on This Phone?

Samsung models

Samsung Note 5 – Use ‘Capture more’ allowed you to take a single long screenshot of a page, from the top and scrolling all the way to bottom, in one file.
Samsung Galaxy S8, S9, S9 Plus – Use ‘Scroll capture’
1) Enable Smart capture from Advanced settings.
2) Open the screen / webpage you want to take a snapshot.
3) Take a screenshot using any standard method you know like using hardware buttons.
4) After taking screenshot, you will see options at the bottom of phone screen, tap on Scroll capture (previously “capture more”) button.
5) Keep tapping or pressing the Scroll capture button to scrolling down the page until you cover the complete screen.
6) Done, long screenshot saved on your Samsung phone.

Long scrollshots on Huawei smartphones

Applicable to : Huawei Mate 9 and Mate 10 models ( EMUI 5.0 )
Step-by-Step guide
1) Open the screen / webpage you want to take a snapshot.
2) Hold down on the Power button and Volume down buttons simultaneously for 2-3 seconds.
3) You will hear camera sound with an animation of thumbnail to confirm that screenshot is taken by your Huawei phone. Before the animation disappears, tap on the Scrollshot option.
4) Your phone will start scrolling down the screen until you tap on the screen which tells it to stop.
5) The scrollshot will now appear on your display for you to inspection.
6) From here, you can Edit it or Share on social media, or Delete on the fly.
If you don’t take any action it will be saved to the image gallery under Screenshots folder.

How to take a screenshot without touching the phone ?

How to take screenshot without hands
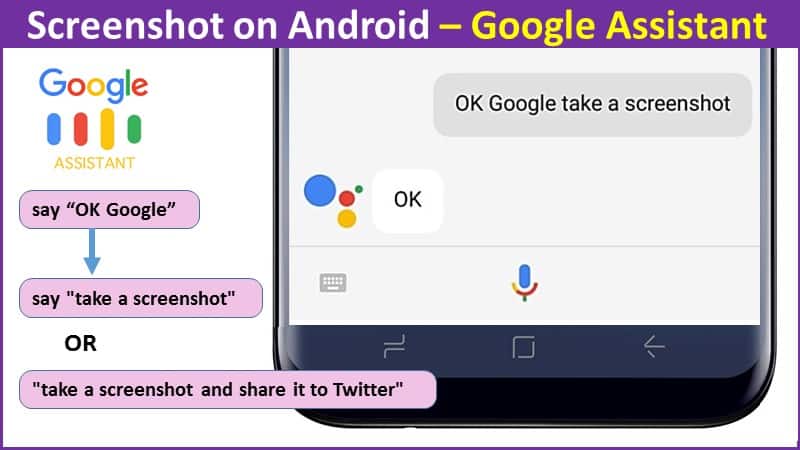
You can use the Google Assistant mostly available on all Android phones, which allows you to send voice commands to your phone to do different tasks, one of which can be taking a screenshot or screen recording.
1) Locate the image /content you want to capture on the screen like a chatting App WhatsApp or web browser or video game etc.
2) Long-press on the Home button or say “Okay Google” or “Hey Google” to launch the Assistant.
3) Now either say “Take a screenshot” or type the command in using your keyboard.
4) You will not get editing options but your screenshot will be saved to your phone’s Photo Gallery, so you can edit it later or share it on social apps.

How to take scrolling screenshots on any Android device

If your phone inherently does not support taking a long scrolling snapshot and you still want to capture long screen like a webpage, WhatsApp chat, or any other chat application or an email then you can use the external apps from play-store.

Using an App from Google Playstore –

a long webpage or long conversation can be captures using different Apps from Playstore, however for some of the latest phones from Samsung and Huwai etc. you get this facility built-in without loading any external App.

1) Stitch & Share: big screenshot / scrolling screenshots

1) Download and install Stitch & Share from Google Play – FREE Download link
2) Using your device’s unique button combination, capture the first screenshot
3) Scroll down within the app, keeping a small portion of what was in the first screenshot visible and capture the next screenshot
4) Repeat the previous step until you have captured everything you want to appear within the screenshot
5) Swipe down on your notification panel and tap the Stitch & Share notification
6) Tap the green arrow icon in the bottom right corner to save or share your screenshot
If the generated screenshot doesn’t align properly, Stitch & Share allows you to adjust where the images overlap by tapping the scissors icon. The app also includes editing features which allow you to highlight text or insert a blackout bar (great for hiding someone’s name, email or phone number). The free version only offers one color for highlighting, but you can get rid of the ads, get more highlighter colors and eliminate the Stitch & Share watermark with a $0.99 in-app purchase.

2) Stitch & Share: LongShot

LongShot has a few other useful tools. Capture Web Page will open a screen with a URL bar at the top. You can enter any webpage and take a long screenshot. The Select Images tool will allow you to merge previously taken screenshots (or any other images). Here’s an example of what you can do with LongShot.

  1. Download and install LongShot from the Play Store.
  2. Open the app.
  3. Toggle Auto capture on (this will automatically take screenshots as you scroll).
  4. Tap the Capture screenshot button.
  5. Floating green Start button will appear.
  6. Go to the screen you wish to capture.
  7. Tap the Start button and slowly scroll.
  8. Tap Done when you’re done.
  9. All the screenshots will appear on the next page. Tap Join to merge them.
  10. Adjust the screenshots to make a long screenshot.
  11. When you’re done, the screenshot will be in the LongShot folder.

Where are my screenshots saved on any Android Phone?

Once you take a screenshot using any of the above method, then the screenshots will be automatically saved by your phone in default location on device.
The captured screenshot is saved automatically to Gallery > Screenshots

How to email the Screenshot on Android?

When you take screenshot using any of the above methods, the animation of thumbnail will be shown, you can quickly tap the animation to select the screenshot image and use share options.
when you select share option of MAIL, you need to choose your email client (if there are multiple email clients line Gmail, Mail). Select it and it will directly head down to the mail client application in compose mode, the said image snap will be automatically attached to the email. Enter the details and press send mail.


If you want to back up your screenshots to Google Photos, you might need to tell your phone to do so. Open the sidebar in Google Photos, then Device Folder. Tap Screenshots, and flip the Back up & sync toggle. From there on out, all of your screenshots will be backed up to your camera roll in Google Photos.

Sr No

Phone company and model

Topic Link

1 Samsung Galaxy S9 Jump to Topic
2 Samsung Galaxy S9 Plus Jump to Topic
3 Samsung J7 Prime Jump to Topic
4 OnePlus 6 Jump to Topic
5 LG G2, LG G4, LG G6, LG V20, LG Stylo 2, LG Stylo PLUS 2, LG LG Stylo 3, LG stylo 3 plus, LG Stylo 4 Jump to Topic
6 CAT phones S30, 31, 40, S41, 60, 61, T20 Jump to Topic
7 Oppo phones
Oppo A37, Oppo A57, Oppo A59, Oppo A83, Oppo R9s Plus, Oppo R9s, Oppo R9 Plus, Oppo F1, Oppo F1s, Oppo F1 Plus, Oppo N3, Oppo Find 7A, Oppo Joy 3
Jump to Topic
8 Huawei Phones P10 Lite, P10, P10 Plus, Mate 10 Lite Jump to Topic
9 Moto phones Moto X 2014, Moto X Style and Moto X Pure edition, Moto X4, Moto G, Moto Force Z,  Moto Z Droid , Moto Z Force Droid, Moto E4 , Moto E4 Plus Jump to Topic
JioPhone
JioPhone 2
LYF Flame 2
LYF Flame 3
LYF Flame 4
LYF Flame 6LYF Flame 7LYF Flame 8
LYF Water 1
LYF Water 2
LYF Water 3LYF water 4
LYF water 5
LYF water 6
LYF water 7
LYF water 8
LYF water 9LYF water 10LYF water 11LYF Wind 7
LYF Wind 6
LYF Wind 4
LYF Earth 1
LYF Earth
Jump to Topic

How to Make Screenshots Realistic & Beautiful? Use Mobile Case

My website is dedicated towards teaching you How to take a screenshot on any device in the world, be it an iPhone or Android phone or a desktop pc or laptop loaded with Windows OS or Mac, be it a tablet. So once you learn to take a screenshot (printscreen) next job is to share it across social network, add to presentation, email it or any other sharing option or loading an App advertise on Google Playstore. Finally it is a must for those who review these devices.
However the RAW screenshots does not look good for sharing or using on website or presentations, so here you will learn on using mobile case for fitting screenshot.

Importance of generating great App snapshot

– Most of the users see the App screenshots in the app listing before they click on Download button.
– High quality Screenshots grab immediate attention increasing the download rate of your app.
– Attractive design of the Screenshots surely provokes desire, again leading to more app downloads per visit increasing the conversion rate.
– App users will get convinced about app utility simply by looking at the screenshots, they will judge the app before start using it, simply by looking at App Store images.

Some interesting facts you must know before reading this article!

  • Google Play – about 53% of Android users find new apps by searching the Google Play Store. [Source: Mobile Dev HQ]
  • Screenshots – Screenshots make up almost 75% of the app listing in the search results. [Source: Statista]
  • Apple AppStore – About 47% of Apple users find new apps by searching the AppStore. [Source: Mobile Dev HQ]
  • More Downloads – Enhanced Screenshots increases likelihood of App downloading by over 30%. [Source: Split Metrics]

How to Make Mobile Phone Screenshots Realistic and Beautiful.

Starting from basics of capturing a screenshot —

Although you can refer to each and every detailed post on my website, telling you methods of capturing screenshots on various devices, I will just recap some important shortcuts on most popular devices on earth 🙂
If you have an iPhone — Press the Home & Sleep buttons and the screenshot image will be saved in the Photos app.
If you have an Android phone — Press the Volume Down & Power button simultaneously to capture the screen.
And if you own a Windows Phone — Press and hold the Start and Power buttons at the same time to take a screenshot.
On all these devices, the direct screen captures will have saved to your camera roll as RAW screenshots.
Now comes the important part, using these snaps on your website, or a management presentation or a school project or say for App store listing.
RAW screenshots does not look that good or I will say that you can do much value addition to it by adding simple device frames.
This will not only add a flavor to the screenshot, but also tell viewer about whether a screenshot was captured on an iPhone or a Microsoft Lumia or a Google Nexus phone?
The device frames can be actual product photos or artworks, whatever suits to your requirements to make your screenshot images appear gorgeous and more realistic.

Adding Realistic Device Mockups for Beautiful App Screenshots

There are two options, you can use simple tools such as Paint to do basic work, or even PowerPoint directly to add device mockups and add your screenshot to it.
Or use a high end photo editing tools like  Adobe Photoshop (Windows or Mac) or Pixelmator (Mac) which facilitates layered photo editing, making it easy for you to add hardware device frames to any screenshot image and give a professional touch to the presentation.
How to Make Mobile Phone Screenshots Realistic and Beautiful using device mockups

How to find FREE device mockups?

Option 1: Use Dribble

Goto Dribbble website and search for “freebies PSD <mobile name>”
As a result you will find FREE beautiful mockups for any given mobile device.
https://dribbble.com/search?q=freebies+PSD+<samsung>

mobile case for fitting screenshot
NOTE : Dribbble usually add the tag “freebies” or “free” to indicate that anyone can reuse their design(s) for personal and commercial use.
You can also explore more websites like this like Deviant Art and Behance where you can find high-quality hardware mockups for all popular mobile devices in market.

Option 2: Use FaceBook Handskit

Goto FaceBook Handskit website page – https://facebook.design/handskit
Here you can download Photos of hands holding various phones, to be used in any presentation of your designs that you can use without restrictions.
All that you have to do is Download and import the PSD file into Photoshop and then insert the screenshot using the File -> Place command, this gets your screenshot on new layer, which you can size and position precisely over the device mockup. Then finally save the file or use the web option to export it ti JPEG or desired image format.
Use FaceBook Handskit to get Photos of hands holding various phones
In case you are not using Photoshop or local editing software installed on your PC or Mac, then feel free to use  alternate web apps like Magic Mockups, Dunnnk and Frame to add photo-realistic device frames to your mobile screenshots.
Using collection of professional high quality handheld mobile phones, tablets, computer photographs, you can get realistic snaps generation.
Simply overlay your app’s screenshot image on to a photograph and the screenshot will automatically get placed in the screen area of the mobile device automatically and perfectly aligned with the hardware frame pixel by pixel.

Option 3: Use Device Art Generator

Google’s own Device Art Generator ( Goto website ) also provides you ability to add vector device frames around screenshots of Android phones and tablets.
Mainly the Device Art Generator have various templates for Android Wear and all Google Nexus devices. All you have to do is to drag the mobile screenshot image on to a device frame and it automatically wraps in the frame. And the best thing is you can add a flavor to photograph by adding a screen glare and depth (for providing perspective) to the generated screenshots.
Use Google device app screenshot generator

Option 4: Use MockuPhone

MockuPhone ( Goto website ) also provides latest released iPhone, iOS decvices, Pixel, Android phones, Windows Phone, Laptop & Desktop TV’s.
This website provides a unique feature.
All you have to do it to pick a device frame, upload your mobile screenshot image and the tool will generate multiple screenshot images of the same device but at different angles.
This tool produces High definition HD quality screenshots for various device frames for the iPhone, iPad & iPad Mini, Windows Phone, TV screenshots and Android phones.
screenshots device mockups generator

Option 4: Use Scenery for Mac

Specially for Mac users I will recommend to use Scenery which is a free Mac App.
This super App helps you convert your screenshots into professional looking and real-life photographs.
Download the FREE version, Install and launch the app, drag the screenshot and you can instantly preview it inside device photos.
Note : The starter pack does include a couple of free images of the iPhone and Samsung Galaxy phones.
screenshots mockup templates for Mac

Option 5: Using CSS [ Goto website devices.css ]

Now this is very good option for those who are website owners and knows a bit about CSS and HTML.
The main benefit is that you will be able to insert realistic mockups of iPhone, Android, Lumia, iPads and Macbooks using pure CSS nto your HTML website.
All you have to do is edit the HTML to insert the image screenshots and text captions inside the mockups.
And the biggest advantage that you will get is, your text inside mock-ups will be searchable by search engines giving you benefits over SEO.

Option 6: Use app screenshot maker [ Goto website ]

This simple design interface site makes you prepare Gorgeous App Marketing Screenshots in few minutes & that too 100% FREE –
– You can customise Colours, Layouts & Backgrounds
– It provides Apple AppStore & Google Play Support
–  You will be able to export in all phone device sizes
App Screenshots Maker FREE

Option 7: Use Mailchimp

Once upon a time mailchimp used to support a facility wherein when you send  the raw screenshot image as an email attachment to smartphones@mailchimp.com and withing few minutes, mailchimp used to automatically detects the mobile device name and the image orientation (portrait or landscape) using the EXIF data in the image and send processed screenshot with the appropriate hardware frame.
It used to support iPhone, iPad, Galaxy Tab, Nexus and a many other mobile devices, all you had to do is to send an email with the subject “help” to the same address for a complete list.
However as in 2018, this facility is called off by mailchimp.
I have a mailchimp account so tried a workaround, I generated a new campaign, inserted the screenshot and previewed it in mobile template, however this does not work and mailchimp shows a simple mobile frame which is not so professional to be used in any presentation, so as in 2018 this idea is useless.

Option 8 : The New MacBook Pro Mockups by behance

You will be able to remove the screen border to make the showcase looks very modern and sexy.
Features of Behance mockups for MacBook Pro 2018
• 4K Resolution.
• Changeable Background.
• Support both Photoshop & Sketch App.
• Sketch Symbols.
• Photoshop Smart Object.
• 2 MacBook Pro Mockup Styles

Paid options:

PlaceIt [Paid option]
PlaceIt is also very good service for adding device mockups to your screenshots but it requires a subscription.

How to screenshot iPad / iPad Pro / iPhone / iPad mini?

Once you are Apple fan you ought to get all the gadgets from Apple including the Mac, iPhone, iPod and iPad too! While I talk about the iPad Pro, iPad, and iPad mini, the screens are so big, that there’s a lot you can view and share across the social network. So here in this post you will learn on How to take a screenshot on iPhone, iPad, iPod touch for Any Generation device.

How to take a screenshot of your iPad or iPad Pro or iPhone or iPad mini or iPad 2?

Press the Home button and Sleep/Wake button simultaneously to get screenshot on iPad or iPad Pro or iPhone or iPad mini.

INDEX

1 How to take a screenshot of your iPad or iPad Pro or iPhone or iPad mini or iPad 2 or ipad air 2? Jump to Topic
2 How to take a partial screenshot on iPhone or iPad or iPad Pro or iPad mini or iPad 2 or ipad air 2? Jump to Topic
3 How to edit your screenshots with Instant Markup? iOS 11 or later. Jump to Topic
4 Where to find your screenshots on your iPad or iPad Pro? Jump to Topic
5 Troubleshooting : Screenshot not working Jump to Topic

How to take Screenshot on iPad or iPad Pro
Applicability : below method is applicable to iPad or iPad Pro or iPhone or iPad mini or iPad 2  or ipad air 2, iPhone 5s
1) Open the App or video or game console or Social network window (chat) you want to capture. You can use split view/picture-in-picture as desired.
2) Set up everything on the screen exactly the way you want it for the screenshot.
3) Press and hold the Sleep/Wake (on/off – POWER) button and Home button at the bottom of the iPad screen simultaneously, then release them quickly.
4) The screen will flash white and you will get confirmation of camera shutter sound (if your sound is enabled).
5) The screenshot thumbnail will appear at the bottom left corner of your screen.
6) If you wish to edit the image snap, simply Tap on the image. You can choose whether to save the screenshot to your Camera Roll or delete it.
6.1) Or simply swipe it to the left and it will disappear from the display.
6.2) If you don’t dismiss the screenshot by swiping to the left, it will disappear automatically after a few seconds and save to your camera roll.
To find the screenshots stored to your phone memory, go to Photos > Albums and tap Screenshots.
Tip :
I am sure you will master to hit both buttons at the same time, my suggestion is to hold the Sleep/Wake (on/off) button first and then click the Home button, this will surely minimize the chances of accidentally activating Siri or, if you’re trying to screenshot the lock screen, blowing through it with Touch ID.
Also if you are not so quick about it, then surely you will pull up the power-off screen!
How to take Screenshot on iPhone

2) How to take a partial screenshot on iPhone or iPad or iPad Pro?

Applicability : below method is applicable to iPad or iPad Pro or iPhone or iPad mini or iPad 2  or ipad air 2, iPhone 5s
Unlike Windows or Mac, you don’t get Snipping Tool on your iOS device!
So you don’t have any direct option to take partial screenshot of selected area.

Workaround 1:

After capturing the screen as a whole image, go to the Camera Roll and crop out the area that you wish not to be included. But this is time consuming, but possible option using built-in markup tool.

Workaround 2: Only for jailbroken users

Use a Snapper 2 tool to enhance the screenshot-taking ability on iOS device.
[ Similar tool named CroppingScreen is also available with jailbreak tweak ]
So instead of post processing the screenshots for cropping, Snapper 2 lets your crop them on the fly as you take them.
Further you can pin the cropped screenshots on top of the screen, for quick reference.
You can use Snapper 2 to cut out a photo, paste it inside the Notes app using Snapper 2, it avoids  jumping back and forth between the Photos app and the Notes app.
Good thing is that  you can activate the Snapper 2, via the same Home + Sleep button combination, now use your finger to crop a screenshot to a specific area of the screen.
Once you crop the screenshot, double tap it to confirm the shot, or a tap and hold to cancel.
After confirmation, the Cropped image as called as snaps, will get pinned to the screen until you dismiss them. You can drag the snaps anywhere around the screen, or use the contents of the screenshot for a reference while doing other tasks, like comparison of two posts.
And if you feel that the snaps are getting mingled into the screen making it difficult to identify, then simply enable the shadow feature to help you differentiate.
Snapper 2 is compatible with iPhones on iOS 7, 8, 9, 10 and 11. And iPhone X. iPads are tested on iOS 8.4 and 9.3.3.
Snapper 2 features :

  • You can get control over the area to crop before snapping!
  • Facebook-heads-like interface to close snaps
  • Snaps organised by application.
  • Multiple snaps on the screen at the same time possible.
  • Built-in sharing options
  • You can use it with or without Activator!
  • You get history panel accessible via Activator OR the Settings app.

Workaround 3: Works on iPad Pro with keyboard

If you have the iPad Pro, using add on keyboard, you can use the Cmd + Shift + 4 button to get an  image editor with the full screen contents surrounded with crop corners.
When ready, you can save the cropped (and possibly edited) image to Photos folder.


3) How to edit your screenshots with Instant Markup? iOS 11 or later.

You can add text, shapes, drawings, and much more using Instant Markup tool.
You have already learnt that, as soon as you take a screenshot, a thumbnail of it appears at the bottom left corner of screen, now if you tap the thumbnail, it will automatically take you to Instant Markup mode.
This is extremely useful feature, since most of the time you need to do some markup to add value to the screenshot before sending or sharing it on social networks.
So this utility tool, helps you to mark, highlight and annotate your screenshots.
Use pencil, eraser. highlighter or  Magic Rope during editing to add value to the markup.
Instant Markup also allows you crop your screenshots. Simply touch and hold one of the edges or corners and drag it to the new crop.
How to edit your screenshots with Instant Markup
There are four additional tools you can add to a screenshot in Instant Markup by tapping the More button in the bottom right corner of the screen (it looks like a plus symbol), which are:
Add a text field —
Text lets you add a layer of text & type words on your screenshot. Tap the newly added text field to call up the keyboard so you can write something. Tap the circle to choose a different text color (white, black, blue, green, yellow, and red), and tap AA to adjust the text’s font, size, and alignment.
Signature —
If you do editing frequently to add your name or brand logo etc. then signature is tool for you.
Create and store a signature, and add it to your screenshot during editing at a click.
Magnifier —
You can use this feature to zoom in image areas and work around details.
As needed you will be able to resize and reshape the Magnifier border, and increase or decrease the amount of zoom. Simply drag the loop around and resize it using a blue dot or adjust the shape.
Shapes — Rectangle, Circle, Speech bubble, or Arrow
Absolutely essential feature to add value to the screenshot, add solid or outlined callout of any size and shape simply by dragging the edges. (again use the blue dots to resize, and the green dots to adjust the arrow’s curve and the speech bubble’s appearance.)
And similar to other image editing tools, markup also gives you an opportunity to undo or redo your editing steps.
Sharing or Saving — iOS 7 or later
Finally once you are done with editing and ready to go, simply share the edited image, right from the Instant Markup interface.
All you have to do is to tap the Share button and choose to share via social media, AirDrop, or email.
You can share the photo directly to Facebook, Twitter, Flickr, etc. or via the corresponding AirDrop or email icons at the bottom. Only make sure that both Wi-Fi and Bluetooth needs to be active on your device.
[ Note : share icon is located in the lower-left corner after you open the photo ]
OR tap Done. and choose Save to Photos or Delete the Screenshot.


4) Where to find your screenshots on your iPad or iPad Pro?

If you use editing tool, at final step you get an option to save the photo.
And if you skip Instant Markup, then the screenshot will be automatically saved to the device, which can be accessed and edited at later point of time using the same editing tool.
1) Launch the Photos app from your Home screen.
2) Goto Photos > Albums and tap Screenshots.
3) Alternatively you can locate the screenshots in the main Photos and Camera albums by scrolling through all photo library.


5) Troubleshooting : Screenshot not working

Many times this problem can occur after you update the iOS, in that case you can try the following —
Fix 1: Add a time delay in button pressing sequence
Press the Power and Home button simultaneously as usual, but press the Home button after one second you press the Power button.
Fix 2: Force restart the iOS device
Restart iPad: Press and hold the iPhone or iPad’s home and the power button, until the “slide to power off” occur. Slide to power off, after about 30 seconds, turn the iPad again..
Force Restart iPad: Press and hold the iPhone or iPad’s home and the power button for minimum 10 seconds till you can see the Apple logo on the screen. Device will force restart.
Recheck taking the screenshot using standard methods described above in this post.
Fix 3: Use AssistiveTouch
Take screenshots using AssistiveTouch (Method already described in this post)
Fix 4: Check the iPad Home button is working
Simply check if the Home button on iPad is working for other operations, if not, head down to the local Apple store to repair it!
Fix 5: Try iPhone System Repair Software to Fix any iOS System Related Issues or update the iOS to latest software version.
Fix 6: Wait for the Next iOS Update!
If you try everything hard, and still screenshot not working, then best way is to wait and watch for Apple to release a new iOS update to patch things up.

All above methods are equally applicable for iPad or iPad Pro or iPhone or iPad mini all versions.


Bottom line:

Taking a screenshot is as common as calling someone on mobile phone. Its inherent part of social media for sharing.
Maybe its taking picture of your social feed of facebook, or chat on Snapchat, or navigation map callouts, your gaming highest score or a shot from favorite movie, there can be numerous reasons.
Sometimes the Screenshots can be extremely useful as an Evidence, recording useful information while browsing, creating wish-lists, or getting a troubleshooting advice.
And that is the reason I wrote my learning’s on how to capture the screen on your iOS device, and adding drawings or text using Markup tool.

References for this post:

  • Apple official website ( Source post )

Jumbo discount offer

Our site is hosted on SiteGround

Get Mega Discount on SG Hosting

Amazon Prime

What's New on Amazon Prime this Week?

HowzBuy.com

About us
Contact us

JOBS

Apply Now

Legal

Privacy Policy
Terms & Conditions

Test Videos

Chipolo video

Archives

Copyright © 2025 · News Pro Theme on Genesis Framework · WordPress · Log in

This website uses cookies to improve your experience. We'll assume you're ok with this, but you can opt-out if you wish. Cookie settingsACCEPT
Privacy & Cookies Policy

Privacy Overview

This website uses cookies to improve your experience while you navigate through the website. Out of these cookies, the cookies that are categorized as necessary are stored on your browser as they are essential for the working of basic functionalities of the website. We also use third-party cookies that help us analyze and understand how you use this website. These cookies will be stored in your browser only with your consent. You also have the option to opt-out of these cookies. But opting out of some of these cookies may have an effect on your browsing experience.
Necessary
Always Enabled
Necessary cookies are absolutely essential for the website to function properly. This category only includes cookies that ensures basic functionalities and security features of the website. These cookies do not store any personal information.
Non-necessary
Any cookies that may not be particularly necessary for the website to function and is used specifically to collect user personal data via analytics, ads, other embedded contents are termed as non-necessary cookies. It is mandatory to procure user consent prior to running these cookies on your website.
SAVE & ACCEPT