• Amazon.com
  • Amazon.in
  • home
    • baby guide
    • HowzBuy.com

How to Make Screenshots Realistic & Beautiful? Use Mobile Case

My website is dedicated towards teaching you How to take a screenshot on any device in the world, be it an iPhone or Android phone or a desktop pc or laptop loaded with Windows OS or Mac, be it a tablet. So once you learn to take a screenshot (printscreen) next job is to share it across social network, add to presentation, email it or any other sharing option or loading an App advertise on Google Playstore. Finally it is a must for those who review these devices.
However the RAW screenshots does not look good for sharing or using on website or presentations, so here you will learn on using mobile case for fitting screenshot.

Importance of generating great App snapshot

– Most of the users see the App screenshots in the app listing before they click on Download button.
– High quality Screenshots grab immediate attention increasing the download rate of your app.
– Attractive design of the Screenshots surely provokes desire, again leading to more app downloads per visit increasing the conversion rate.
– App users will get convinced about app utility simply by looking at the screenshots, they will judge the app before start using it, simply by looking at App Store images.

Some interesting facts you must know before reading this article!

  • Google Play – about 53% of Android users find new apps by searching the Google Play Store. [Source: Mobile Dev HQ]
  • Screenshots – Screenshots make up almost 75% of the app listing in the search results. [Source: Statista]
  • Apple AppStore – About 47% of Apple users find new apps by searching the AppStore. [Source: Mobile Dev HQ]
  • More Downloads – Enhanced Screenshots increases likelihood of App downloading by over 30%. [Source: Split Metrics]

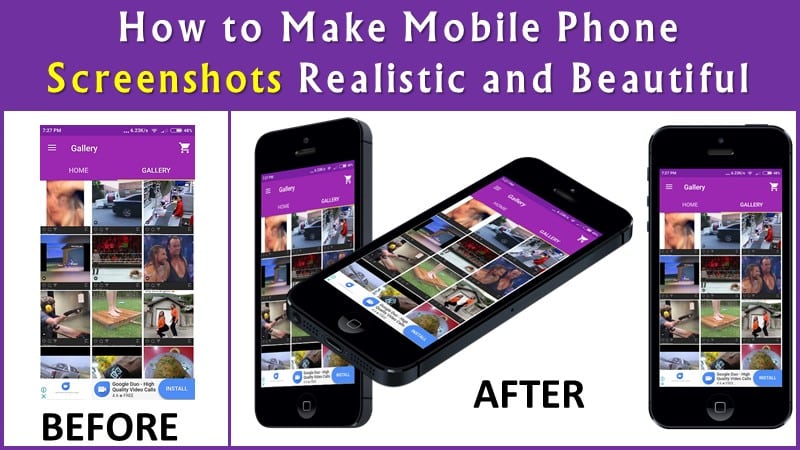
How to Make Mobile Phone Screenshots Realistic and Beautiful.

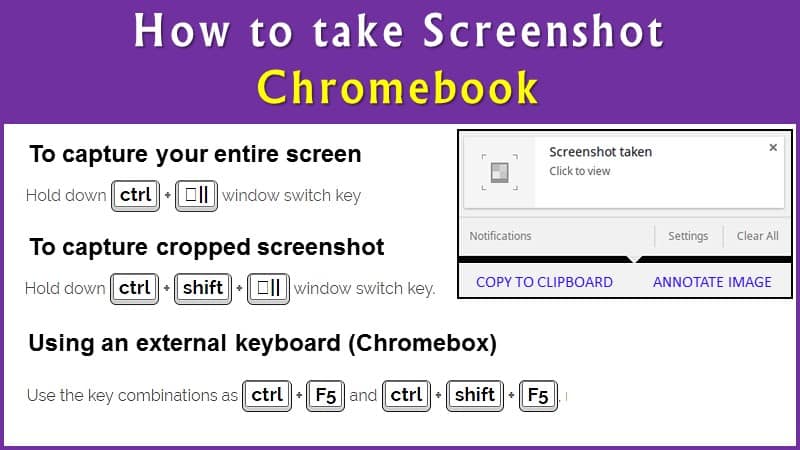
Starting from basics of capturing a screenshot —

Although you can refer to each and every detailed post on my website, telling you methods of capturing screenshots on various devices, I will just recap some important shortcuts on most popular devices on earth 🙂
If you have an iPhone — Press the Home & Sleep buttons and the screenshot image will be saved in the Photos app.
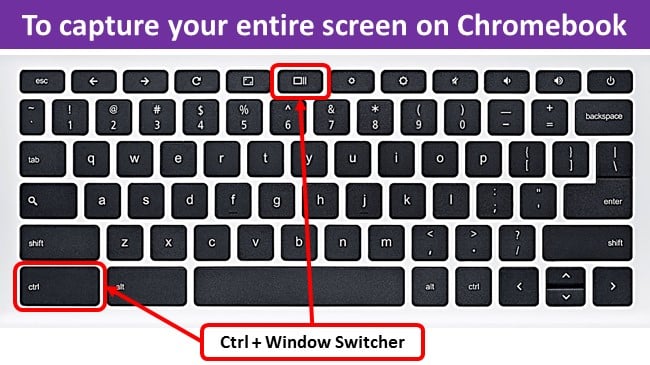
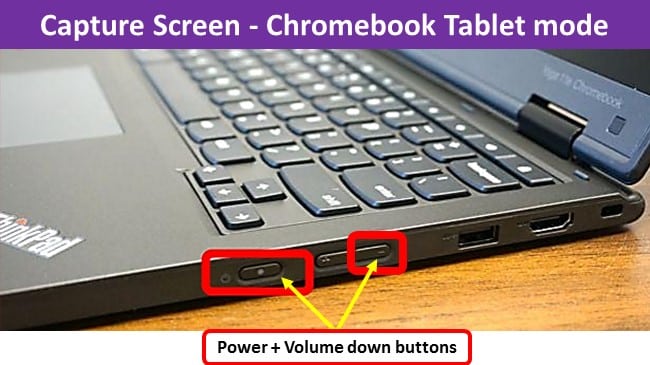
If you have an Android phone — Press the Volume Down & Power button simultaneously to capture the screen.
And if you own a Windows Phone — Press and hold the Start and Power buttons at the same time to take a screenshot.
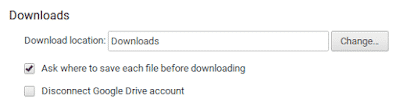
On all these devices, the direct screen captures will have saved to your camera roll as RAW screenshots.
Now comes the important part, using these snaps on your website, or a management presentation or a school project or say for App store listing.
RAW screenshots does not look that good or I will say that you can do much value addition to it by adding simple device frames.
This will not only add a flavor to the screenshot, but also tell viewer about whether a screenshot was captured on an iPhone or a Microsoft Lumia or a Google Nexus phone?
The device frames can be actual product photos or artworks, whatever suits to your requirements to make your screenshot images appear gorgeous and more realistic.

Adding Realistic Device Mockups for Beautiful App Screenshots

There are two options, you can use simple tools such as Paint to do basic work, or even PowerPoint directly to add device mockups and add your screenshot to it.
Or use a high end photo editing tools like  Adobe Photoshop (Windows or Mac) or Pixelmator (Mac) which facilitates layered photo editing, making it easy for you to add hardware device frames to any screenshot image and give a professional touch to the presentation.
How to Make Mobile Phone Screenshots Realistic and Beautiful using device mockups

How to find FREE device mockups?

Option 1: Use Dribble

Goto Dribbble website and search for “freebies PSD <mobile name>”
As a result you will find FREE beautiful mockups for any given mobile device.
https://dribbble.com/search?q=freebies+PSD+<samsung>

mobile case for fitting screenshot
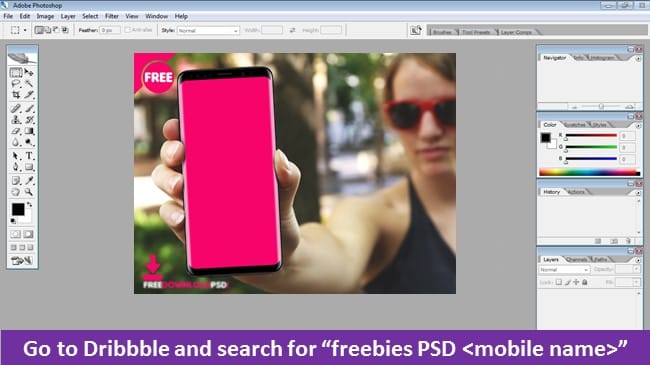
NOTE : Dribbble usually add the tag “freebies” or “free” to indicate that anyone can reuse their design(s) for personal and commercial use.
You can also explore more websites like this like Deviant Art and Behance where you can find high-quality hardware mockups for all popular mobile devices in market.

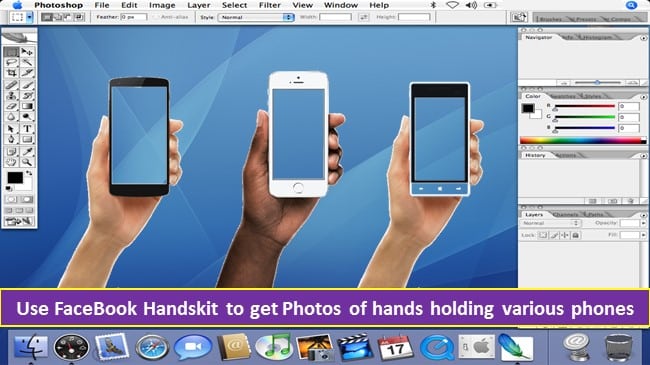
Option 2: Use FaceBook Handskit

Goto FaceBook Handskit website page – https://facebook.design/handskit
Here you can download Photos of hands holding various phones, to be used in any presentation of your designs that you can use without restrictions.
All that you have to do is Download and import the PSD file into Photoshop and then insert the screenshot using the File -> Place command, this gets your screenshot on new layer, which you can size and position precisely over the device mockup. Then finally save the file or use the web option to export it ti JPEG or desired image format.
Use FaceBook Handskit to get Photos of hands holding various phones
In case you are not using Photoshop or local editing software installed on your PC or Mac, then feel free to use  alternate web apps like Magic Mockups, Dunnnk and Frame to add photo-realistic device frames to your mobile screenshots.
Using collection of professional high quality handheld mobile phones, tablets, computer photographs, you can get realistic snaps generation.
Simply overlay your app’s screenshot image on to a photograph and the screenshot will automatically get placed in the screen area of the mobile device automatically and perfectly aligned with the hardware frame pixel by pixel.

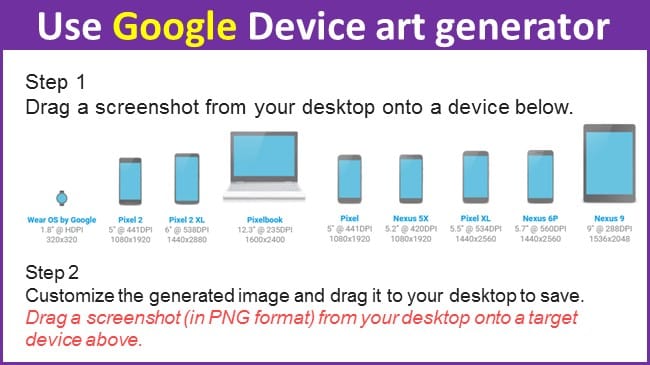
Option 3: Use Device Art Generator

Google’s own Device Art Generator ( Goto website ) also provides you ability to add vector device frames around screenshots of Android phones and tablets.
Mainly the Device Art Generator have various templates for Android Wear and all Google Nexus devices. All you have to do is to drag the mobile screenshot image on to a device frame and it automatically wraps in the frame. And the best thing is you can add a flavor to photograph by adding a screen glare and depth (for providing perspective) to the generated screenshots.
Use Google device app screenshot generator

Option 4: Use MockuPhone

MockuPhone ( Goto website ) also provides latest released iPhone, iOS decvices, Pixel, Android phones, Windows Phone, Laptop & Desktop TV’s.
This website provides a unique feature.
All you have to do it to pick a device frame, upload your mobile screenshot image and the tool will generate multiple screenshot images of the same device but at different angles.
This tool produces High definition HD quality screenshots for various device frames for the iPhone, iPad & iPad Mini, Windows Phone, TV screenshots and Android phones.
screenshots device mockups generator

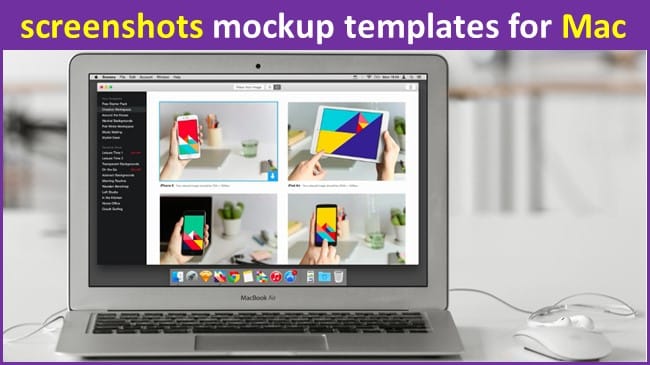
Option 4: Use Scenery for Mac

Specially for Mac users I will recommend to use Scenery which is a free Mac App.
This super App helps you convert your screenshots into professional looking and real-life photographs.
Download the FREE version, Install and launch the app, drag the screenshot and you can instantly preview it inside device photos.
Note : The starter pack does include a couple of free images of the iPhone and Samsung Galaxy phones.
screenshots mockup templates for Mac

Option 5: Using CSS [ Goto website devices.css ]

Now this is very good option for those who are website owners and knows a bit about CSS and HTML.
The main benefit is that you will be able to insert realistic mockups of iPhone, Android, Lumia, iPads and Macbooks using pure CSS nto your HTML website.
All you have to do is edit the HTML to insert the image screenshots and text captions inside the mockups.
And the biggest advantage that you will get is, your text inside mock-ups will be searchable by search engines giving you benefits over SEO.

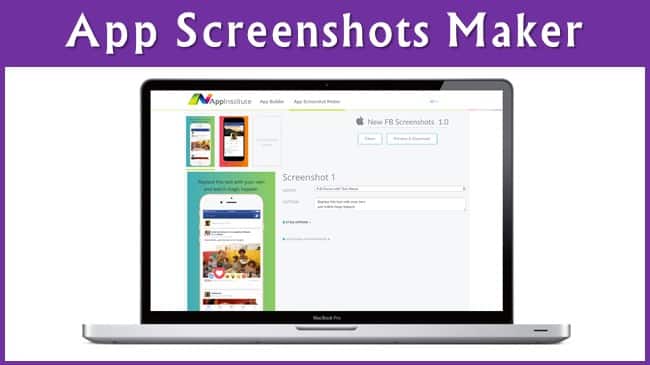
Option 6: Use app screenshot maker [ Goto website ]

This simple design interface site makes you prepare Gorgeous App Marketing Screenshots in few minutes & that too 100% FREE –
– You can customise Colours, Layouts & Backgrounds
– It provides Apple AppStore & Google Play Support
–  You will be able to export in all phone device sizes
App Screenshots Maker FREE

Option 7: Use Mailchimp

Once upon a time mailchimp used to support a facility wherein when you send  the raw screenshot image as an email attachment to smartphones@mailchimp.com and withing few minutes, mailchimp used to automatically detects the mobile device name and the image orientation (portrait or landscape) using the EXIF data in the image and send processed screenshot with the appropriate hardware frame.
It used to support iPhone, iPad, Galaxy Tab, Nexus and a many other mobile devices, all you had to do is to send an email with the subject “help” to the same address for a complete list.
However as in 2018, this facility is called off by mailchimp.
I have a mailchimp account so tried a workaround, I generated a new campaign, inserted the screenshot and previewed it in mobile template, however this does not work and mailchimp shows a simple mobile frame which is not so professional to be used in any presentation, so as in 2018 this idea is useless.

Option 8 : The New MacBook Pro Mockups by behance

You will be able to remove the screen border to make the showcase looks very modern and sexy.
Features of Behance mockups for MacBook Pro 2018
• 4K Resolution.
• Changeable Background.
• Support both Photoshop & Sketch App.
• Sketch Symbols.
• Photoshop Smart Object.
• 2 MacBook Pro Mockup Styles

Paid options:

PlaceIt [Paid option]
PlaceIt is also very good service for adding device mockups to your screenshots but it requires a subscription.

9 EASY ways to Take Screenshots (Print Screen) on Chromebook?

Today there are over 25 million Chrome OS users and more being added each day, wondering on the missing ‘Print Screen’ button? and Where do the screenshots go on a Chromebook? So here is a simple guide on how to take a screenshot on a Chromebook or Chromebox or any Chrome OS device.

Don’t worry, its fairly simple to take a screen shot.

How to Take Screenshots (Print Screen) on Chromebook?

On Chromebook use ctrl + window switch key, On Chromebox use ctrl + F5 to take a full screenshot and use additional Shift key to take partial screenshot.

INDEX

1 Hot to take FULL screenshot Using a keyboard on Chromebook? Jump to Topic
2 How do you take a cropped screenshot on a Chromebook? Jump to Topic
3 Chromebook Tablet mode – Using the side buttons to capture screen Jump to Topic
4 Using a chrome extension to get screenshot Jump to Topic
5 Using a stylus to get screenshot Jump to Topic
6 Use built-in menu of Chrome OS laptop running Chrome OS Jump to Topic
7 Use Screenshot Apps Jump to Topic
8 Use Google Assistant – Using Voice commands Jump to Topic
9 Using the Pixelbook Pen Jump to Topic
10 OTHER TIPS AND TRICKS
10.1 How to paste screenshot on Chromebook?
10.2 How to edit screenshots?
10.3 Where is the switch window button on Chromebook located?
10.4 Where do the screenshots go on a Chromebook?
Jump to Topic
11 Chromebook Screenshot Not working
There can be multiple reasons if the screenshot is not working, I have tried to provide compiled information on what can be the probable reasons and solutions to resolve the issue.
Jump to Topic

1) Using a keyboard on Chromebook

To capture your entire screen

Hold down ctrl + || window switch key
Applicable for : Pixelbook, ASUS Chromebook Flip, Samsung Chromebook Pro, Dell Chromebook 11, Acer Chromebook Spin 11, Acer Chromebook 15, Acer Chromebook R11, HP Chromebook 13,14, google chromebook
How to capture your entire screen on Chromebook
Back to Index


2) How do you take a cropped screenshot on a Chromebook?

Applicable for : Pixelbook, ASUS Chromebook Flip, Samsung Chromebook Pro, Dell Chromebook 11, Acer Chromebook Spin 11, Acer Chromebook 15, Acer Chromebook R11, HP Chromebook 13,14, google chromebook
Hold down ctrl + shift + || window switch key.
Now the Chrome’s cursor will be shown like a cross-hair (temporarily).
Simply press and hold on the trackpad and drag your cursor to select the area of the partial window to capture then release the trackpad or mouse button.
How to capture Part of Screen on Chromebook

Now you will get a pop-up notification to open the saved screenshots

You can click on the pop-up notification to see the screen shot or choose in between the options at the bottom of the screenshot notification window will allow you to copy the image, and / or annotate it.
Chromebook screenshot pop-up notification

While using an external keyboard

Applicable for : Pixelbook, ASUS Chromebook Flip, Samsung Chromebook Pro, Dell Chromebook 11, Acer Chromebook Spin 11, Acer Chromebook 15, Acer Chromebook R11, HP Chromebook 13,14, google chromebook
External keyboard option is available while you use the Chrome-powered desktop (also known as a Chromebox) or when you have plugged in an external keyboard into your Chromebook.
In both cases, the keyboard mostly uses a standard function key row instead of Chrome’s dedicated button row.
In which case the function keys do the same job as Chromebook top row buttons, and hence F1 goes back, F2 goes forward, and F5 button works as the “switch window” button on standard keyboards.
And so the screenshot command functions using Ctrl + F5.
Use the key combinations as ctrl + F5 and ctrl + shift + F5, respectively.
Capture Screen using external keyboard on Chromebook
Back to Index


3) Chromebook Tablet mode – Using the side buttons to capture screen

Now while you are using the Chromebook on a 360-degree hinge like a Pixelbook in TABLET mode and want to capture the screen, then what?
I am sure you will not like to swing the keyboard back around simply to press keys and take a screenshot!
In such a case, you can simply take a screen shot by pressing the
power + volume down keys simultaneously.
These keys are located on the side of Chromebook, this works exactly like you do on your Android phone.
However using this workaround, you will only be able to capture the entire screen 🙁 for capturing cropped screen, you will have to use the keyboard!
Note : to use this method you must be running Chrome OS 64.0.3282.134 or later
Chromebook Tablet mode - Using the side buttons to capture screen
Back to Index


4) Using a chrome extension to get screenshot

Since the built-in image capture and editor tools for Chrome OS are a bit cumbersome, I am suggesting some alternatives like using apps and extensions on Google’s Chrome Web Store to help adding extra flavor on functionality.
Here are my best picks:
You can try using a chrome extensions like Nimbus Screenshot & Screen Video Recorder, which provides more power to capture video too along-with the static screen shots.
As the name implies, Nimbus has additional capabilities like instant uploading and sharing, customization of hot keys, managing screen shots, adding watermarks and mainly capture screen (entire or fragment) selected or scroll.
Download the Chromebook screen capture alternative extension Nimbus Screenshot & Screen Video Recorder
Chromebook screen capture alternative Nimbus Screenshot & Screen Video Recorder
My second pick is Clipular Chrome App which allows you to save, edit, and annotate screenshots. Best part I like is that it can also save screenshots directly to Google Drive!
Third choice is FireShot Chrome App which can save an entire page as an image without multiple screenshots.
Fourth App choice is File System for Dropbox best for you to put things into Dropbox folder in the standard file browser. Just copy your screenshots over from the Downloads folder.

Final and best choice is Screen Capture Extension By Google ( download link )

Now this is the Google-made, Screen Capture extension which will assist you taking a screenshot of your browser window for the visible part of a tab, the whole page, or a user-defined region.
It allows you to scroll up or down while defining a region, so your Chromebook’s small screen isn’t a problem.
This extension also intelligently filters out the floating objects during scrolling, so you capture the image of that object only once. After your screenshot is taken, you can edit it immediately in the browser.
Save To Google Drive ( bonus extension suggestion by me!)
Save to Google Drive extension will let you save the image directly to your Google drive. This is specially useful when you are using the Chromebook in guest login mode, making you risk free of loosing the screenshots after logout.
Back to Index


5) Using a stylus to get screenshot

If you have a Samsung Chromebook Plus or Pro or sprung for the Pixelbook and its pen, you have an additional option available.
First remove the stylus from the side of tab. Then from the Stylus tool menu (which is available at the lower right corner of screen) select “capture screen” to capture the whole screen, or select “capture region” and draw a selection using pen to capture just partial area of the screen.
See below screenshot of available stylus menu from stylus tools.
Using STYLUS for Screen capture on Chromebook
Back to Index


6) Use built-in menu of Chrome OS laptop running Chrome OS

Here is Step by Step approach to use built-in menu of Chromebook to take a screenshot
1) Log on to your Chrome OS laptop.
2) Open the Image or Photo or Video Story that you wish to screenshot.
3) Now click Gear icon displayed at the bottom-left corner of the desktop screen. (See image below)
4) You will get list of menu options, select over the Accessories menu to get submenu of Screenshot (See image below)
How to Take a Screenshot in Chromebook laptop
5) You will get options like, Grab the whole desktop / Grab the current window / Select area to grab.
6) Select desired option (Radio button) – If you select grab area, you can select an area manually by dragging the mouse over it.
Tip : Uncheck the Include pointer checkbox, this will not display the mouse pointer in the screenshot 🙂
7) Finally you can click Take Screenshot from the bottom-right corner to capture the screen.
Back to Index


7) Use Screenshot Apps

Another alternative is to use the screenshot apps like:

  • Awesome Screenshot – download app
  • Lightshot – download app

Back to Index


8) Use Google Assistant

Using Voice commands

This is the most simplest method I have ever used!
All that you have to do is invoke your friend the Google Assistant.
Give a voice command “Okay Google, take a screenshot” and the Pixelbook will take the screenshot for you as well as prompt you to open the screenshot in any of the supported apps installed on Pixelbook.
If you don’t use any of the App to open it, screenshot will automatically get vanished after few seconds and will not be stored.

Using Keyboard

Alternatively you can use the dedicated Assistant key on your Pixelbook.
And then type in “take a screenshot”. and the Pixelbook will take the screenshot for you as well as prompt you to open the screenshot in any of the supported apps installed on Pixelbook.
Similar to the voice command, the screenshot is not saved unless you do so using an app.
Back to Index


9) Using the Pixelbook Pen

Your Pixelbook Pen, if you have purchased this accessory, can help you take screenshots From the Pixelbook pen menu that appears on the drawer, select:
Capture screen – to take a screenshot of the entire screen
Capture region – to take a screenshot of an area of the screen.
Back to Index


10) OTHER TIPS AND TRICKS

10.1) How to paste screenshot on Chromebook?

While you work on Windows and use the “Print screen” button, the screen capture automatically gets copied into the windows clipboard. Thus you can simply go to any other application like word, PowerPoint or paint and paste the screenshot from memory.
However unfortunately the Chrome OS doesn’t save screenshots as copied images to memory (clipboard)
So to copy the screenshot to clipboard on Chromebook for using say into an image editor, look at the notification window above the system clock and click on Copy to clipboard button, now press ctrl + V to paste it to another application.

10.2) How to edit screenshots?

You can use the Chrome’s built-in image editor to edit the screenshots, which allows modifications like crop, rotate, brightness adjustment etc.
Steps to follow for editing image –
Step 1: Open the Downloads folder, Select the screenshot image you wish to edit and double-click it to open in the image viewer.
Step 2: You will see a pen icon  in the bottom right corner of the window, click it to enter in the image editing mode.
Step 3: Use the available tools like crop, rotate, and brightness adjuster which will be available in the edit mode (located at the the bottom of the window.)
Step 4: Edit the image as desired using all tools, once done simply click the pen icon to finish your edits.
Note : This built-in editor will overwrite on original image, I mean you do not have any save-as option. So I suggest to make a copy of original image before editing it.

10.3) Where is the switch window button on Chromebook located?

The Switch window button is represented by multiple squares and typically located in the topmost row, in between the
Full-screen and Brightness down buttons.
However please note that the keys referenced above may appear in different locations depending upon the manufacturer and/or model of your Chromebook.

10.4) Where do the screenshots go on a Chromebook?

By default, your screenshot image files on Chromebook are locally saved to the “Downloads” folder and available also in offline mode. The images in the download folder are automatically labeled with the date and time they were recorded.
So simply go to the downloads folder, and open up the screenshot or edit it or copy it to another folder.
The extension of screenshot image file is PNG. So your image file will looks something like “Screenshot 2020-08-25 at 4.21.18 PM.png” by default, so if you wish, you can always rename it to new name.
Tip while using the guest account on Chromebook
While you have logged in using the guest account, the “Downloads” folder is emptied after the guest logs out, so all those screenshots will be deleted.
So to preserve the screenshots during guest use, make sure you copy the files to an SD card or upload it to Google Photos or Google Drive before you logout from guest account.
Back to Index


11) Chromebook Screenshot Not working

There can be multiple reasons for screenshot not working on your chromebook, here are some suggestions to check things to make it happen.

11.1) Wrong keyboard and language settings

If the ctrl + || window switch key combination is not working, one of the possible reasons it to have wrong keyboard and language settings, which changes the behavior of keys.
Go to the keyboard settings and make sure that the box is Unchecked for “Treat top-row keys as function keys.” With the function key box checked, you may get the error specified above.
Please refer to the guide on 
— How to Choose keyboard language & special characters on Chromebook? — See official Ref guide here
— How to Change language on Chromebook? — See official Ref guide here

11.2) Screenshots do not work if you have a context menu open.

11.3) Error message — “An error occurred Failed to save screenshot”

Trial 1 — Please check if the hard disk drive is full, you may not have FREE space left for saving the screenshots
Trial 2 — This can be an access (authorization) issue. Log out and try the screenshot using Guest mode. If that works then contact your Admin or check your accessibility settings.
Trial 3 — Check your default download directory.
chrome://settings-frame/ > Show Advanced Settings > Downloads: > Download Location: > Downloads
Go into settings and change the directory to the pre-configured download directory on your chromebook.
changing default download directory to solve screenshot problem in chromebook
Trial 4 — Enable an extension called: ‘Save to Google Drive”.
Trial 5 — Sometimes when the Downloads are set to Drive, then Chromebook will try to save it to Google Drive, and if you have network connection problems, then it will throw this error. So try changing settings to the local Downloads folder and see if it works.
Trial 6 — if you are using a micro-sd card or USB, reasons can be the download folder is USB drive and you have a faulty USB port, faulty drive, or not getting enough power to the medium, due to which Chromebook is unable to save it to the specified drive. Again in such case changing the download folder by removal of micro-sd card and / or USB would work.
Trial 7 — If you have tried all the above solutions and still problem persists, as a last resort you can try Reset Chrome settings to default  — See official Ref guide here
Trial 8 — Reset your Chromebook hardware, Remember that this is to be tried as a last resort ONLY if you do not have any option left and you have tried all above trials. — See official Ref guide here

WARNING:
Files are saved in the ‘Downloads’ folder by default but they are temporary and can be deleted when you run low on space. If this happens, you will see the warning:
“Caution: These files are temporary and may be automatically deleted to free up disk space.”
They will also be removed when you do a powerwash, a recovery, have profile errors, or forget the password you first used to when adding your profile.
Powerwash is — Reset your Chromebook to factory settings — See official Ref guide here

How to Take Screenshots (Print Screen) on Chromebook

How to take a Screenshot on Chromebook?

Well you have bought a HP Chromebook 11 or Samsung Chromebook Series 3 which surely are cheap alternatives to Windows or Mac laptops.
However cheap alternative will have its own pros and cons, like Chromebook do required a Wi-Fi connection to do most of the operations.
Or you will not find a simple Print Scr Key! Which helps in taking a screen shot like a breeze!
So my pictorial guide above will surely help you learning ways to take a screenshot on Chromebook.
If you have liked this guide, do put in comments below, since this website is simply dedicated to taking screen shots on various gadgets, it will help me understanding if I shall do such more websites on particular subjects.
Cheers !!

Jumbo discount offer

Our site is hosted on SiteGround

Get Mega Discount on SG Hosting

Amazon Prime

What's New on Amazon Prime this Week?

HowzBuy.com

About us
Contact us

JOBS

Apply Now

Legal

Privacy Policy
Terms & Conditions

Test Videos

Chipolo video

Archives

Copyright © 2025 · News Pro Theme on Genesis Framework · WordPress · Log in

This website uses cookies to improve your experience. We'll assume you're ok with this, but you can opt-out if you wish. Cookie settingsACCEPT
Privacy & Cookies Policy

Privacy Overview

This website uses cookies to improve your experience while you navigate through the website. Out of these cookies, the cookies that are categorized as necessary are stored on your browser as they are essential for the working of basic functionalities of the website. We also use third-party cookies that help us analyze and understand how you use this website. These cookies will be stored in your browser only with your consent. You also have the option to opt-out of these cookies. But opting out of some of these cookies may have an effect on your browsing experience.
Necessary
Always Enabled
Necessary cookies are absolutely essential for the website to function properly. This category only includes cookies that ensures basic functionalities and security features of the website. These cookies do not store any personal information.
Non-necessary
Any cookies that may not be particularly necessary for the website to function and is used specifically to collect user personal data via analytics, ads, other embedded contents are termed as non-necessary cookies. It is mandatory to procure user consent prior to running these cookies on your website.
SAVE & ACCEPT