If you are fan of ASUS systems, you ought to try out the new Zenfone series from them. Asus introduced their latest smartphone in 2015 which is called as Zenfone 2, a 5.5-inch 1028p display phone with high-end specs with dual-SIMs. From there till latest model of ASUS ZenFone Max Pro M1, common thing that you need to learn is How to take a screenshot on asus ZenFone Series phones?
After introduction of base model there are several upgrades launched till date by Asus like Asus Zenfone 2, Asus Zenfone 4, Asus Zenfone 5, Asus Zenfone 6, Asus Zenfone Max Pro M1 and for all of these phone owners like you, its important to learn on taking a printscreen or screenshot or screen snap may be for sharing with family and friends or using it inside a presentations.
Here you will learn various methods starting from very basic methods on generating a screenshots on Asus phones, later I will append this post with Asus laptops too.
How to take a screenshot on asus ZenFone and where do screenshots get stored?
There are different ways to capture the screenshot or printscreen on your Asus smartphone —
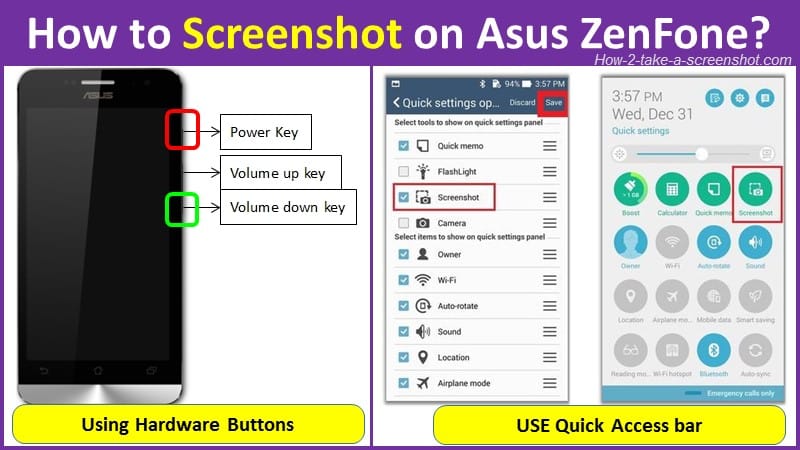
Method 1: Take Asus phone Screenshot using hardware buttons
This is the most basic method used in any of the Android OS phone in market and pretty simple, with only one hitch is that it needs some time of 2-3 seconds, which in case you are capturing a screenshot of a video becomes tricky since you ought to miss the scene you want to capture screen of. But lets begin with this basic method.
Applicable for : All series of ASUS phones, Asus Zenfone 2, Asus Zenfone 4, Asus Zenfone 5, Asus Zenfone 6, Asus Zenfone Max Pro M1
Step-by-Step approach
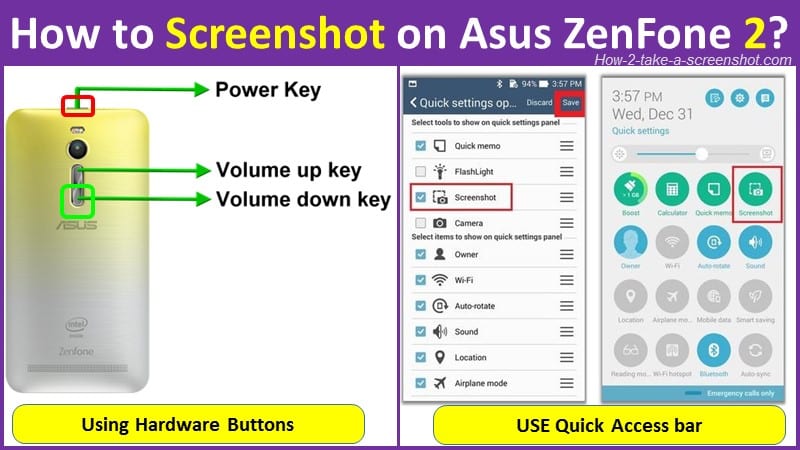
1) Main thing is locate the Power and Volume keys of your Asus Zenphone, remember depending upon the model these keys are located at different locations of phone.
To clarify see two different pictures given in this post for Original Asus ZenFone and latest ZenFone 2, there is difference in hardware button locations, for the original version the hardware buttons are located on right hand side of phone which are shifted in the ZenFone version 2 to the back side of phone (see snapshots below) the Power key is shifted on the top and volume keys on the back side in model ZenFone 2!
may be these changes are done to address some technical reasons or as an ergonomic improvements in placement of buttons, but both ways you should be aware where the buttons are located to take a screenshot.
2) Keep the screen ready of which you wish to take a screenshot, be it a website page or a social media screen like twitter or Instagram or whats app.
3) Now that you know button locations, simply Press and hold Power key and Volume Down key simultaneously for about 1 second. With a confirmation camera sound the device will generate a screenshot and show an animation thumbnail of the screenshot generated.
4) If you wish to share ![]() or edit the captured screenshot, immediately tap on the thumbnail, else wait for a second till the screenshot thumbnail disappears and gets saved to the device automatically by the phone.
or edit the captured screenshot, immediately tap on the thumbnail, else wait for a second till the screenshot thumbnail disappears and gets saved to the device automatically by the phone.
The screenshot image will be saved automatically to the folder >> Internal storage >> Screenshots.
Method 2: Take Asus Zenfone Screenshot with Recent Apps Key
Applicable for : Asus Zenfone 2, Asus Zenfone 4, Asus Zenfone 5, Asus Zenfone 6, Asus Zenfone Max Pro M1
On some Asus phones and tablets, you will be able to use this method, which is using the recent apps key ![]() located at the bottom of screen. See the image below —
located at the bottom of screen. See the image below —
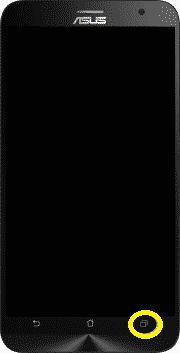
The recent apps key ![]() is mostly available on all resent Zenfone phones and tabs, which can be easily identified with a double-collapsed rectangular button at the bottom of the phone.
is mostly available on all resent Zenfone phones and tabs, which can be easily identified with a double-collapsed rectangular button at the bottom of the phone.
Step-by-Step approach to use this key for taking screenshot
1) Enable the recent apps key
Go to the Settings page ![]() >> Scroll down to “Asus customized settings” >> Tap on the “Recent app key” >> choose “Tap and hold to capture screen” when a pop up appears.
>> Scroll down to “Asus customized settings” >> Tap on the “Recent app key” >> choose “Tap and hold to capture screen” when a pop up appears.
Alternatively depending upon the Asus smartphone model you have, you may have to —
Tap on “Application” >> Tap “Settings” >> Choose “ASUS customized” from options. >> Choose “Key settings“>> Choose “Tap and hold to get screenshot”
2) Now that the recent apps key is enabled, you are ready to take a screenshot using this new key
3) Go to the screen you want to take a snapshot of like a social app or web browser window etc.
4) Simply Press and hold ![]() icon for a second (long press) to capture the screenshot.
icon for a second (long press) to capture the screenshot.
5) You will see an animation of captures screen, a thumbnail will appear on screen with a camera shutter sound. If you wish to edit or share ![]() the screenshot immediately, simply click on the thumbnail or just wait till the thumbnail disappears from screen.
the screenshot immediately, simply click on the thumbnail or just wait till the thumbnail disappears from screen.
6) Your screenshot is now generated and save to the Gallery.
The screenshot image will be saved automatically to the folder >> Internal storage >> Screenshots.
Method 3: Screenshot from the Quick Settings Panel
Note that this method is only applicable for Asus Zenfone 2 and not on Zenfone 4/5 and 6.
Again you will need to do some simple settings before you use this method.
Step-by-Step approach
1) Pull down the “Quick settings” menu >> tap on the edit icon on top (located first one from the left >> Scroll down the tools list and find the “Screenshot” option >> Check the box besides it. >> After that, tap “Save”
You are done and ready to take a screenshot using pull down.
Note : Again here you need to know that at a time you can only have 4 tools enabled ! So, you may need to disable another tool when you check the “Screenshot”.
2) Now as usual go to the screen you want to capture.
3) Simply pull down the “Quick settings” panel and tap on the screenshot icon.
4) With a click sound a screenshot of the current screen will be captured by the device.
5) You can locate the generated Screenshots in the folder in Gallery.
The screenshot image will be saved automatically to the folder >> Internal storage >> Screenshots.
Method 4: Taking a screenshot on Asus phones using a Google Assistant
Other steps being same I will not go into details like keeping the screen ready etc.
However remember that you need to enable Google assistant before you use this feature.
Step-by-Step approach
1) Open the screen on which you want to take a screenshot
2) Now launch google assistant by long pressing home key.
3) Either Type or say “Take screenshot”.
4) Google assistant will generate a screen capture and save it to device.
Note : You can select if you want to save the screenshot in photos, Google Drive or share it through social share accounts immediately like WhatsApp, FaceBook or Instagram etc. However remember that in this case By default, it will not save it in your gallery. So you need to do it explicitly.
Screenshots are consuming space of Asus phones ? use this trick.
If you are worried that screenshots are consuming lot of space on your phone, then simple trick is to use external storage space which is mostly available for FREE.
Another advantage is that you will be able to access these screenshots from other devices like computers, tablets and phones.
In that case select the Google drive to save the screenshots.
Bottom line
I hope you have learnt different ways to take a screenshot on your Asus phones, although this is very much basis, but more important for those who don’t really know about taking a screenshot.
If you have found that this post is really useful for you, please share across friends and comment on this post.
Leave a Reply